前回作成した さくらインターネットVPS(880円/月) + Linux + Nginx + SiteGuard + Asp.net Core + SQLite 本番環境構築手順 を、ホスト名ではなくドメイン名でインターネットに公開する手順を作成しました。
今回構築した https://unikktle.com は、今後も機能を追加して行こうと思っています。
さくらVPS 契約
契約
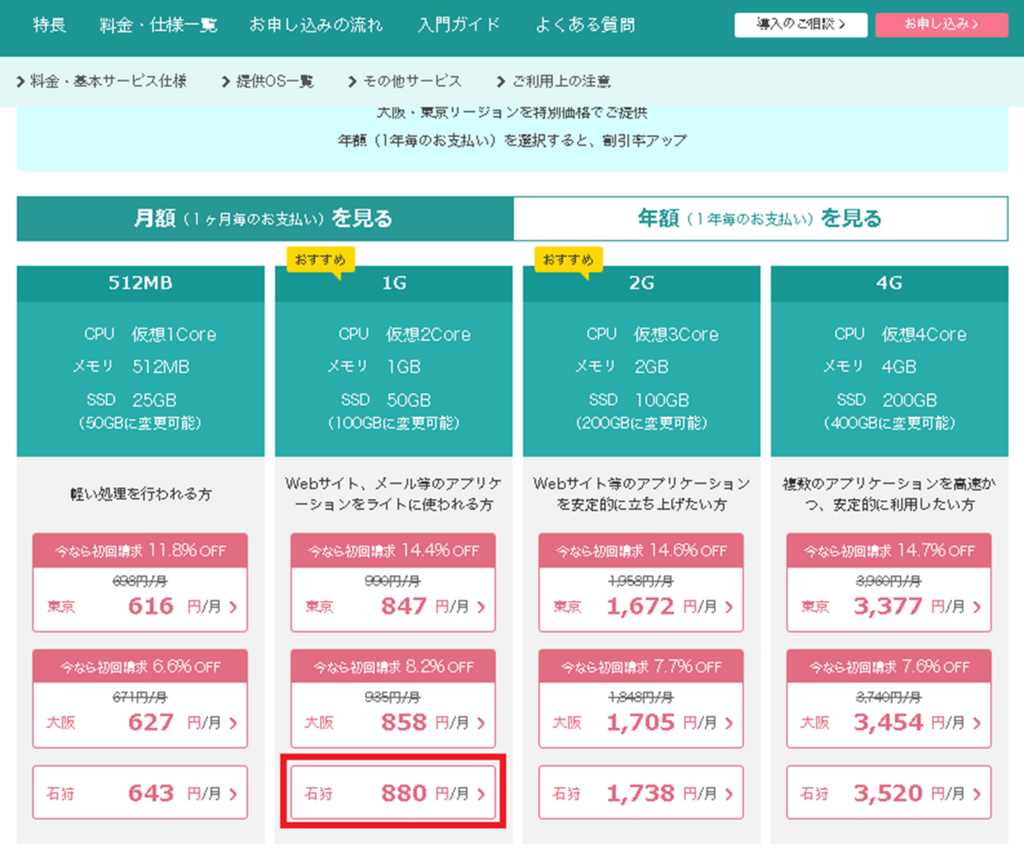
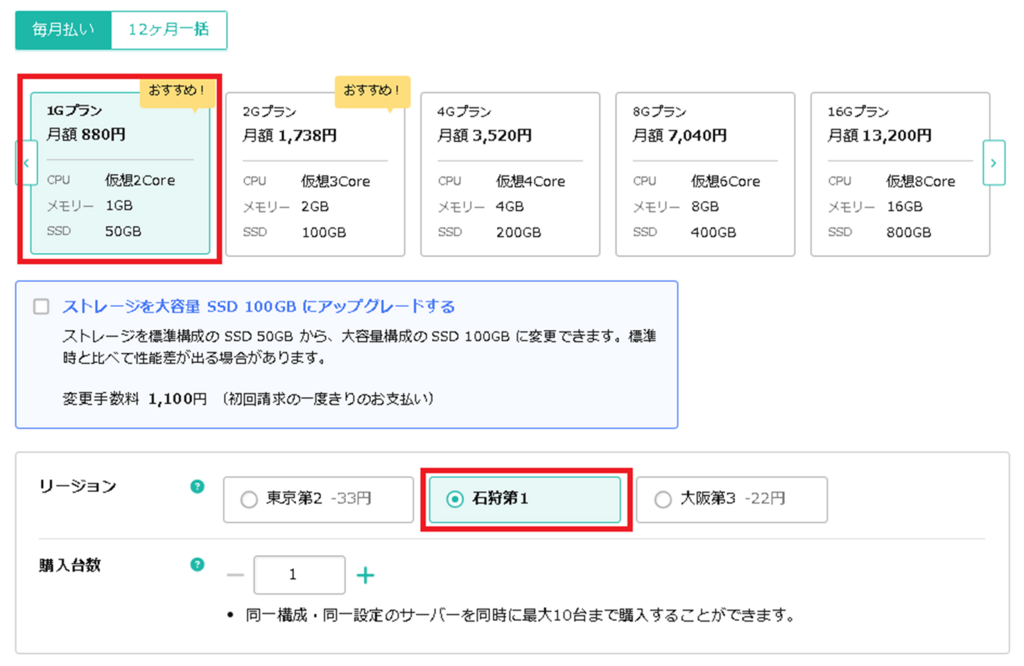
今回採用した契約は「1G 石狩」。「512MB」だとLinuxのOSを動かすだけでメモリが枯渇し、CPUが1CoreだけだとOSの動きが悪い、東京大阪石狩リージョンでは石狩が最も安い。
https://vps.sakura.ad.jp/
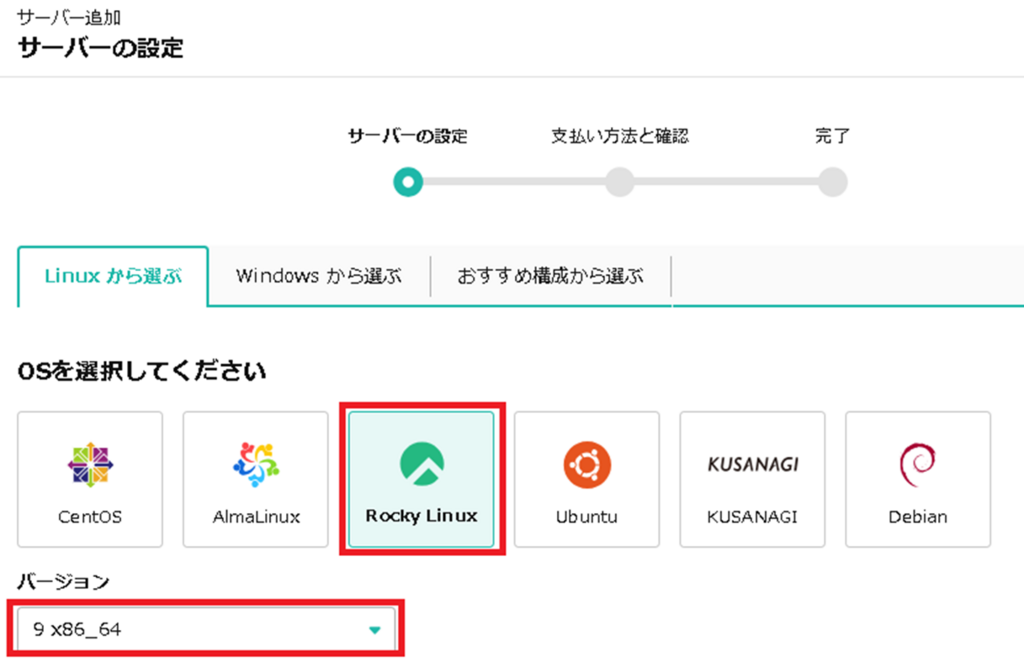
サーバー設定
sshキー設定は無し。
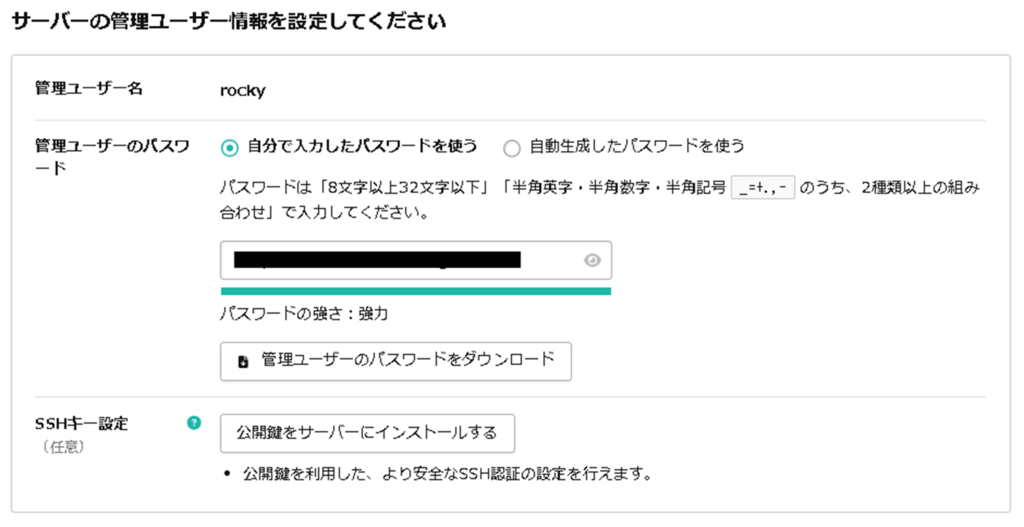
デフォルトのままで良い。
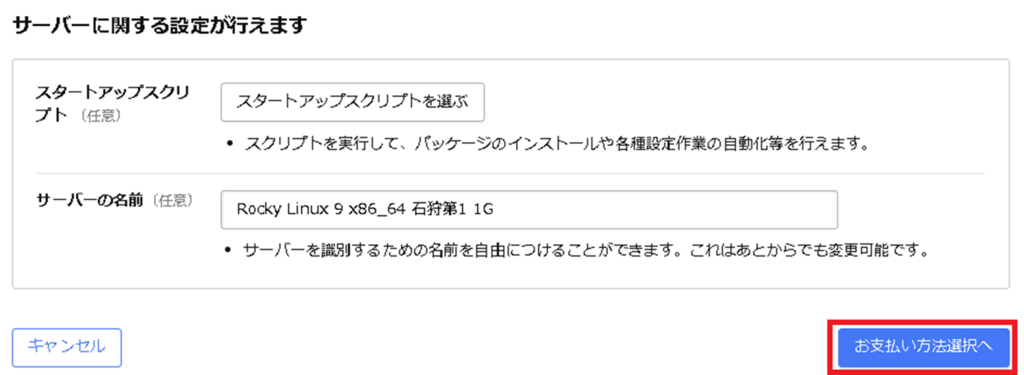
確認し契約終了。
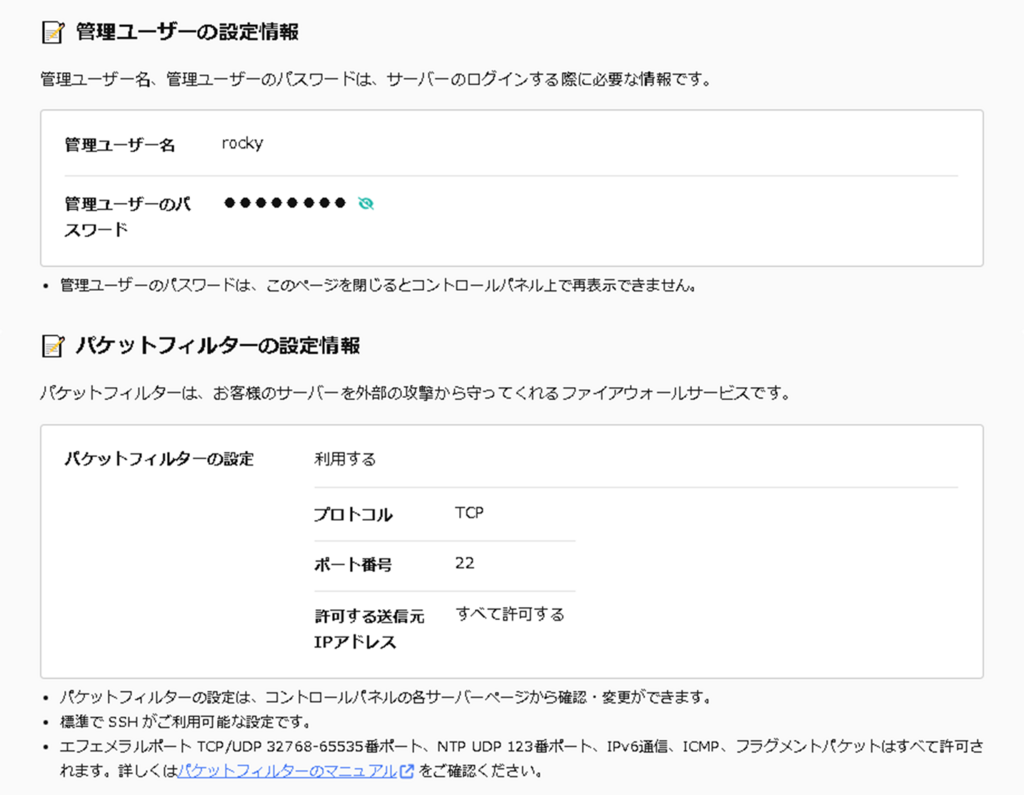
さくらVPS コントロールパネル
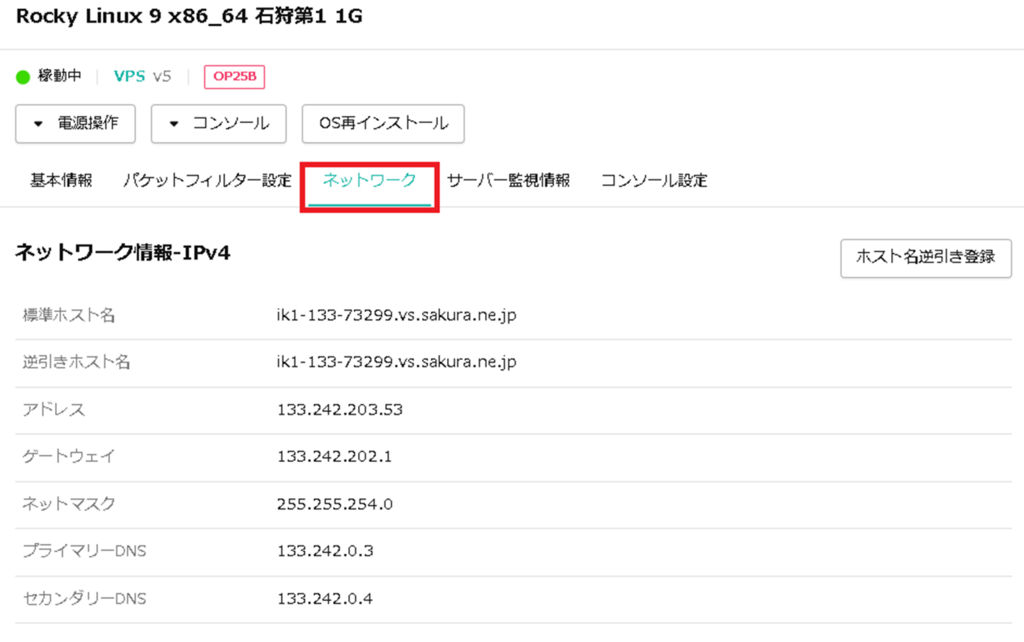
サーバ情報/ネットワーク情報 確認
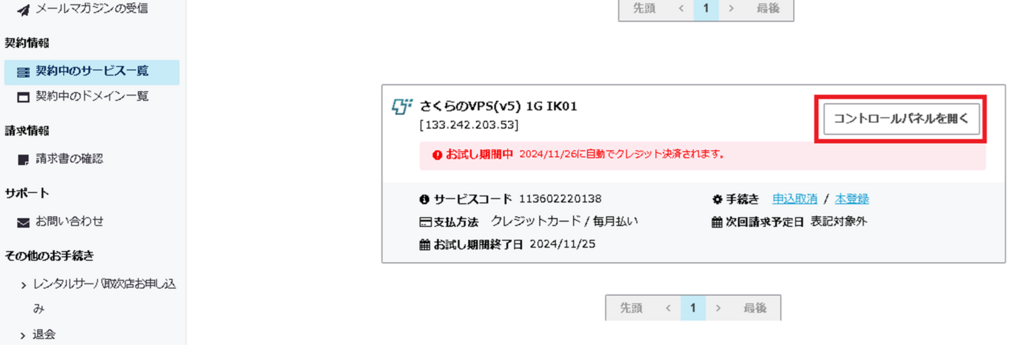
契約したさくらVPSのコントロールパネルを開く。
https://secure.sakura.ad.jp/auth/login?url=https://secure.sakura.ad.jp/menu/service/
「ネットワーク」を確認しメモしておく。
OSインストール
外部公開する Linuxサーバーを構築する場合、最近の主流は CentOS ではなく Rocky Linux。
同じRHEL系統ですが CentOS より Rocky Linux の方が堅牢。
ISOファイル
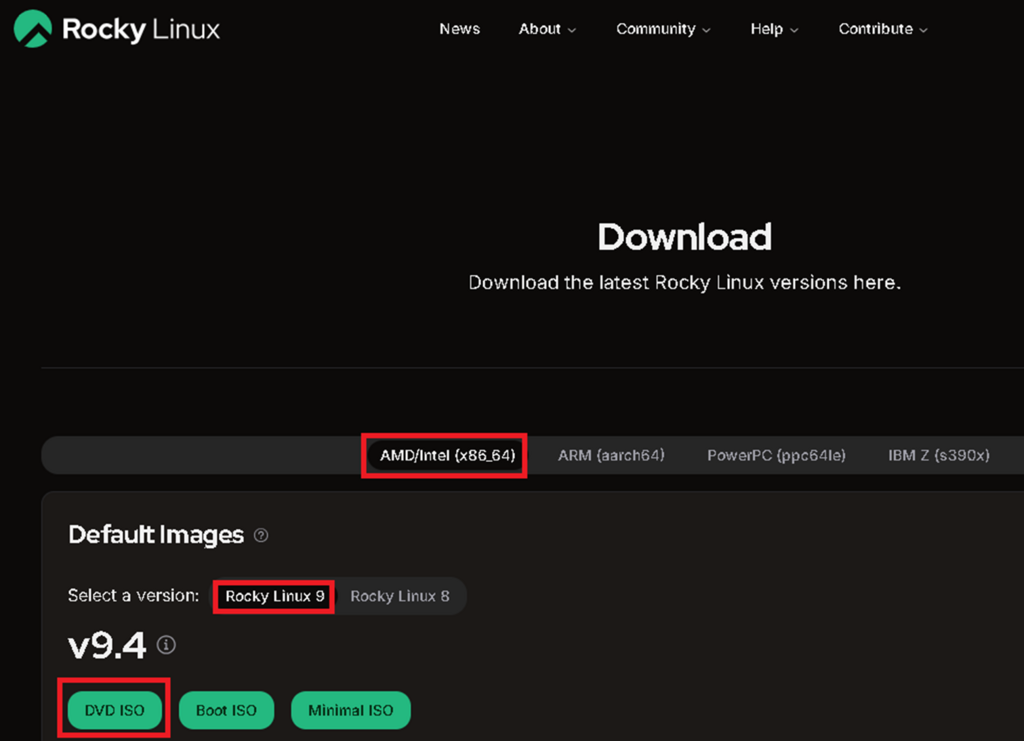
サービス提供会社がカスタマイズしたOSを使うのは好きじゃないので、Rocky Linux 専用サイトから ISOファイルをダウンロードし、VPSへアップロードしてインストールします。
ISOファイルダウンロード
https://rockylinux.org/download
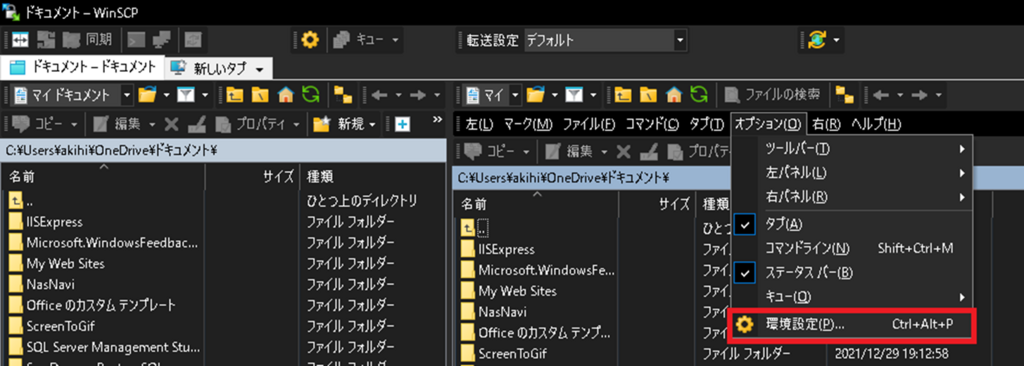
WinSCP設定
WinSCPの環境設定を変更して使い易くしておく。

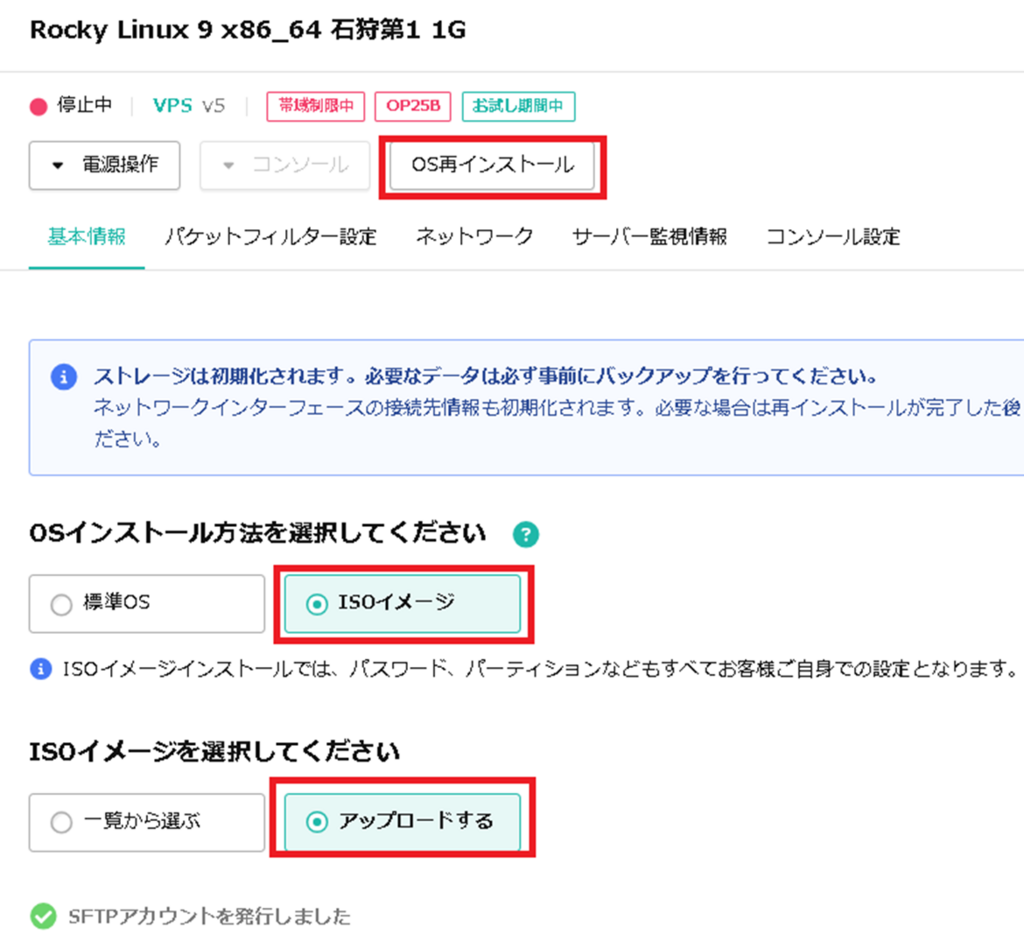
ISOファイルアップロード
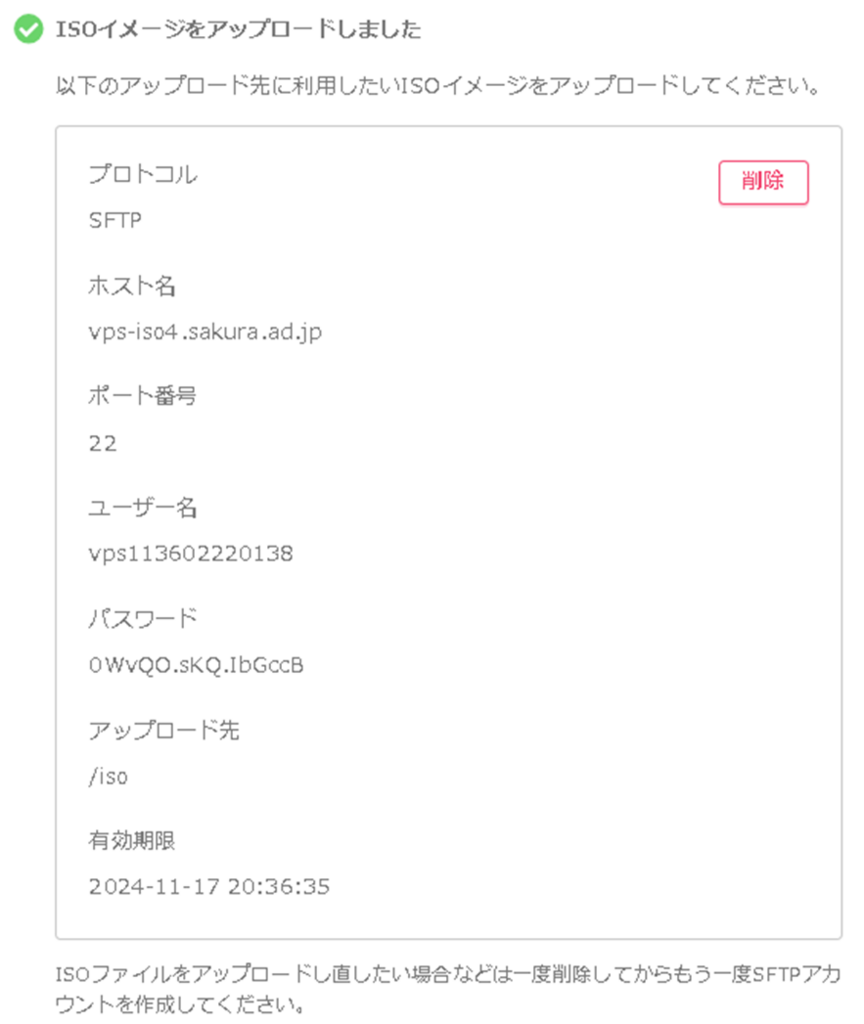
ISOファイルをVPSへアップロードする為のSFTPアカウント取得
発行されたSFTPアカウントをメモしておく。
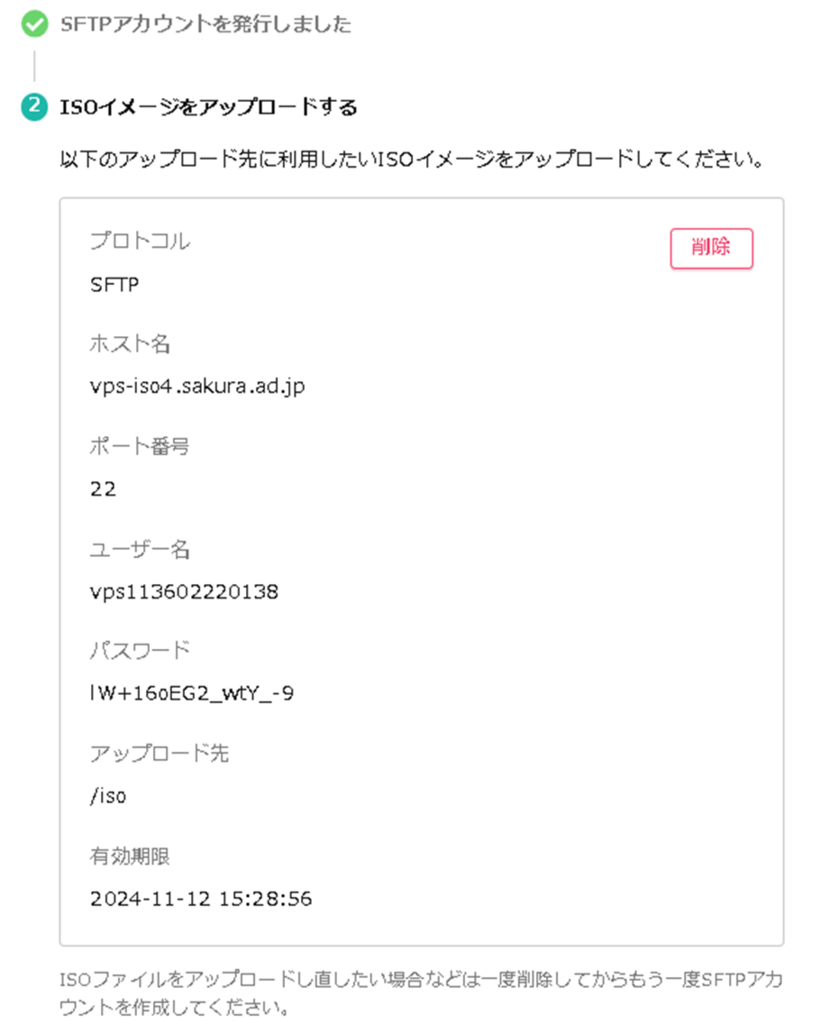
発行されたSFTPアカウントを使い、WinSCPでSFTP接続し、「ISO」フォルダ配下に ISOファイルをアップロードする。
※アップロードが終わるまで7時間かかりました。

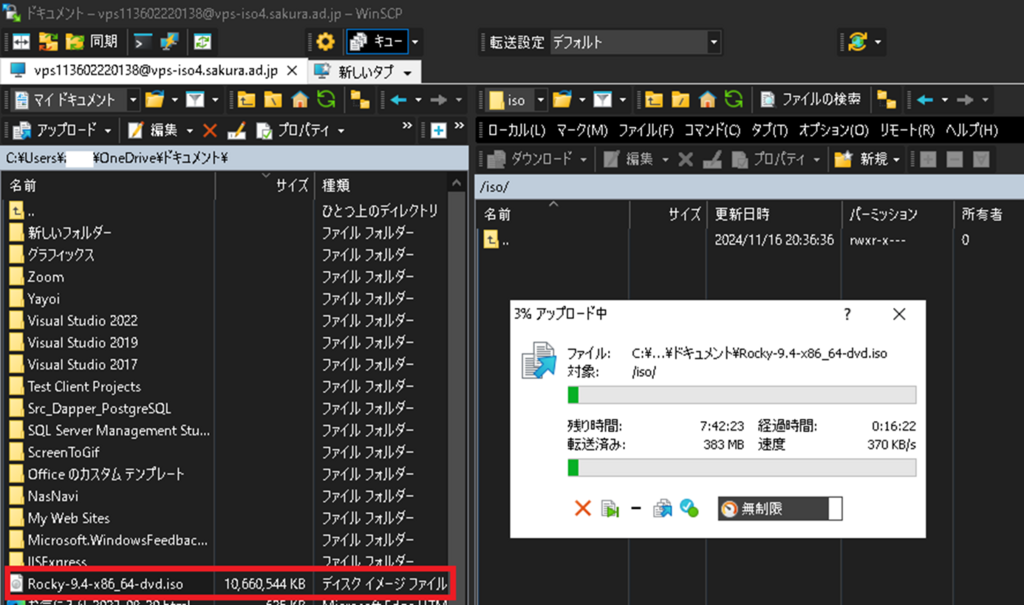

アップロード後、「内容確認」をクリック。


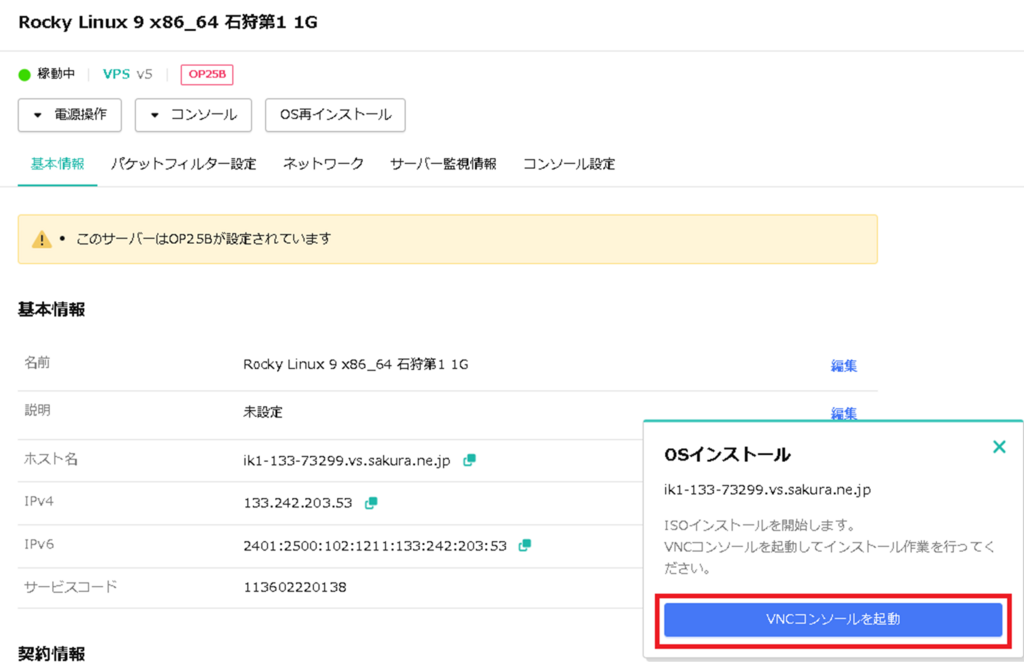
「OS再インストール」をクリック。


OSインストール
VNCコンソール
「VNCコンソールを起動」をクリック。
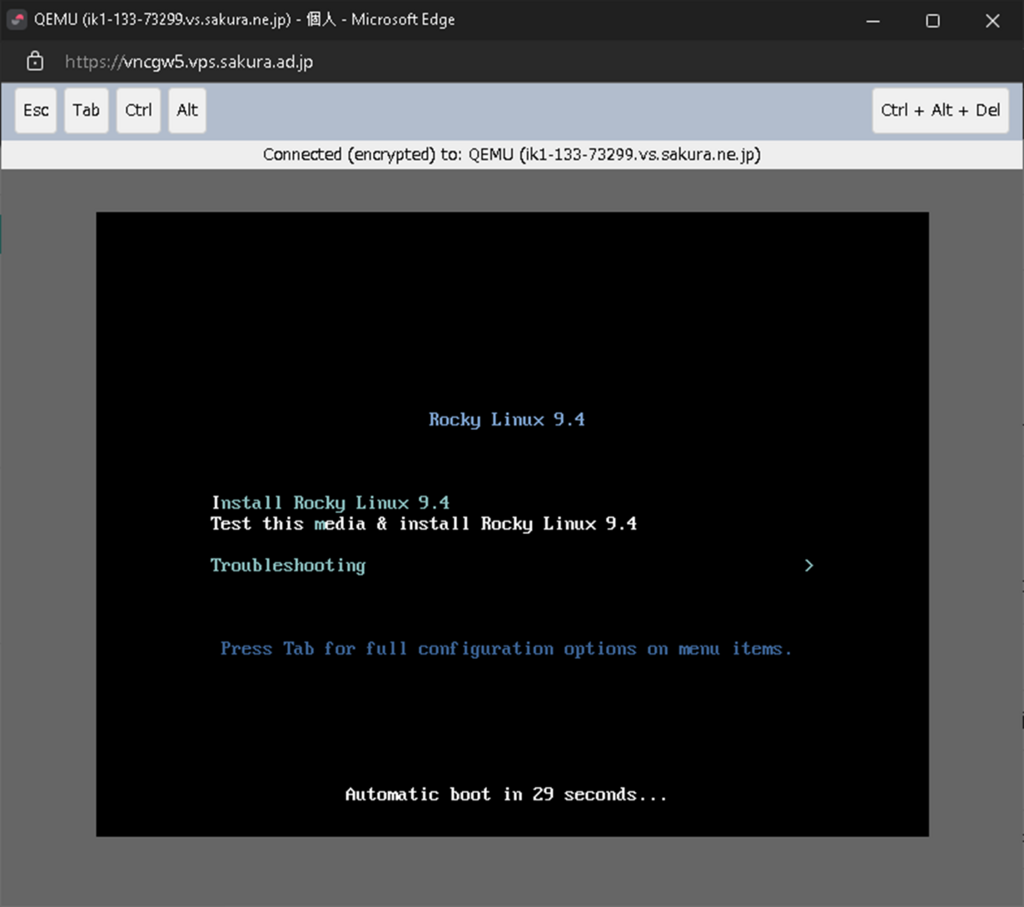
boot時は なにもせず暫く待つ
言語選択
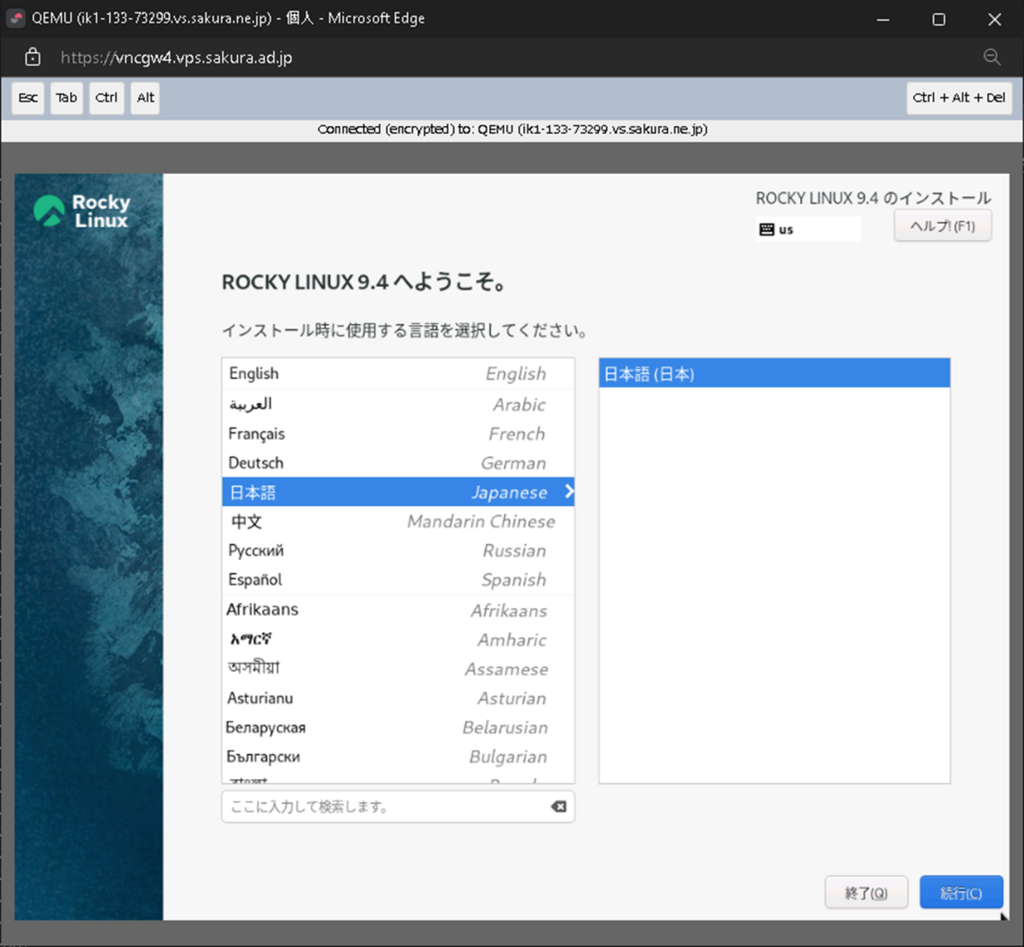
言語選択で日本語を選択し、「続行」をクリックて少し待つ。
※反応が悪いことがある。
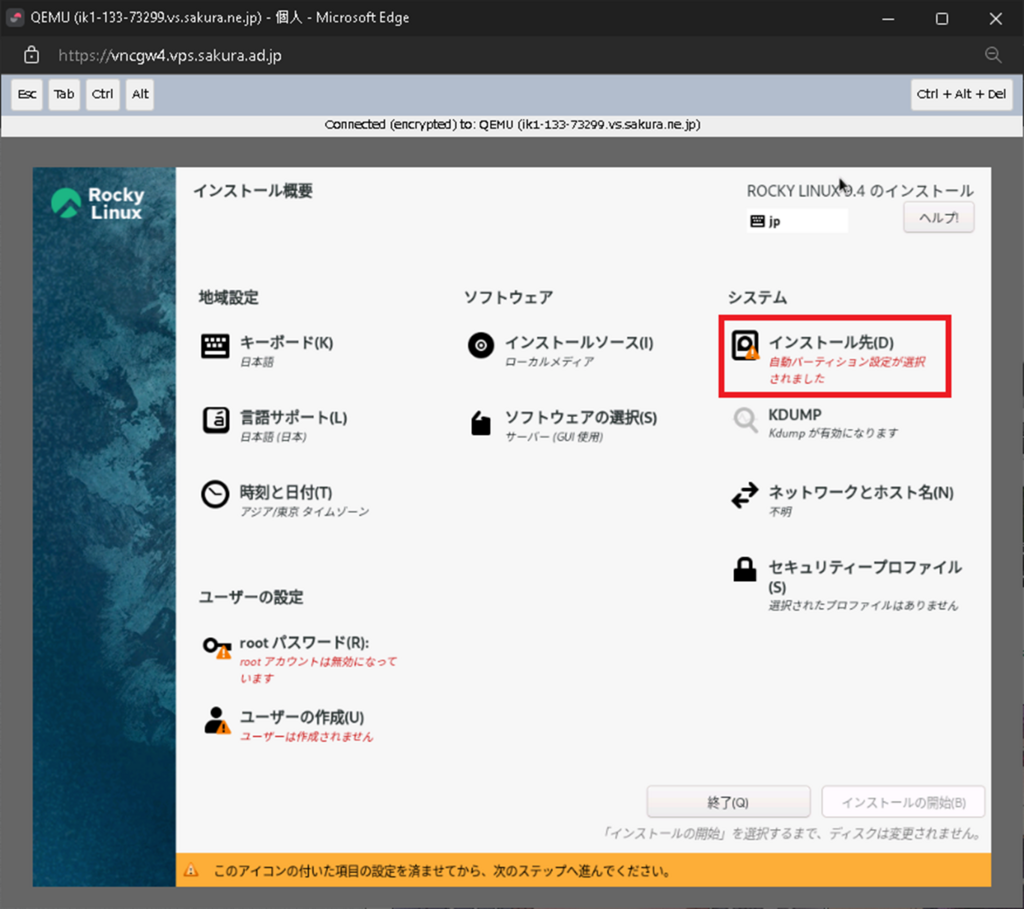
インストール先
「インストール先」をクリック。
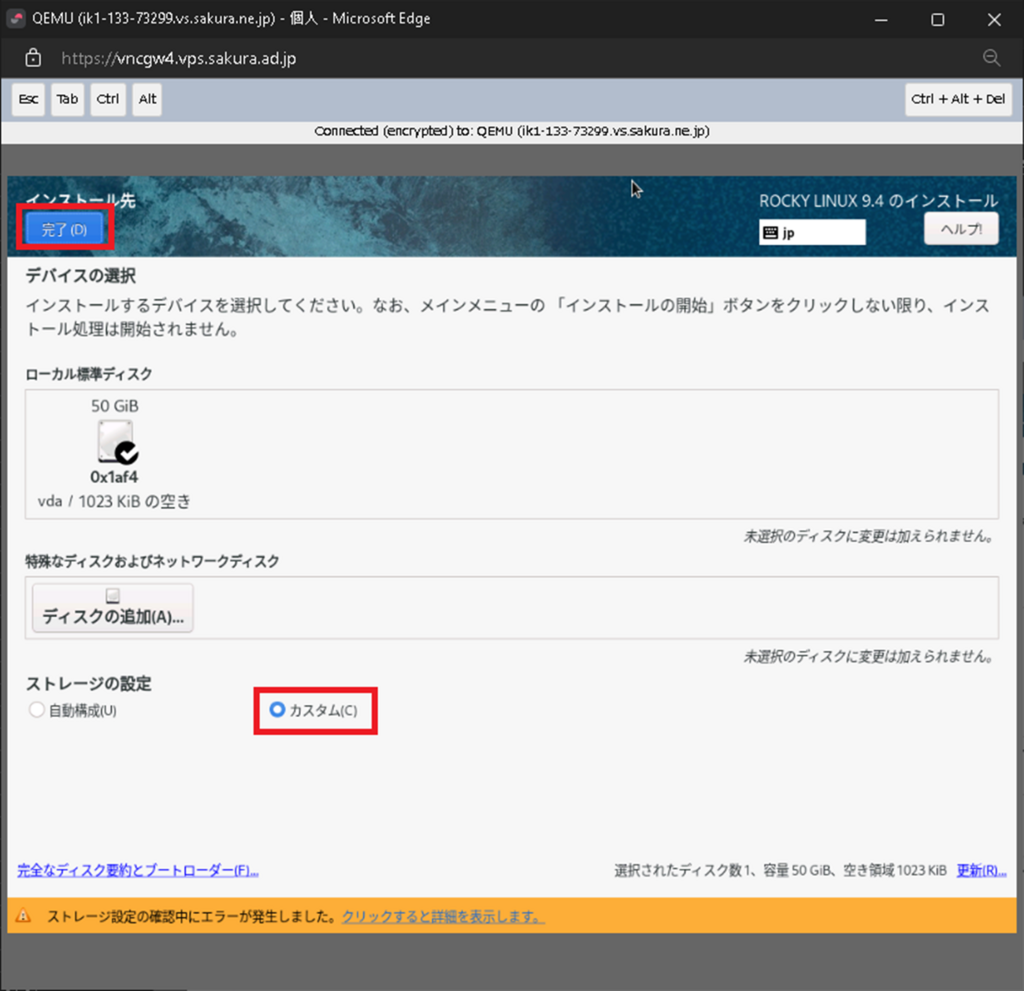
「カスタム」を選択し「完了」クリック。
「/」を選択状態にして「-」をクリック。
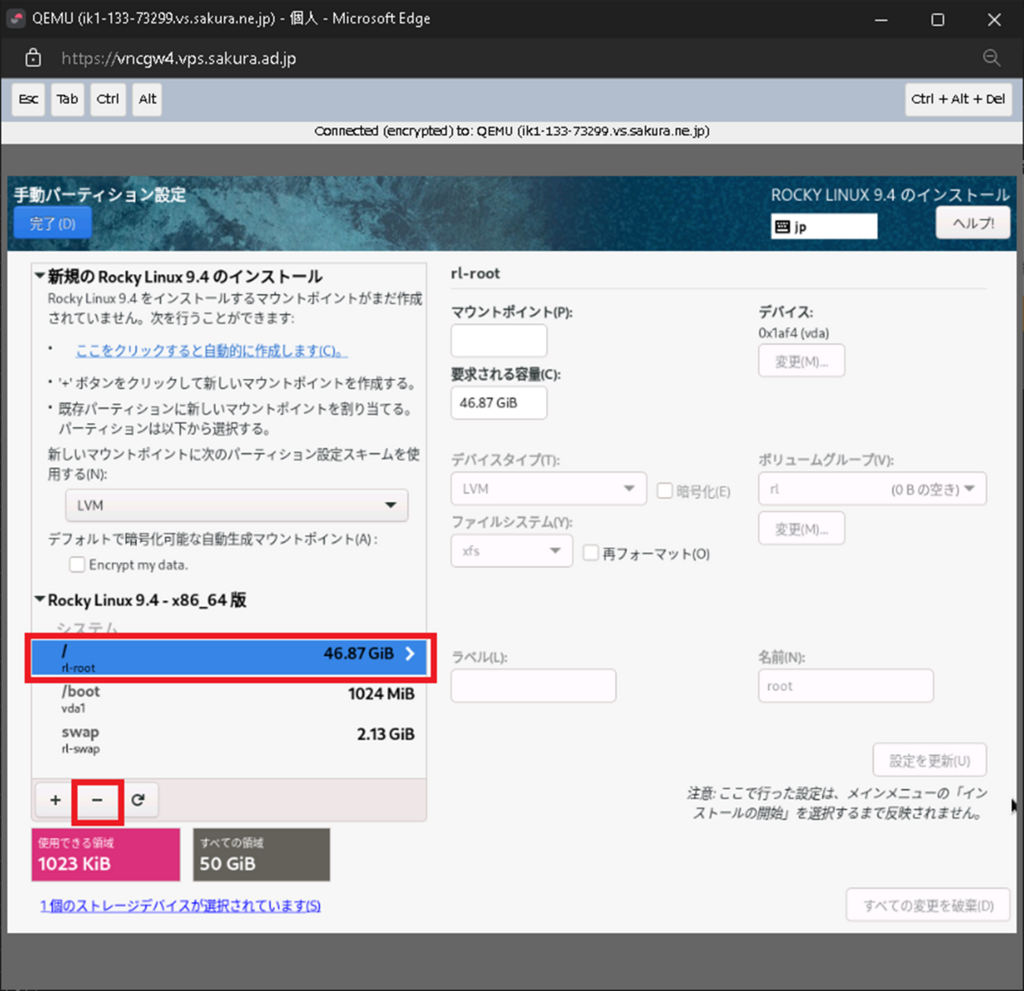
全て削除。
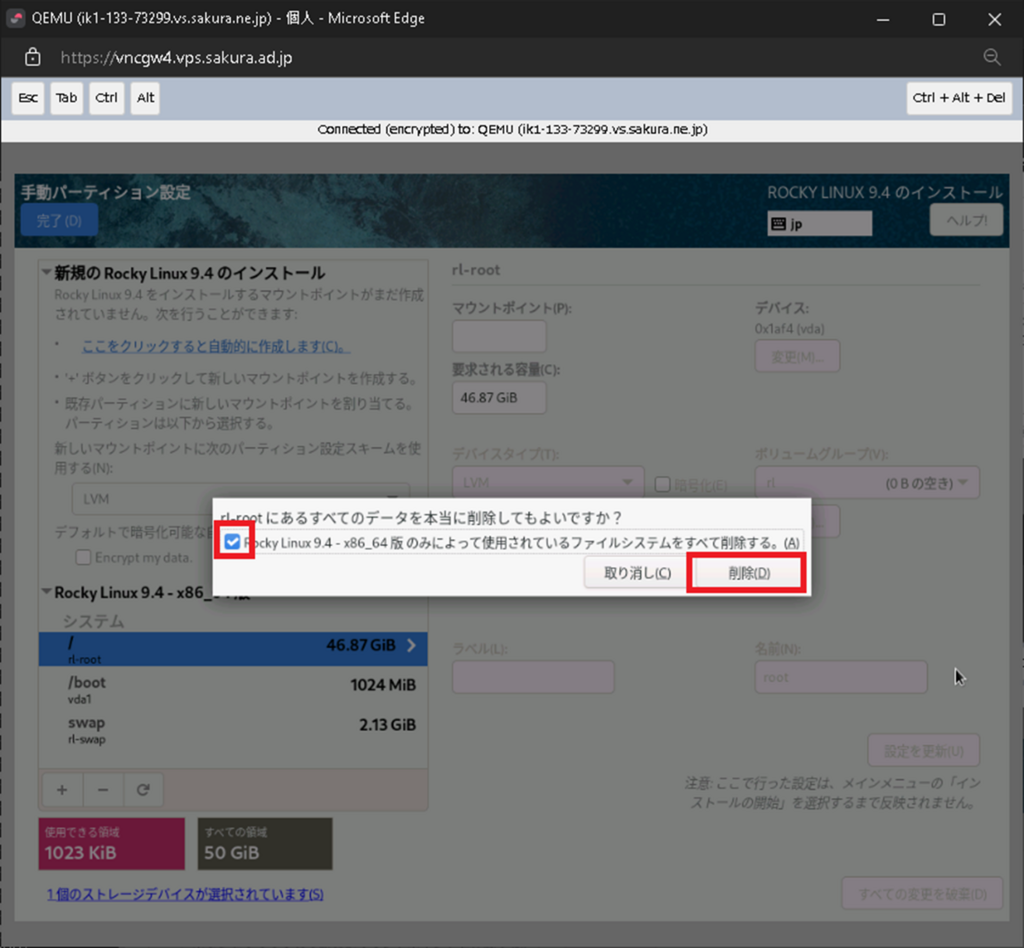
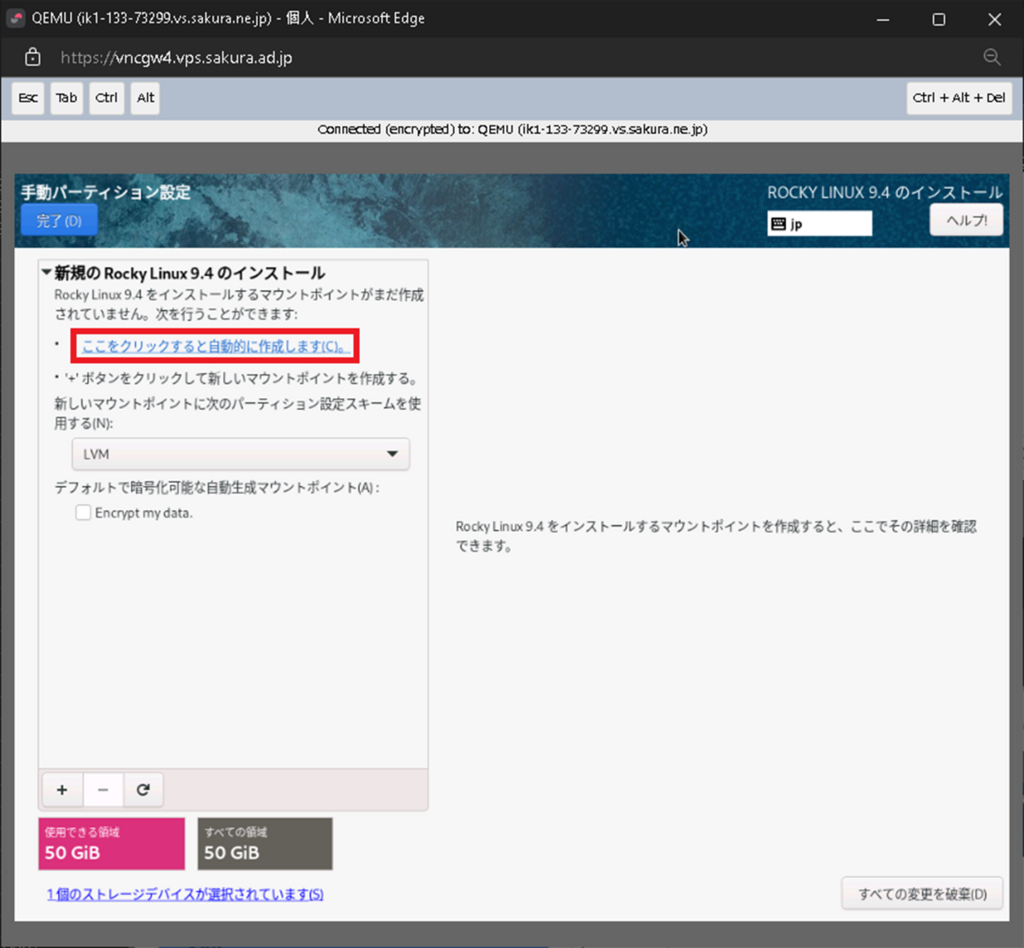
「ここをクリックすると自動的に作成します」をクリック。
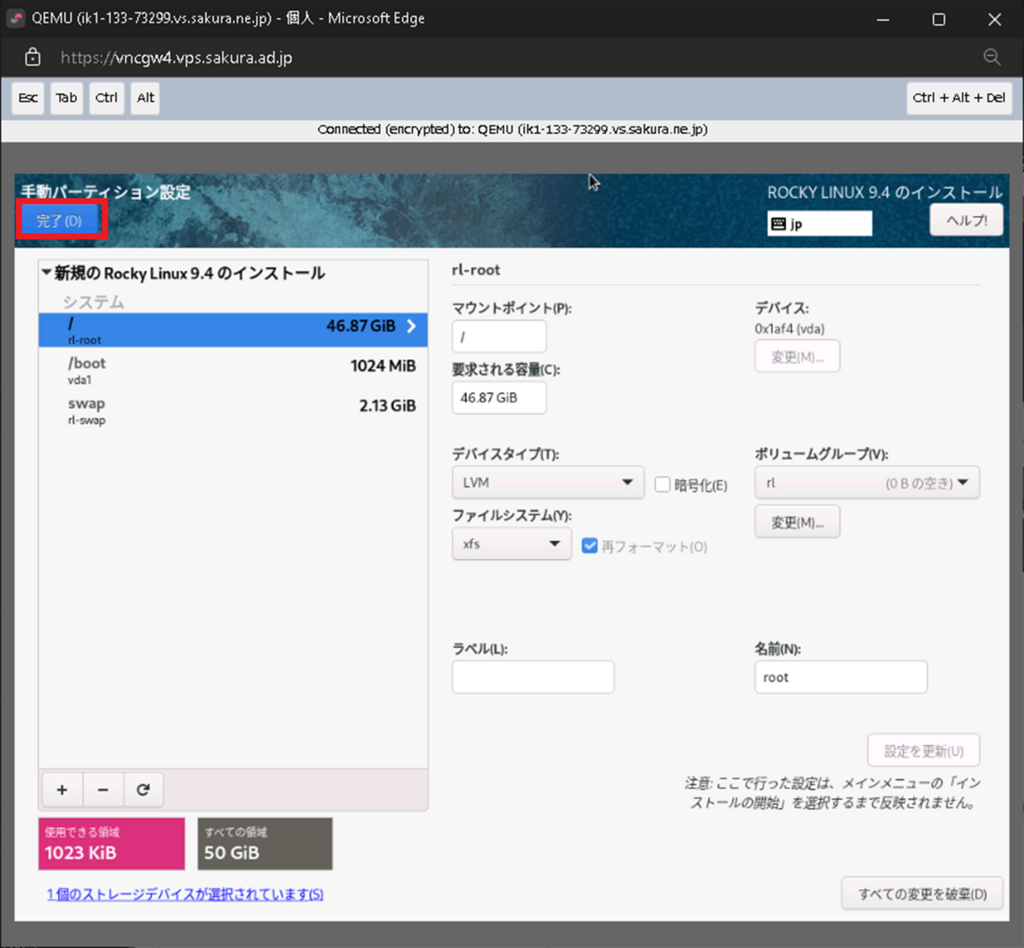
自動作成された設定そのまま「完了」クリック。
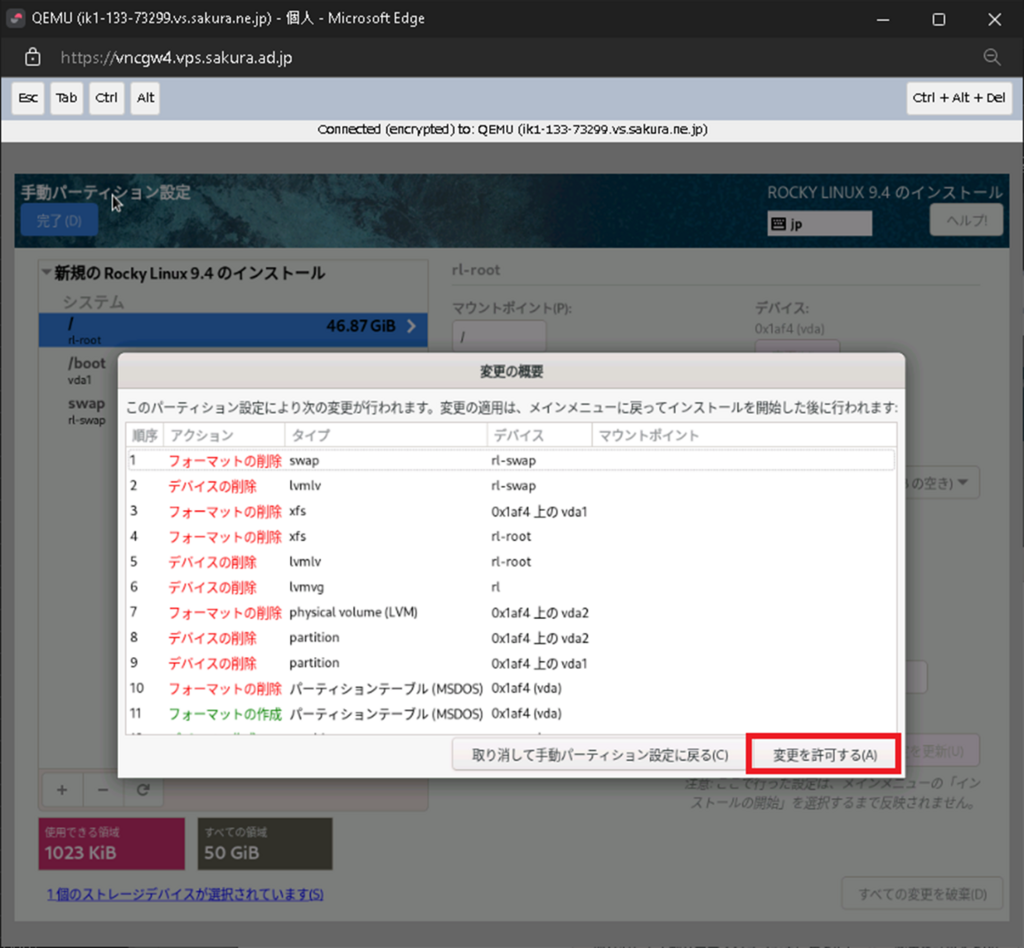
「変更を許可する」クリック。
「インストール先」がエラーになっていないことを確認。
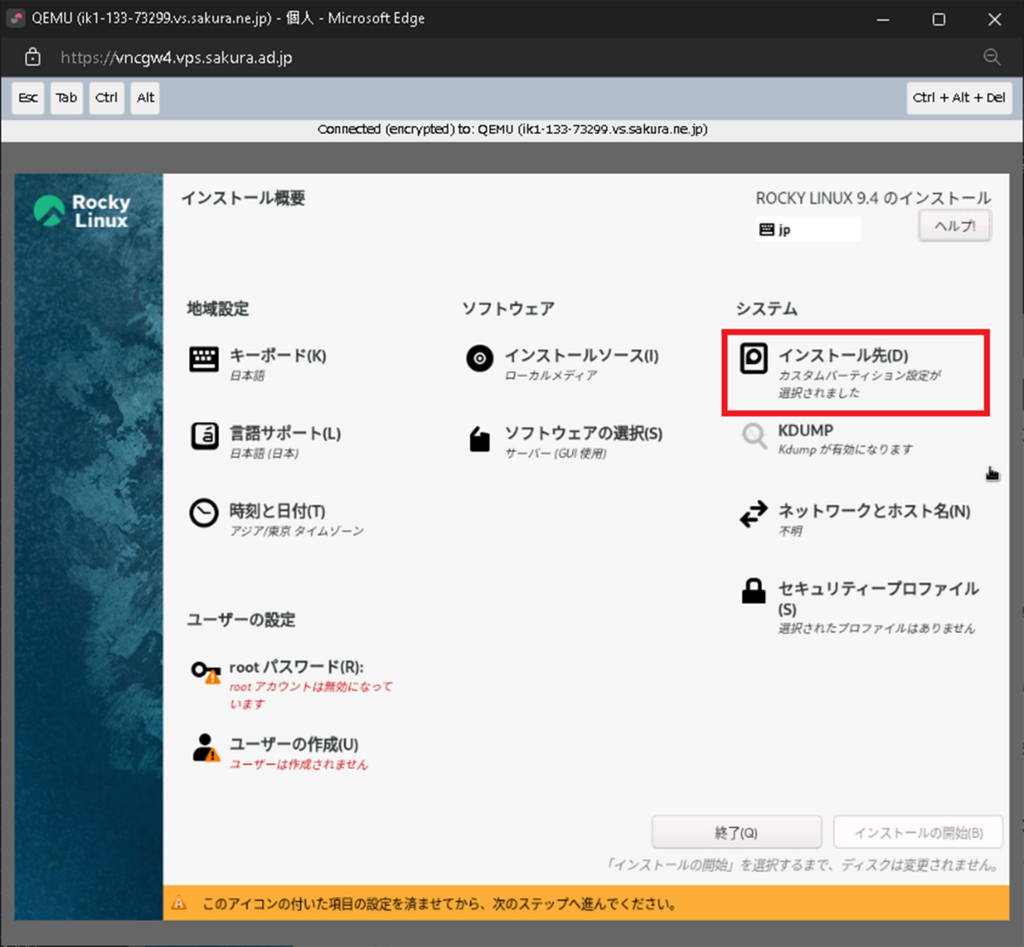
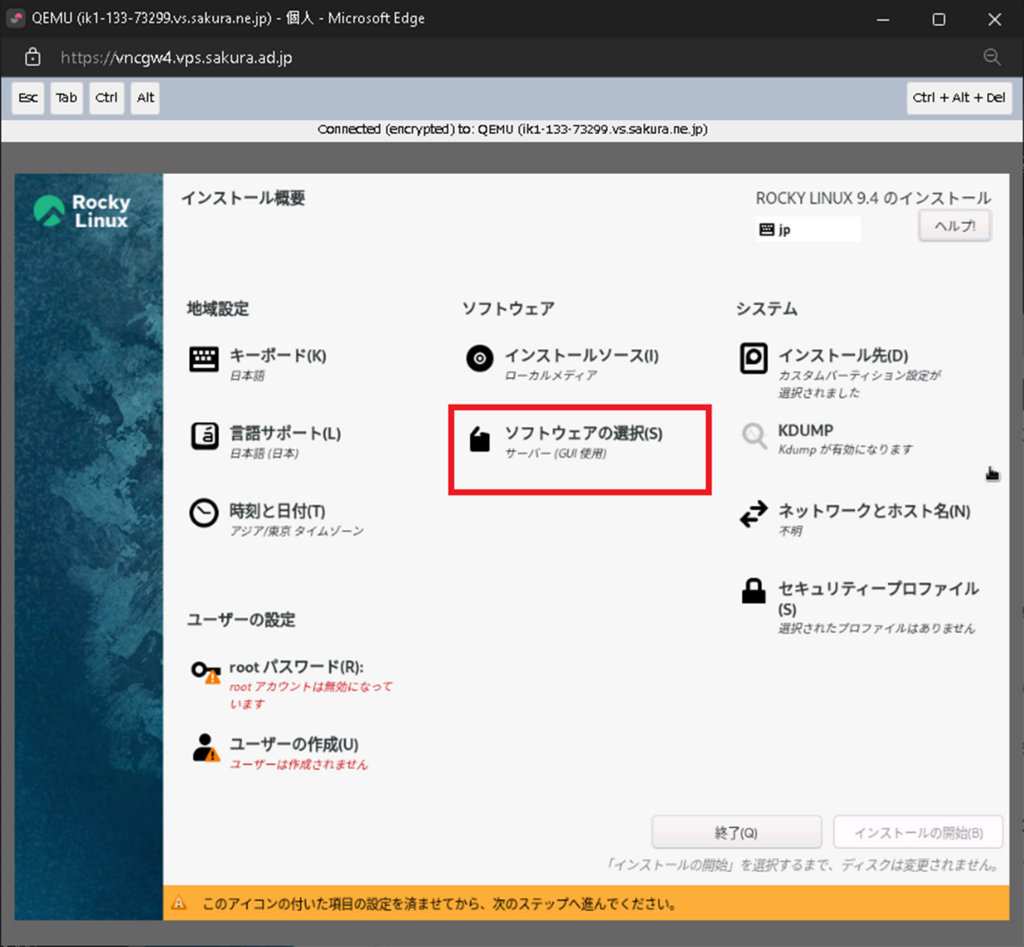
ソフトウェアの選択
「ソフトウェアの選択」クリック。
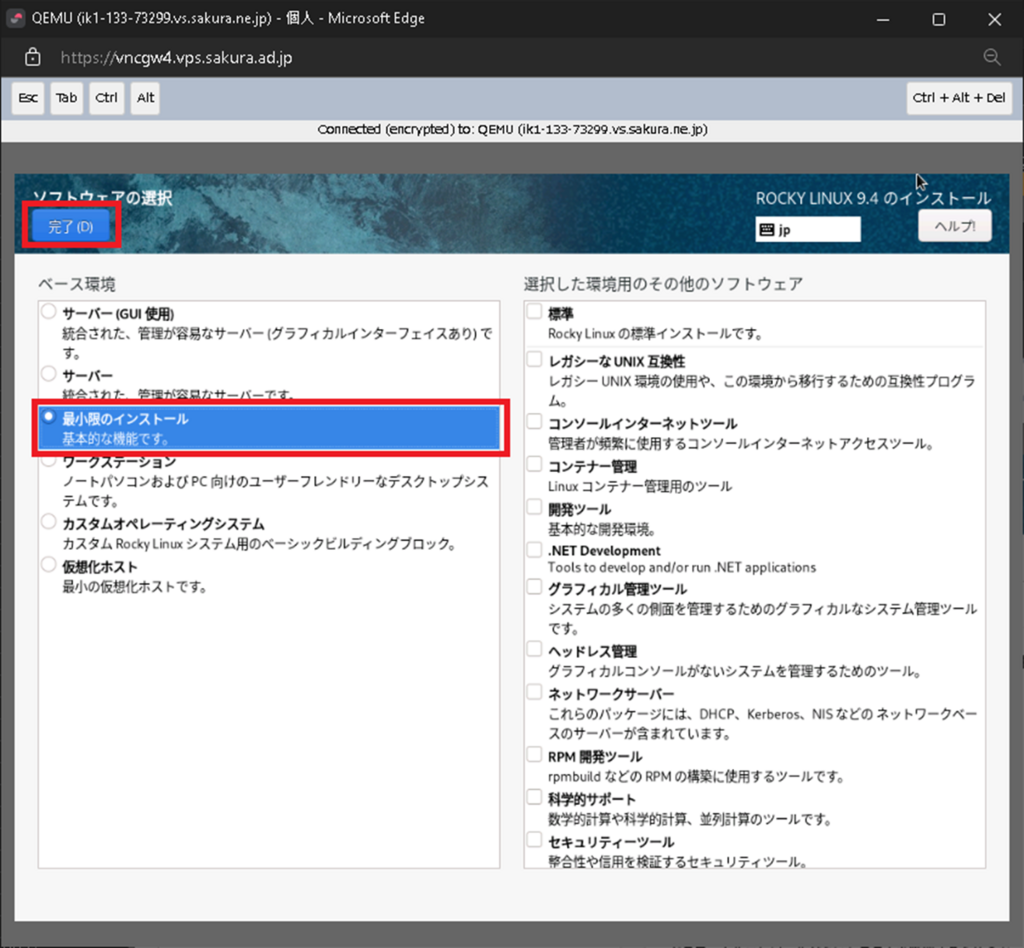
「最小限のインストール」のみ選択、その他は全て未選択で「完了」クリック。
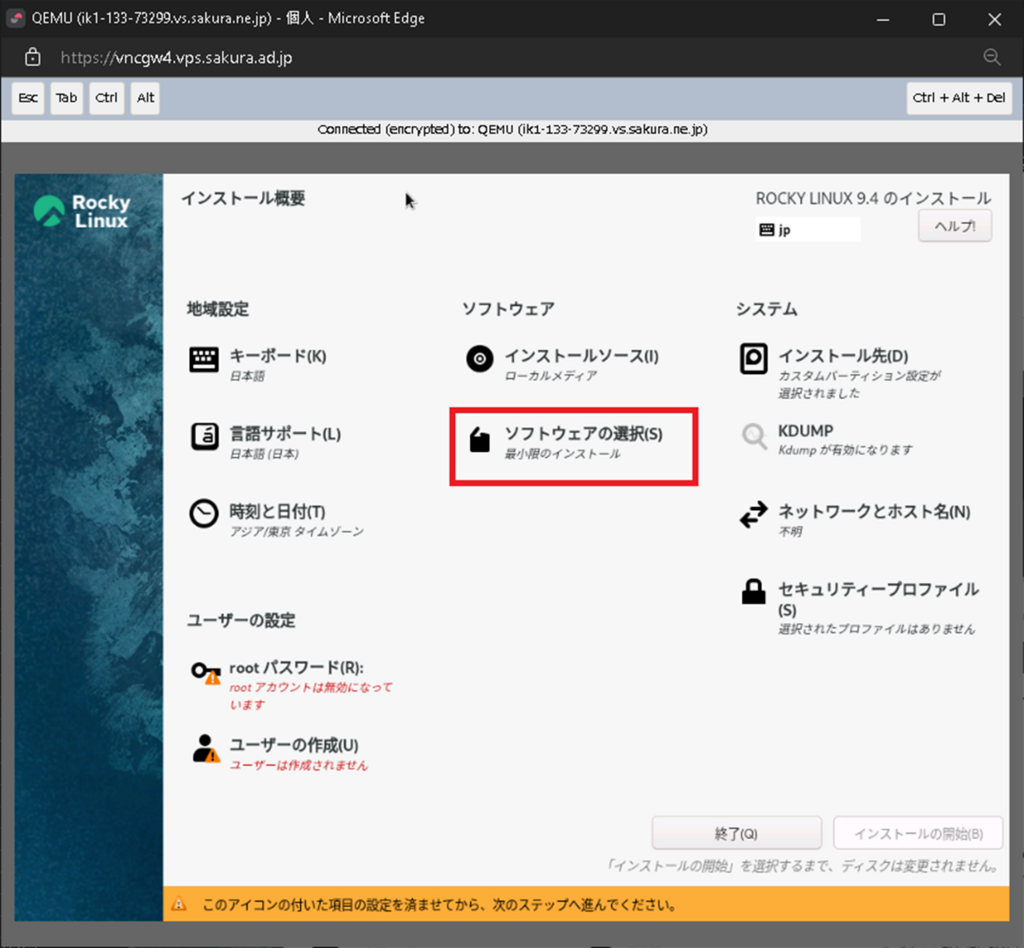
「ソフトウェアの選択」が「最小限のインストール」になっていることを確認。
ネットワークとホスト名
「ネットワークとホスト名」クリック。
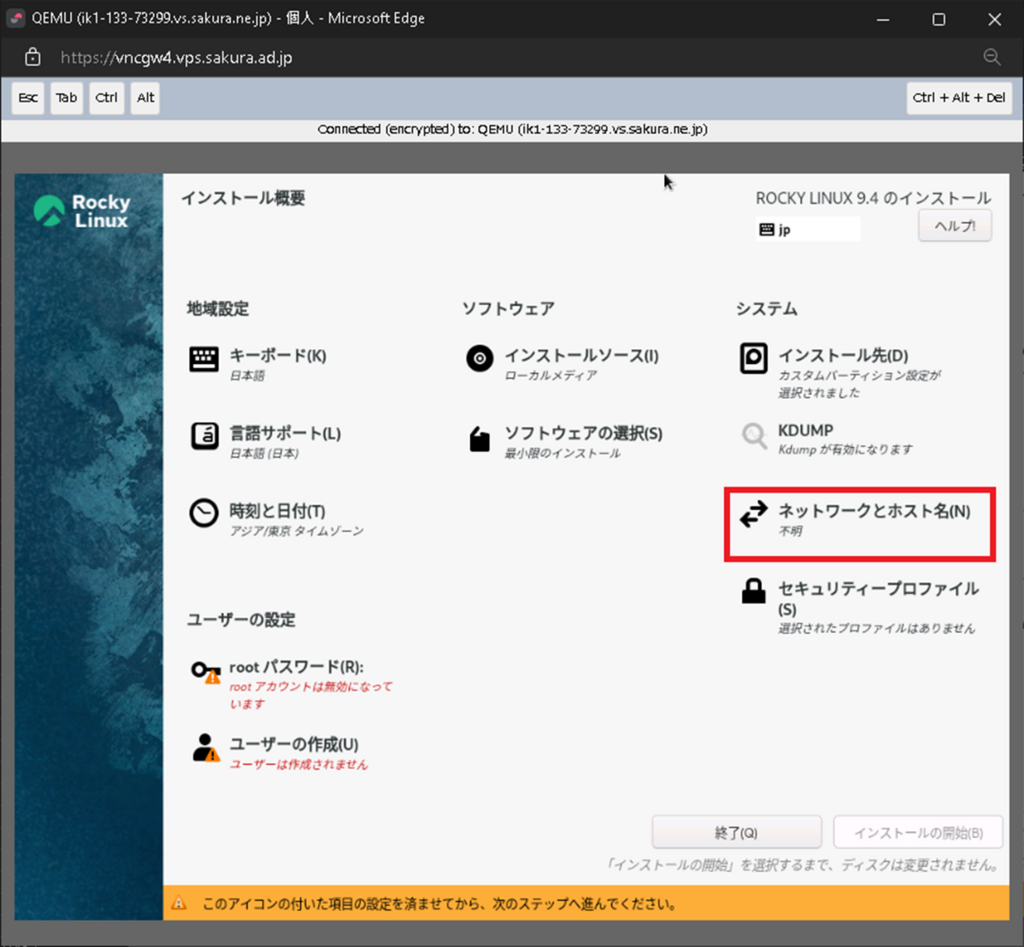
「ホスト名」に「さくらVPSコントロールパネル > ネットワーク > 標準ホスト名」を入力し「適用」をクリック。
※「ens3」に対応するネットワークインターフェースは「eth0」。
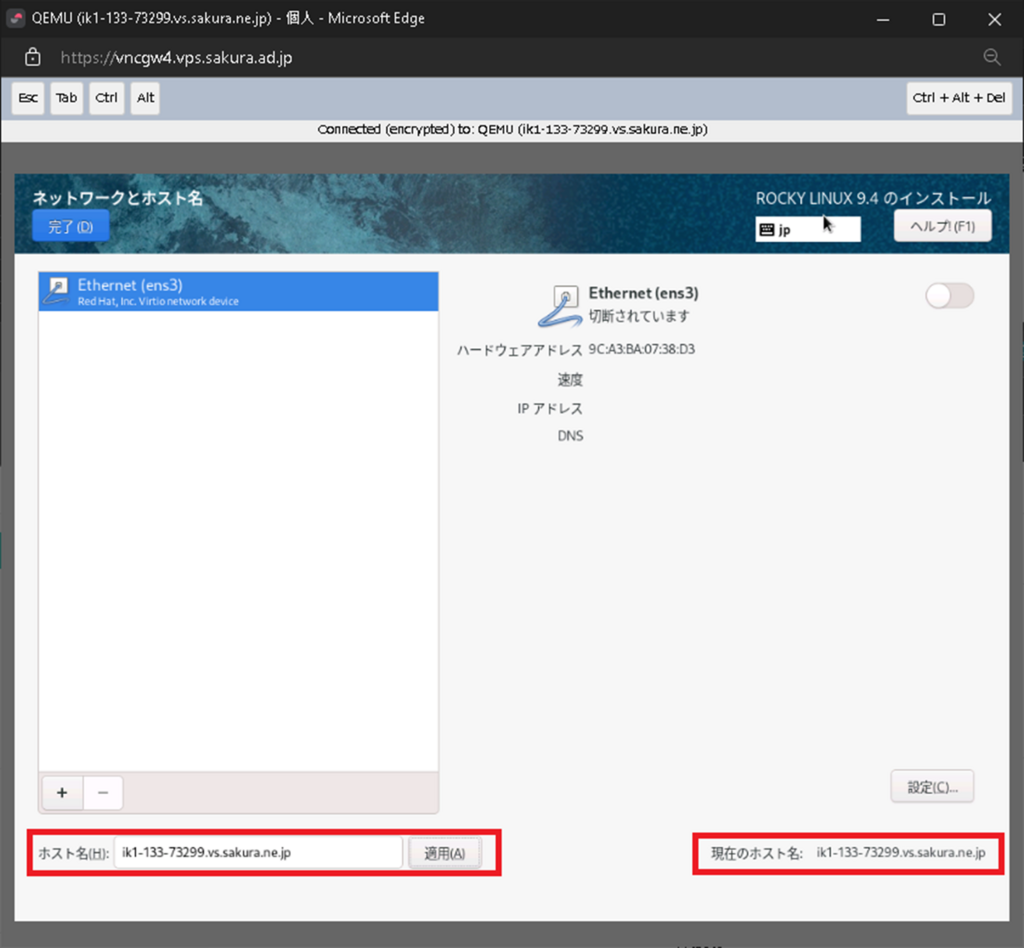
メモ


「設定」をクリック。
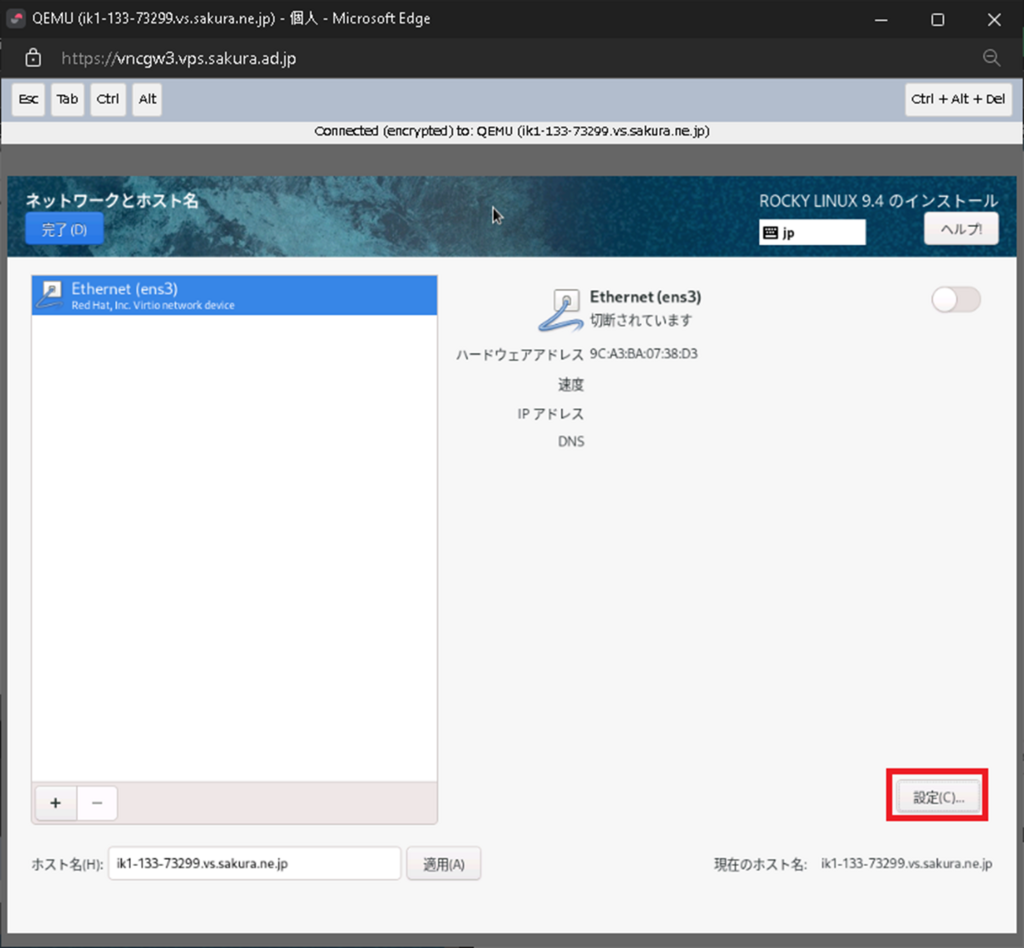
「IPv4設定」は「メソッド」を「手動」に変更し各値を入力。
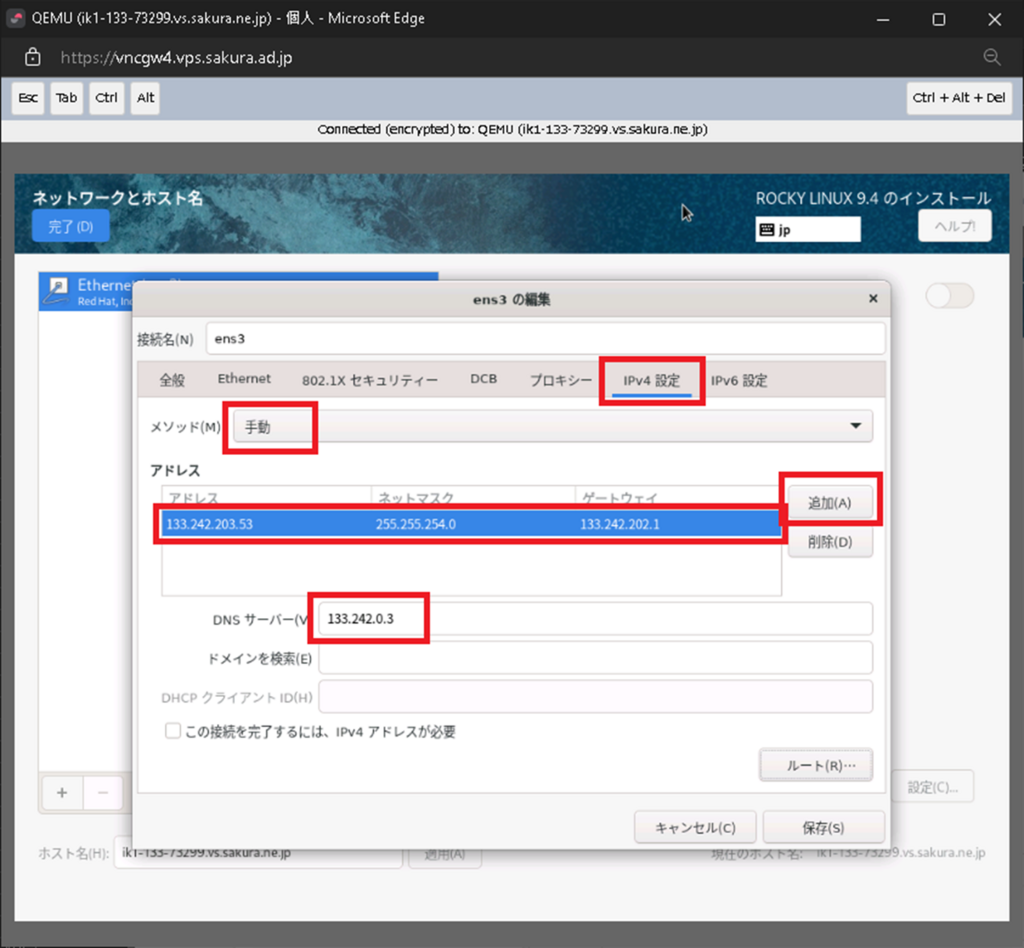
メモ

「IPv6設定」は使わないので「メソッド」を「無視」に変更。
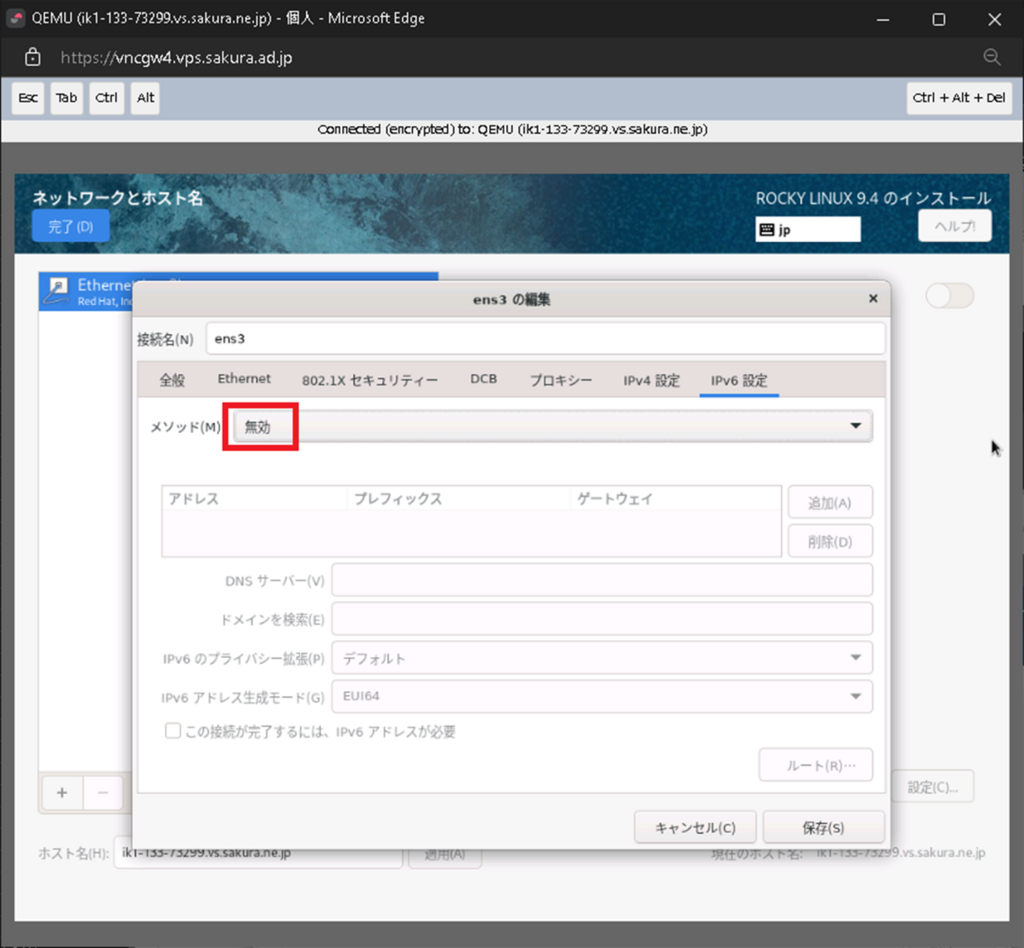
他のタブはデフォルト設定のまま、「保存」クリック。
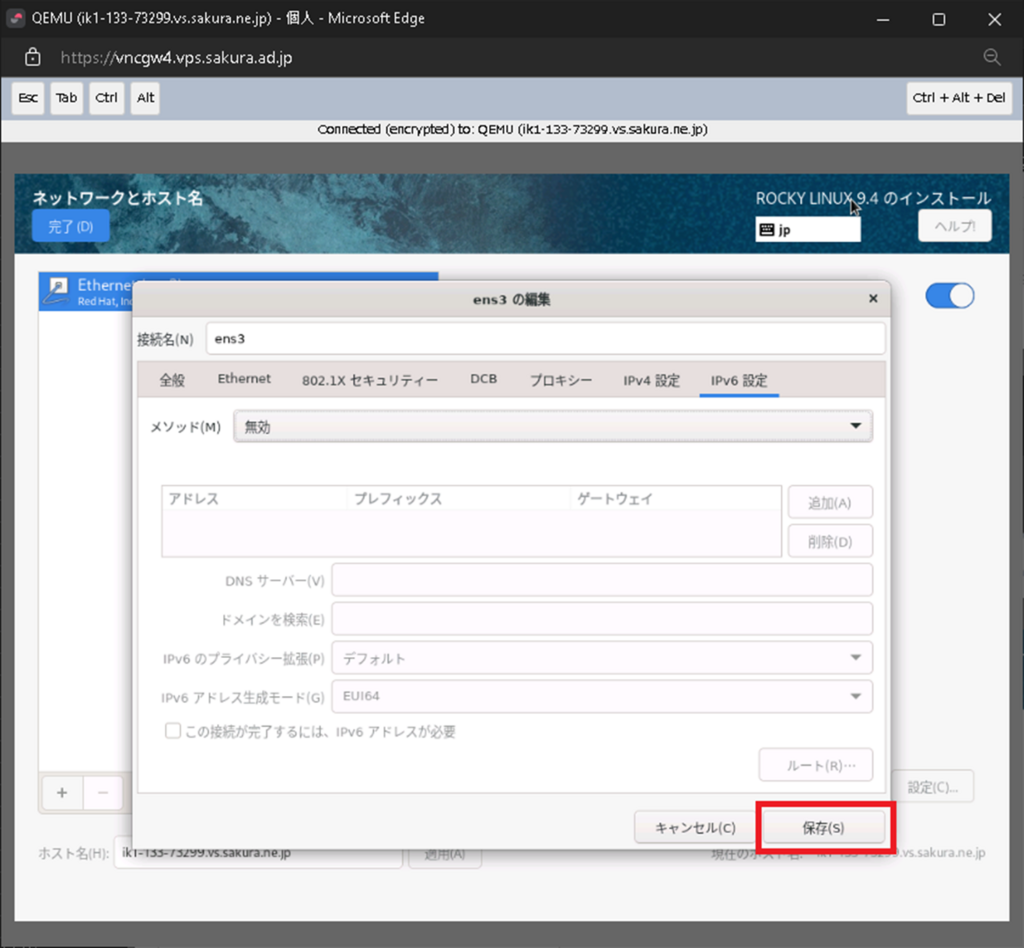
「オン」に切り替え「接続済み」になるのを確認。
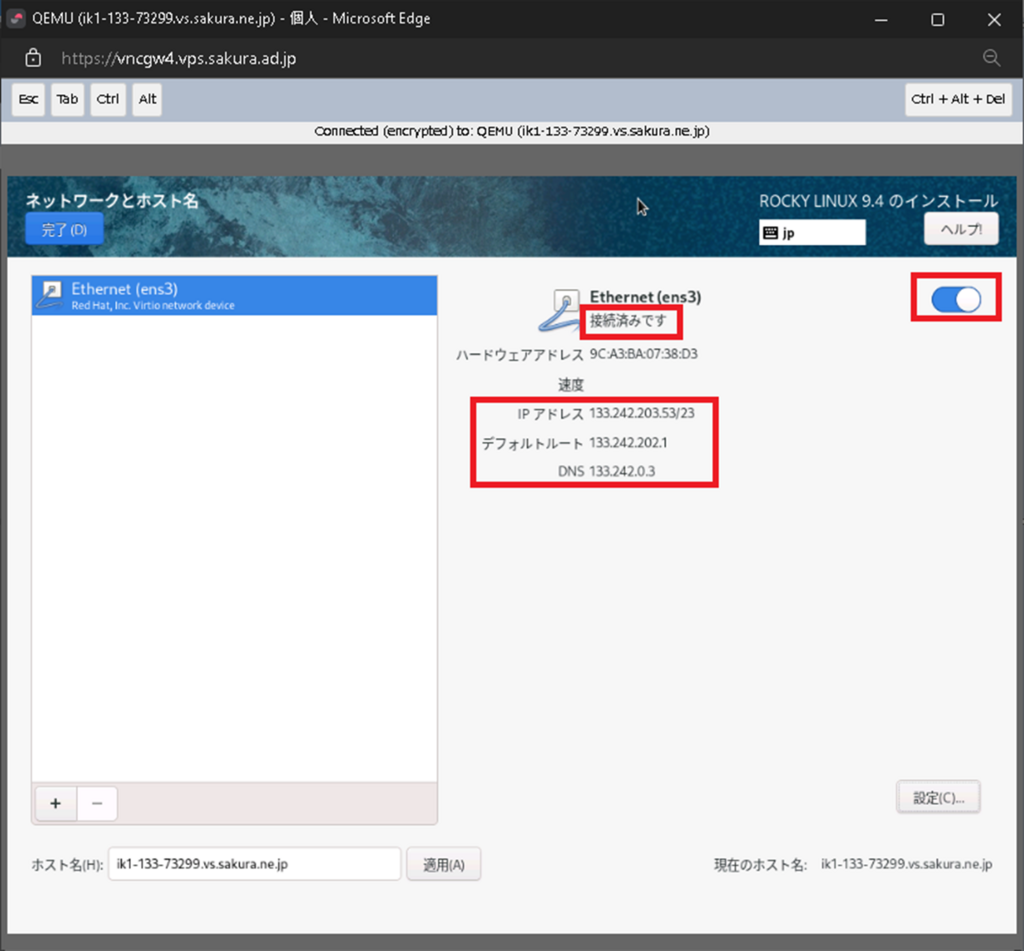
「完了」をクリック。
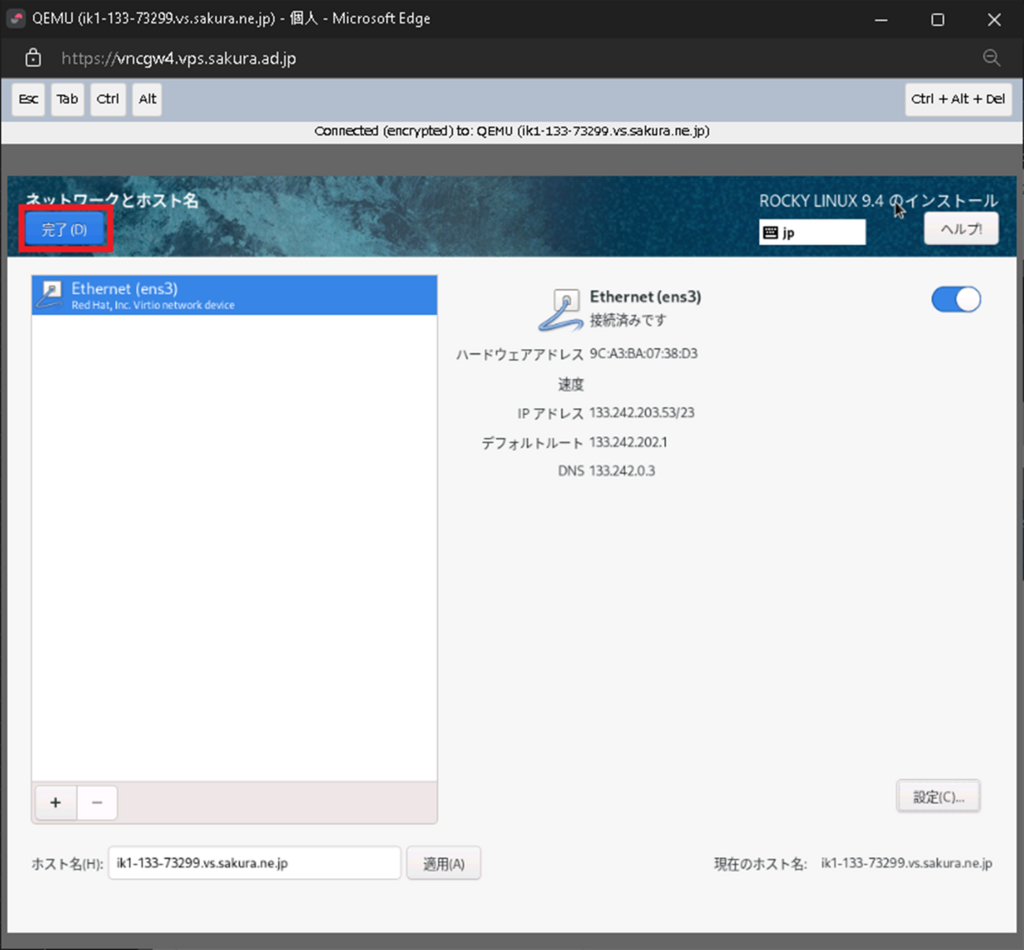
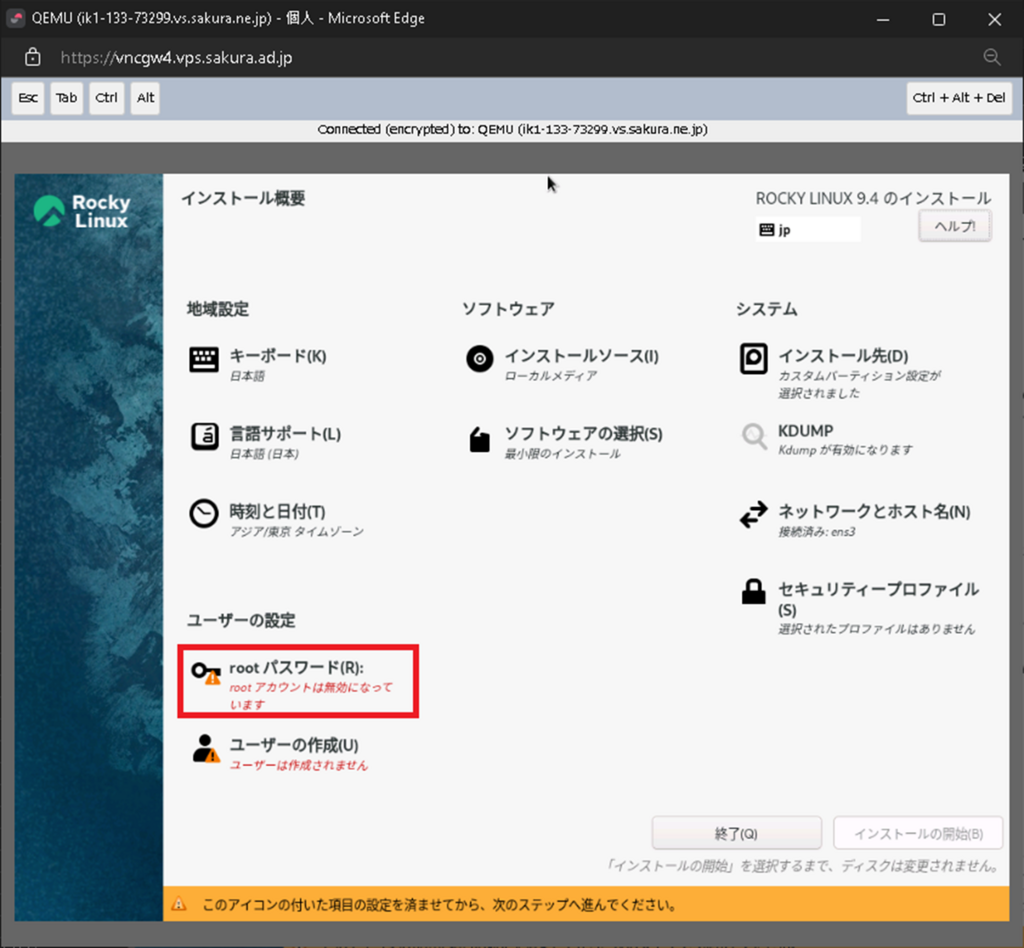
rootパスワード
「rootパスワード」クリック。
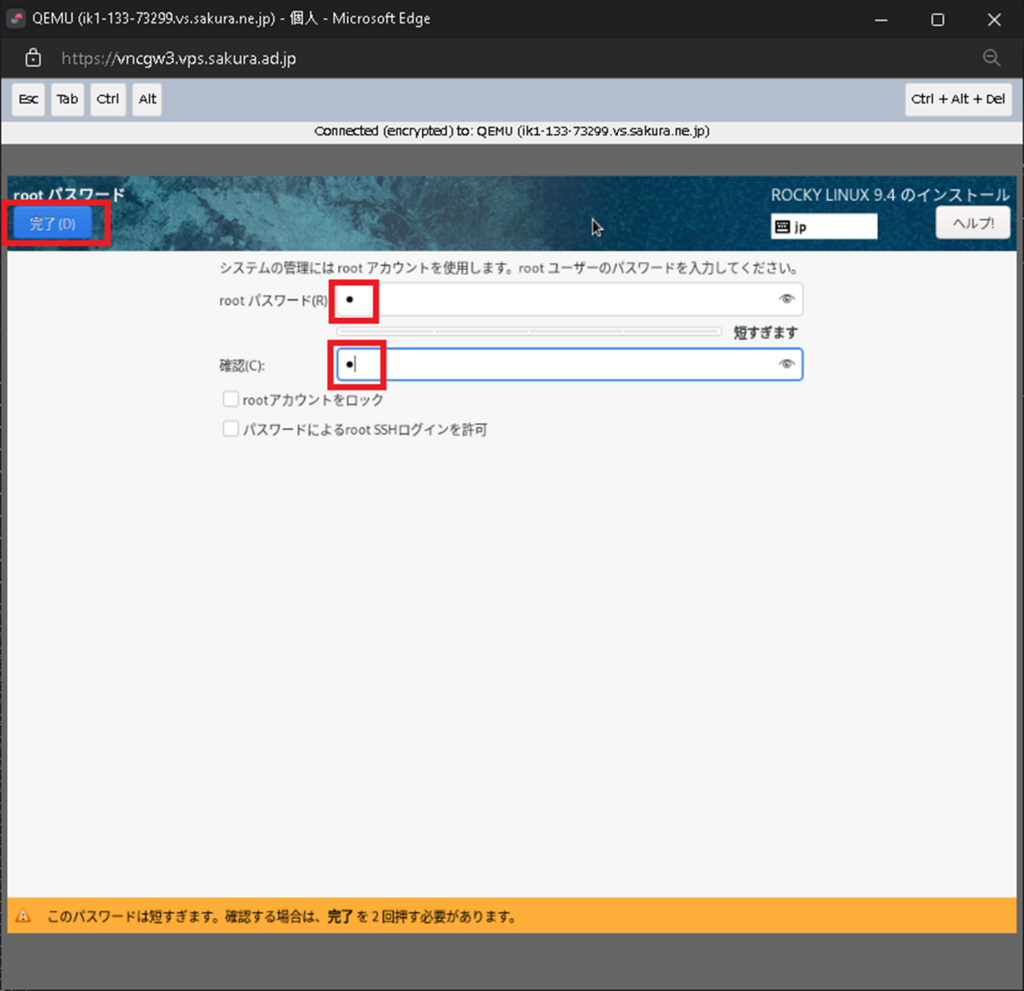
パスワードを入力し「完了」をクリック。
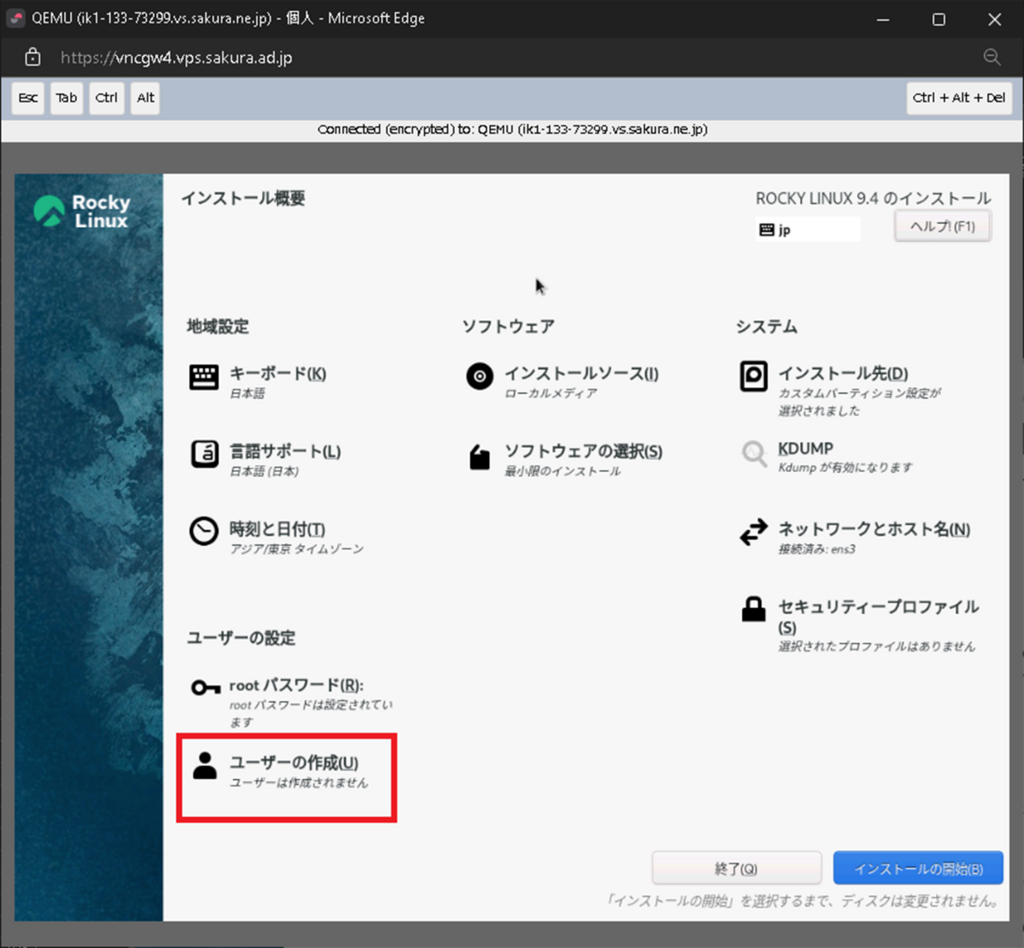
ユーザーの作成
「ユーザーの作成」をクリック。
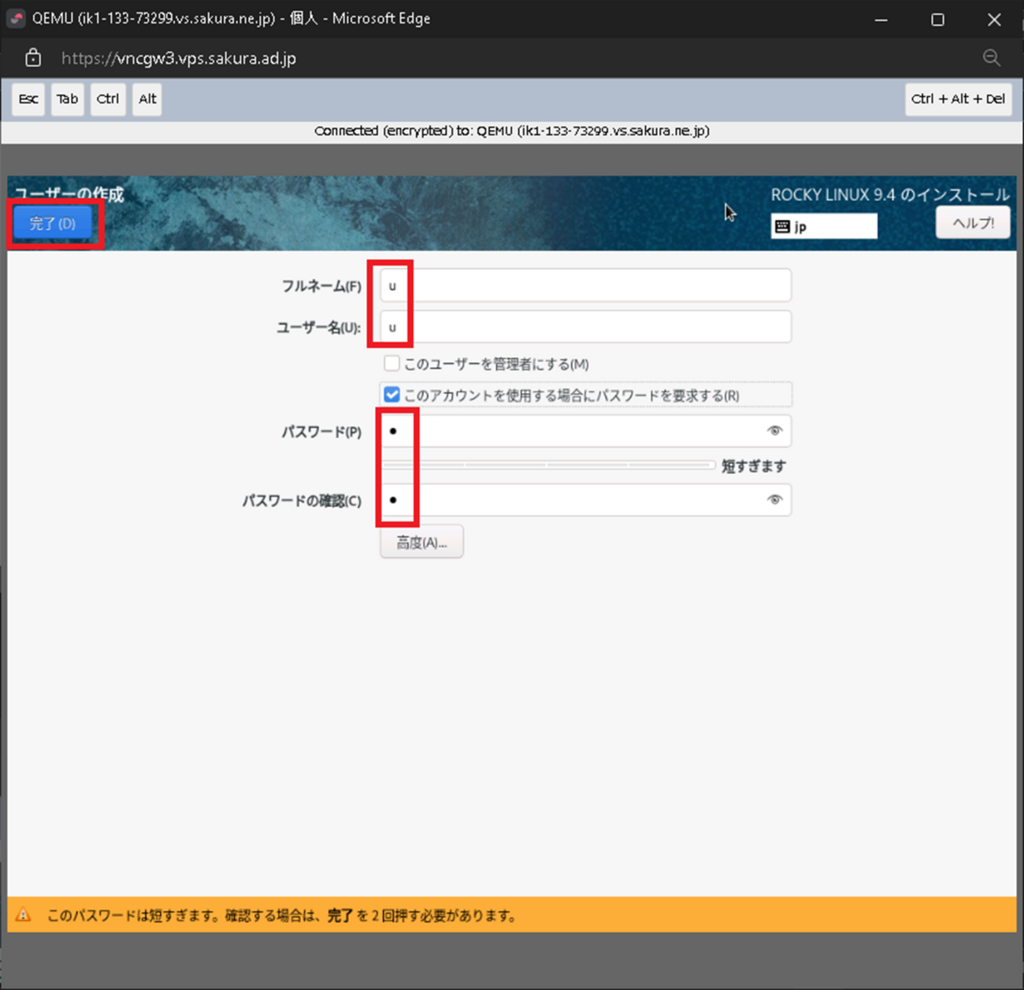
ユーザー名とパスワードを入力し「完了」クリック。
ユーザ名: u
パスワード: p
※サンプルなので ID/パスワード は簡素な1文字にしています。
インストール開始
「インストールの開始」をクリック。
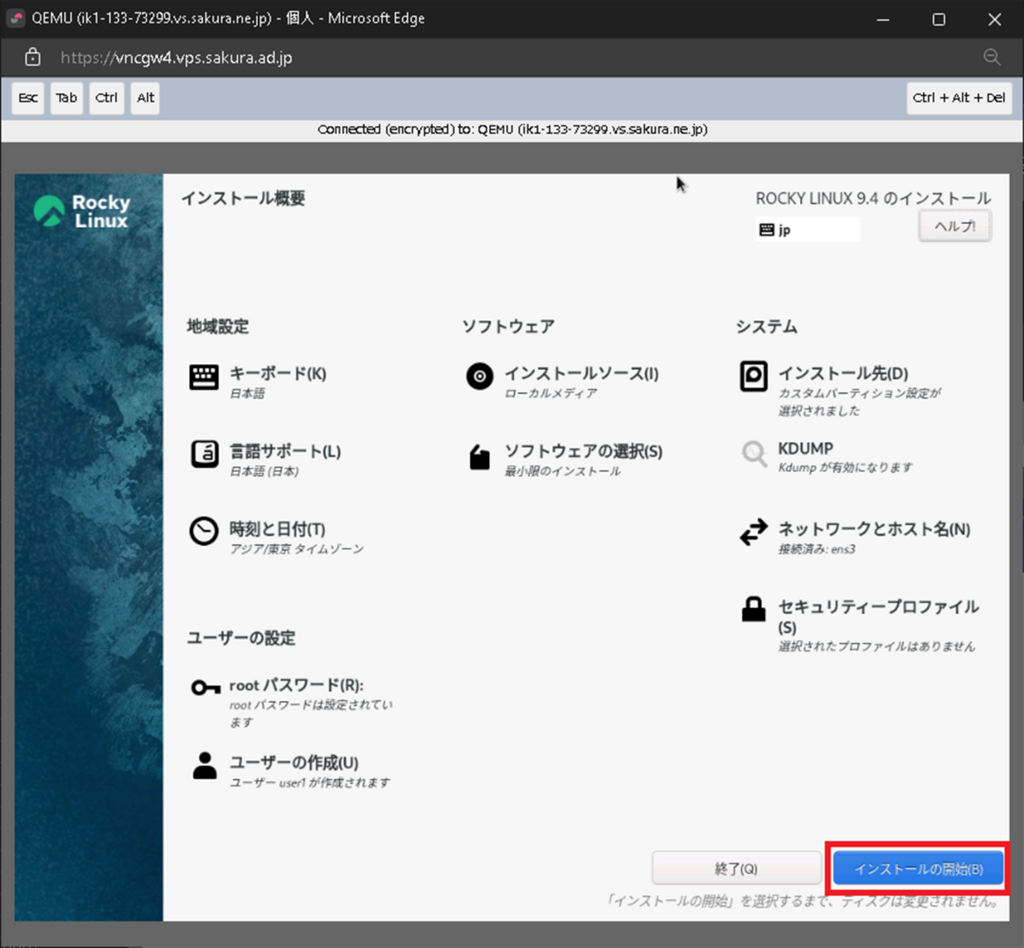
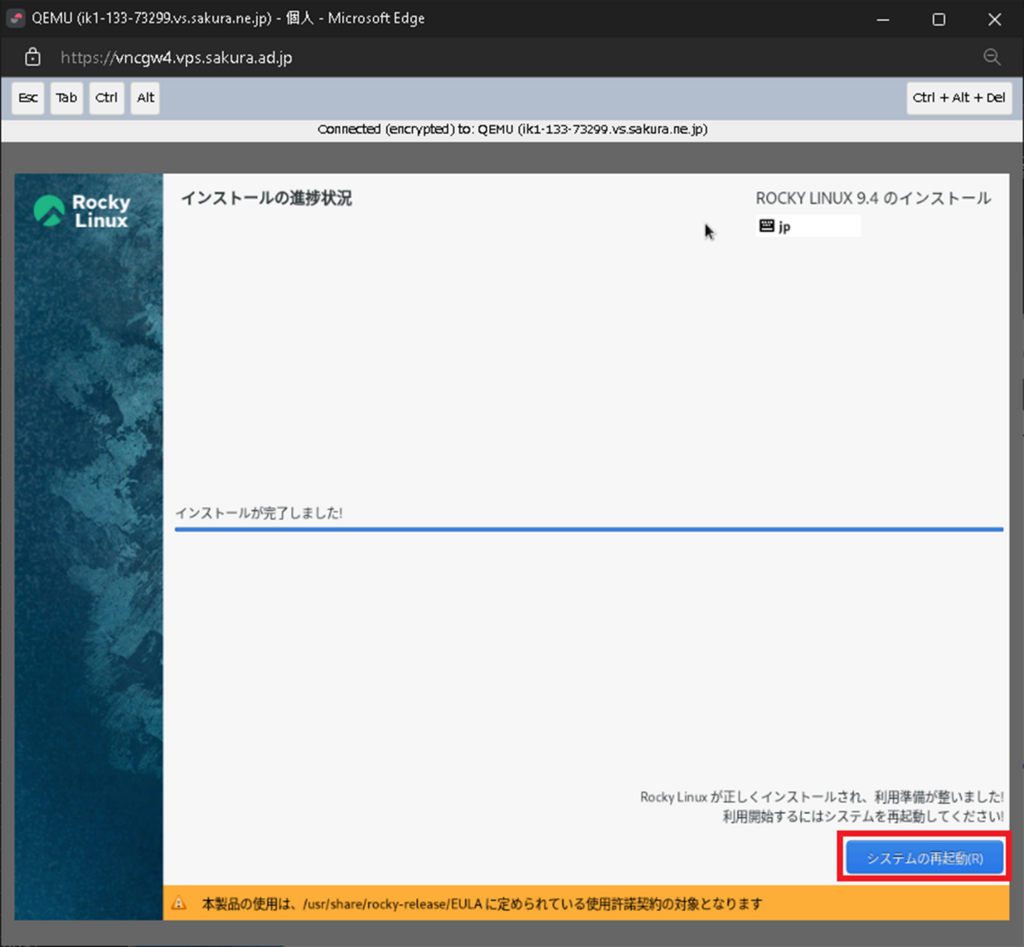
インストールが完了したら「システムの再起動」をクリック。
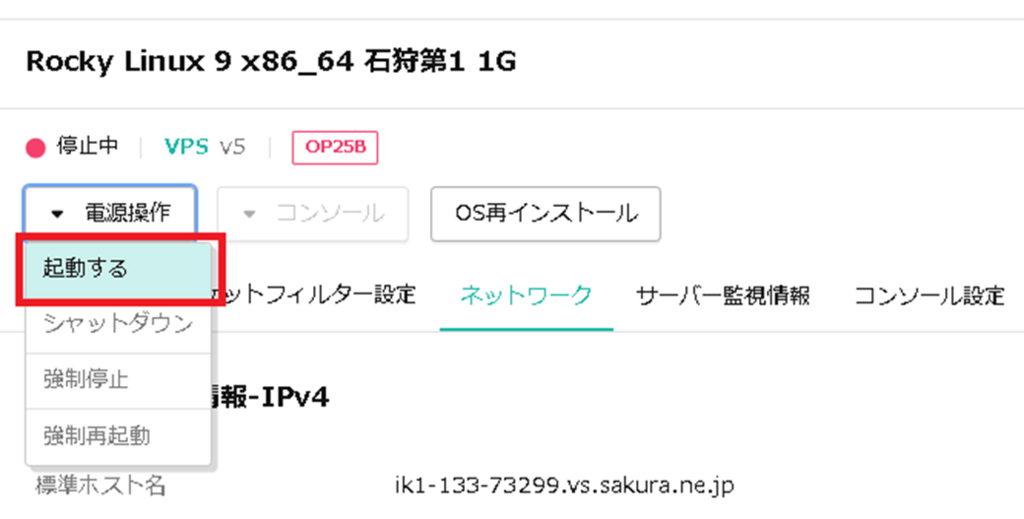
OSインストール時は、シャットダウン後に自動起動しないので、さくらVPSコントロールパネルからOSを起動する。

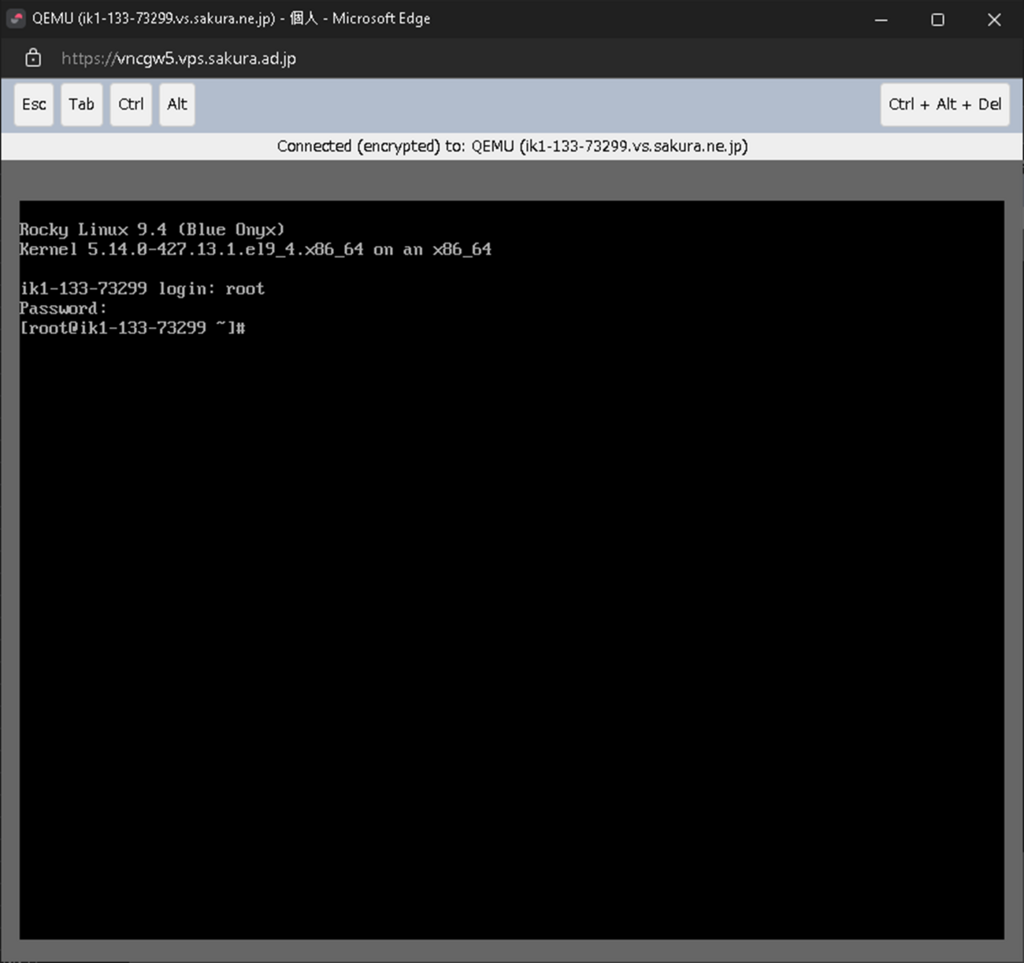
VNSコンソールで、OSが起動し、rootユーザーでログインできることを確認。

ssh接続確認
Puttyからログインできることを確認
IPアドレスとポート番号を入力。
設定は「Save」で保存しておき、次回からは「Load」して「Open」で接続。


メモ。

一般ユーザでログイン。
ユーザ名: u
パスワード: p

rootに変更。「$」が「#」に変われば成功。
|
1 2 3 4 |
$ su - パスワード p |

PuTTYの環境設定を変更して使い易くしておく
Windowsサイズを広げておく。

フォントを「MSゴシック」に変更、サイズを大きくして見易くしておく。

自動切断防止設定。
※さくらVPSだと数分の報知で自動切断される。

文字コードはUTF8に。

NetworkManager設定
使わないNICを削除
ens4 ens5 は使わないNICなので削除。
|
1 2 3 4 |
# nmcli connection delete '有線接続 1' # nmcli connection delete '有線接続 2' |

メモ。

状態を確認
OS再起動後、ssh接続できるか確認。
|
1 2 3 |
# sync;sync;shutdown -r now |
NICの状態を確認。
|
1 2 3 |
# nmcli device status |

メモ
NetworkManager の不要なログを止めたい。
https://blog.neoflow.jp/linux/3229/
無効化。
|
1 2 3 4 |
# systemctl stop NetworkManager # systemctl disable NetworkManager |
有効化する場合。
|
1 2 3 4 |
# systemctl enable NetworkManager # systemctl start NetworkManager |
ログ確認。
|
1 2 3 |
# journalctl -ex |
SELinux設定
ツールをインストール
|
1 2 3 |
# yum install -y policycoreutils-python-utils |
ポリシー変更
SELinux のポリシーに新しいsshポート番号を追加。
|
1 2 3 |
# semanage port --add --type ssh_port_t --proto tcp 10001 |
確認
SELinux が許可しているポート番号を確認する。
|
1 2 3 |
# semanage port --list | grep ssh |

ポリシー変更
localhostのリバースプロキシ接続を許可。
|
1 2 3 |
# setsebool httpd_can_network_connect on -P |
確認
OS再起動後でもssh接続できるか確認。
|
1 2 3 |
# sync;sync;shutdown -r now |
メモ
※22ポートは削除できない。
|
1 2 3 |
# semanage port --delete --type ssh_port_t --proto tcp 22 |
SELinuxを無効化する場合(disabled)。
|
1 2 3 |
# vi /etc/selinux/config |
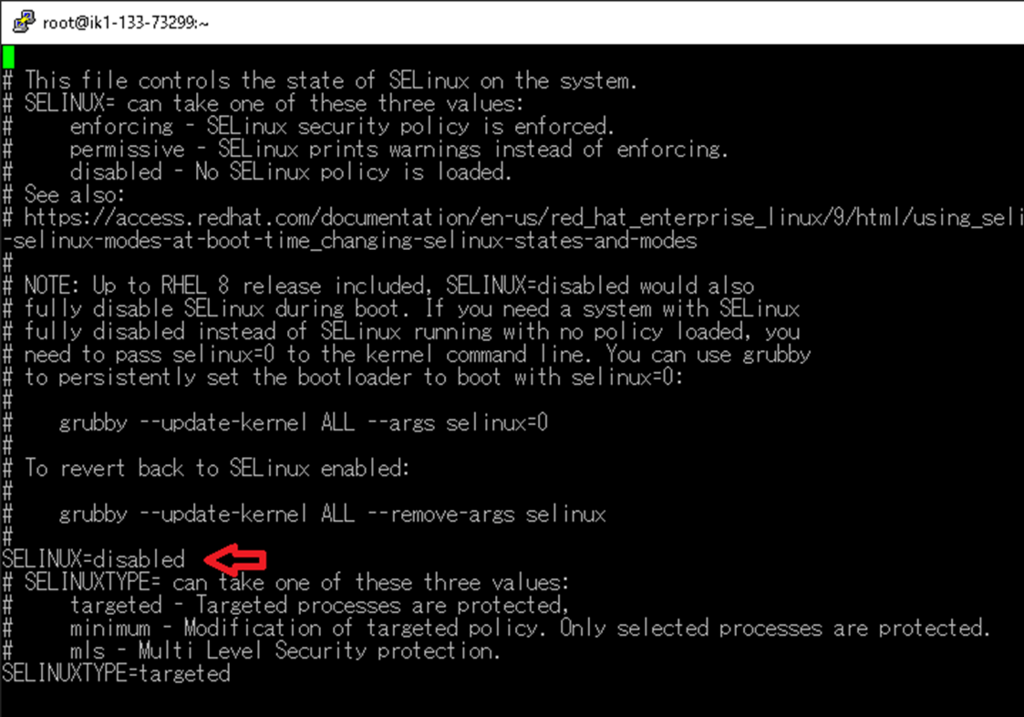
SELinuxの状態確認。
|
1 2 3 |
# getenforce |

ファイアウォール設定
設定変更
httpのポートを開放。 ※Let’s Encript のSSL証明書更新処理がhttpポートを使う。
|
1 2 3 |
# firewall-cmd --add-service=http --zone=public --permanent |
httpsのポートを開放。
|
1 2 3 |
# firewall-cmd --add-service=https --zone=public --permanent |
ping/icmpに応答させない。
|
1 2 3 |
# firewall-cmd --set-target=DROP --permanent |
IPv6は使わないので dhcpv6-client を削除。
|
1 2 3 |
# firewall-cmd --remove-service=dhcpv6-client --zone=public --permanent |
cockpitは削除。
|
1 2 3 |
# firewall-cmd --zone=public --remove-service=cockpit --permanent |
forwardを無効化。
|
1 2 3 |
# firewall-cmd --zone=public --remove-forward --permanent |
PuTTYからLinuxに接続している接続元IPアドレスを確認。
|
1 2 3 |
# ss | grep -E "133.242.203.53" |

接続元IPアドレスに限定して必要なポートを開放。
|
1 2 3 4 |
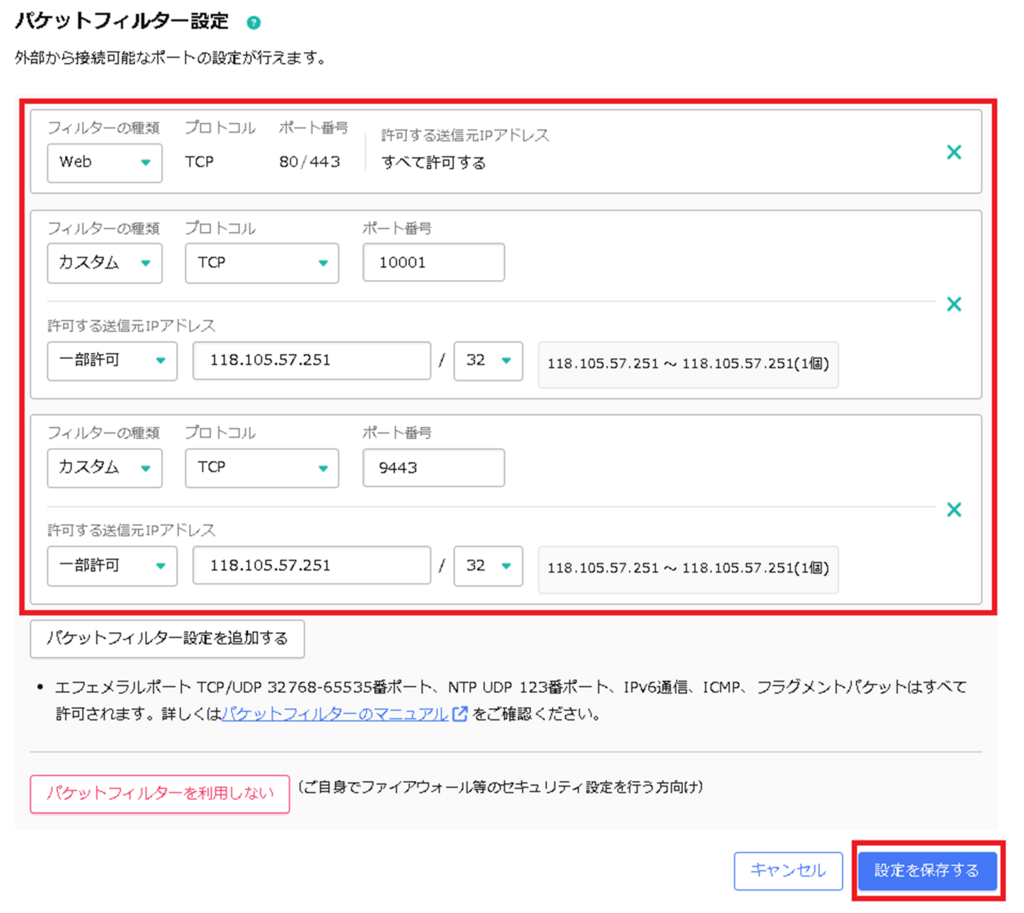
# firewall-cmd --permanent --zone=public --add-rich-rule='rule family=ipv4 source address=118.105.57.251 port protocol=tcp port=10001 accept' # firewall-cmd --permanent --zone=public --add-rich-rule='rule family=ipv4 source address=118.105.57.251 port protocol=tcp port=9443 accept' |
ssh接続のデフォルトポート番号(22)は削除。
|
1 2 3 |
# firewall-cmd --permanent --remove-service=ssh |
ファイアウォールを再起動。
|
1 2 3 |
# systemctl restart firewalld |
確認
設定内容を確認。
※最終的な状態。
|
1 2 3 |
# firewall-cmd --list-all |
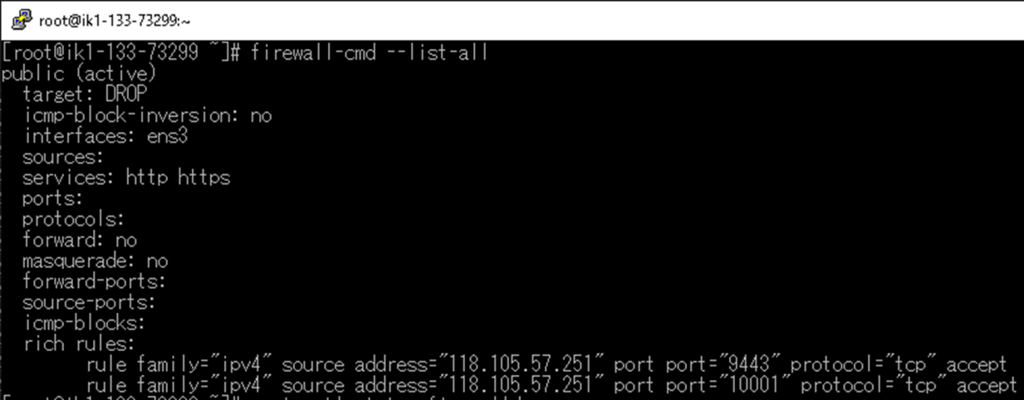
エラーが無いことを確認。
|
1 2 3 |
# systemctl status firewalld |

「runnning」でファイアウォールが有効になっていることを確認。
|
1 2 3 |
# firewall-cmd --state |

「enalbed」で自動起動になっていることを確認。
|
1 2 3 |
# systemctl is-enabled firewalld |

メモ
一時的に無効化。
|
1 2 3 |
# systemctl stop firewalld |
ssh接続ポート番号変更
設定変更
sshd 設定変更。
|
1 2 3 |
# vi /etc/ssh/sshd_config |
新しいポート番号を追加。
rootでのログイン禁止を追加。
|
1 2 3 4 |
Port 10001 PermitRootLogin no |
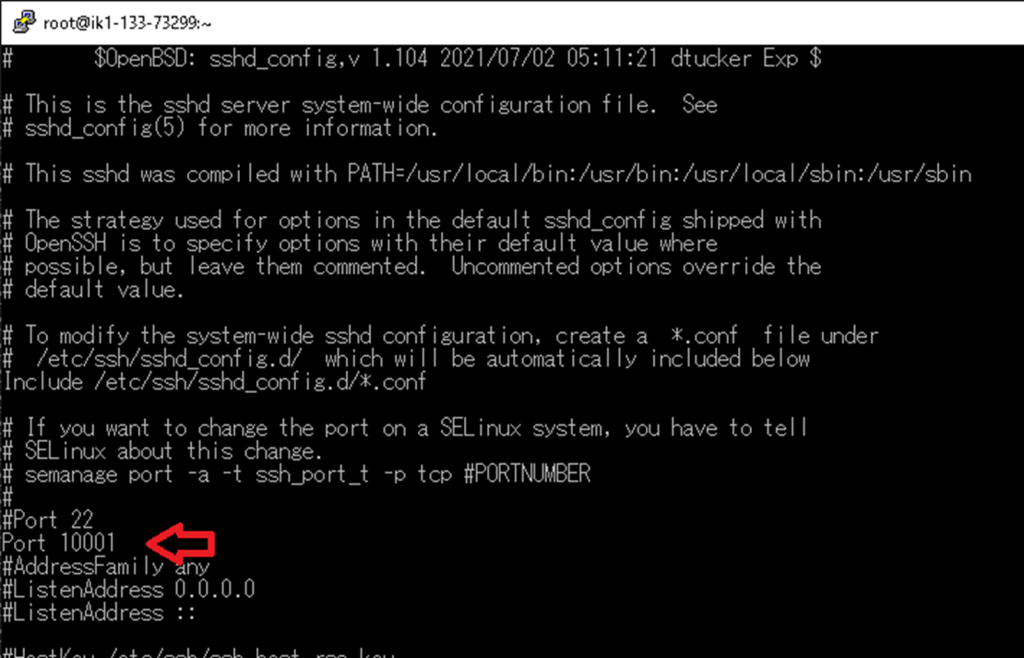

sshd を再起動。
|
1 2 3 |
# systemctl restart sshd |
確認
エラーがないか確認。
|
1 2 3 |
# systemctl status sshd.service |

ssh接続確認
ここまでのネットワーク設定でssh接続できるか再確認。
OS再起動
|
1 2 3 |
# sync;sync;shutdown -r now |
PuTTYで接続
PuTTYで 10001 ポートに接続できるか確認。


PuTTYで 22ポートに接続できなくなっていることを確認。

ssh接続 公開鍵/秘密鍵キー設定
公開鍵/秘密鍵 作成
PuTTYgenで公開鍵/秘密鍵を作成。

「Generate」をクリック。

マウスの動きで乱数生成を行うので,進捗バーが Maxになるまで、ウインドウ上で適当にマウス を動かす。

「key passphrase」を入力し、「public key」で公開鍵をファイル保存、「private key」で秘密鍵をファイル保存する。
key passphrase: p
public key: id_rsa.pub
private key: id_rsa.ppk
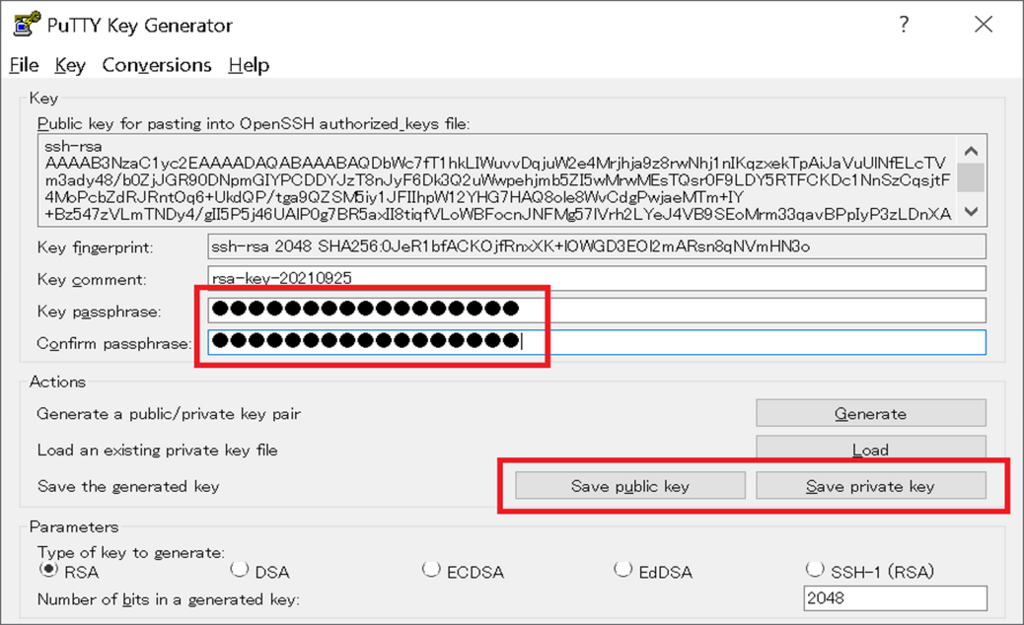
public key(公開鍵)をLinux に登録
WinSCPをパスワード認証で接続。


public keyファイルを、ログインユーザのホームディレクトリにアップロード。
id_rsa.pub

PuTTYでログイン後 キーファイルを変換
一般ユーザー(ログインユーザ)へ切り替え。
|
1 2 3 |
# su - u |
確実にホームディレクトリに移動。
|
1 2 3 |
# cd |
ディレクトリ作成。
|
1 2 3 |
# mkdir .ssh |
自分以外のアクセスを禁止。
|
1 2 3 |
# chmod 700 .ssh/ |
変換。
|
1 2 3 |
# ssh-keygen -i -f id_rsa.pub >> authorized_keys |
公開鍵リスト作成。
|
1 2 3 |
# mv authorized_keys .ssh/authorized_keys |
自分以外の読み書きを禁止。
|
1 2 3 |
# chmod 600 .ssh/authorized_keys |
変換元ファイルを削除。
|
1 2 3 |
# rm -f id_rsa.pub |
確認。
|
1 2 3 4 |
# ll -a # ll -a .ssh |

パスワード認証禁止に設定
rootユーザーに切り替え。
パスワード認証を禁止に変更。
「PasswordAuthentication no」を追加。
|
1 2 3 4 |
# su - # vi /etc/ssh/sshd_config |

sshサービス再起動。
|
1 2 3 |
# systemctl restart sshd |
PuTTY接続を秘密鍵認証に切り替える
古い設定を Loadし名前を変えて Save。

キーファイルを設定。
id_rsa.ppk

Saveで保存し、sshkeyファイル接続専用の設定を増やす。

秘密鍵でログイン出来るか確認。
login as : u
PassPhrase for key : p


WinSCPの接続設定を秘密鍵認証に切り替える
「パスワード」入力欄はブランクで良い。


キーファイルを設定。
id_rsa.ppk

保存。

ログイン。接続時にパスフレーズを入力しログインできるか確認。

PassPhrase for key : p


OS更新
更新
OSをyumでアップデート。
|
1 2 3 |
# yum update |
OS再起動。
|
1 2 3 |
# sync;sync;shutdown -r now |
確認
OSバージョン確認。
|
1 2 3 |
# cat /etc/redhat-release |

必要なツールをインストール
SELinux無効化
SELinuxを一時的に無効化。
|
1 2 3 4 |
# setenforce 0 # getenforce |
インストール
各ツールを1つずつインストール。
|
1 2 3 4 5 6 7 8 9 10 11 |
# yum install gcc pcre-devel zlib-devel # yum install apr-devel # yum install apr-util-devel # yum -y install perl # yum install tar # yum install wget # yum install java-21-openjdk # yum install unzip # yum install zip |
SELinux有効化
SELinuxを有効化。
|
1 2 3 4 |
# setenforce 1 # getenforce |
Javaメモ
OpenJDKは無償で、SiteguardもOpenJDKをインストールする手順になっているので、他のJDKは検討しない。
バージョン確認。
|
1 2 3 |
# java -version |

SiteGuard その1
前準備
VPS SiteGuard Server Edition(WAF)。
https://manual.sakura.ad.jp/vps/server/etc/siteguard.html
マニュアルをダウンロード。
https://manual.sakura.ad.jp/cloud/securearea/siteguardserveredition.html
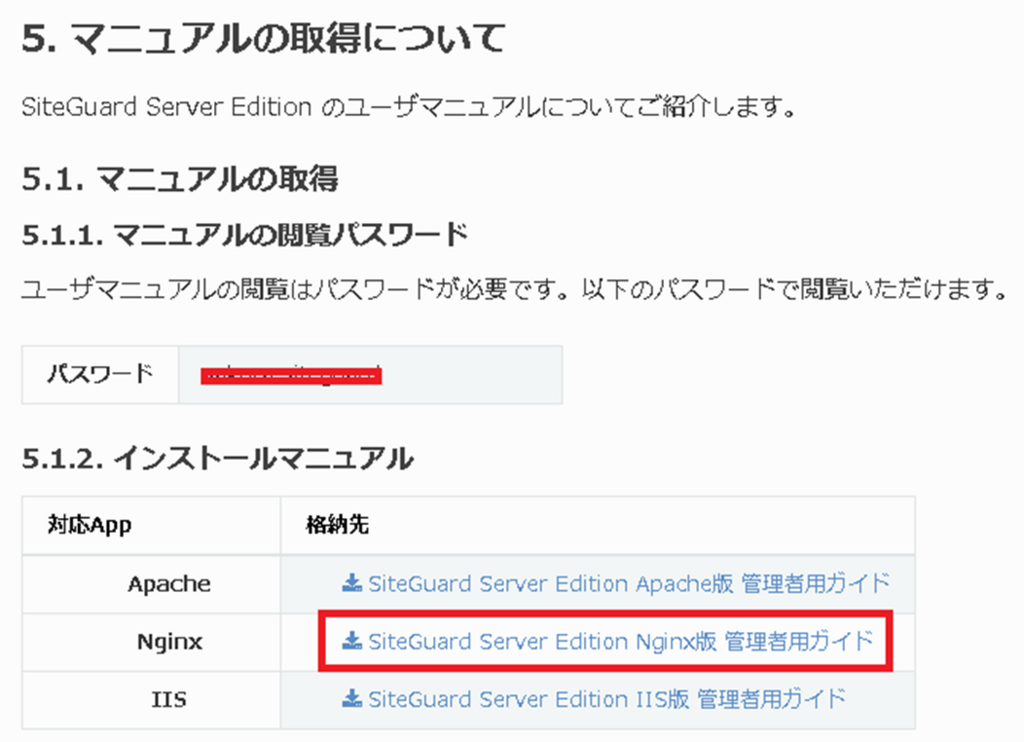
ダウンロードしたマニュアルを開いて作業。
siteguard-server-edition-700-3_nginx.pdf
パスワード、URL、ライセンス情報をローカルにメモしておく。
https://manual.sakura.ad.jp/cloud/securearea/siteguardserveredition.html
SiteGuard インストール
ワークフォルダ作成。
|
1 2 3 4 5 |
# su - # mkdir src # cd src |
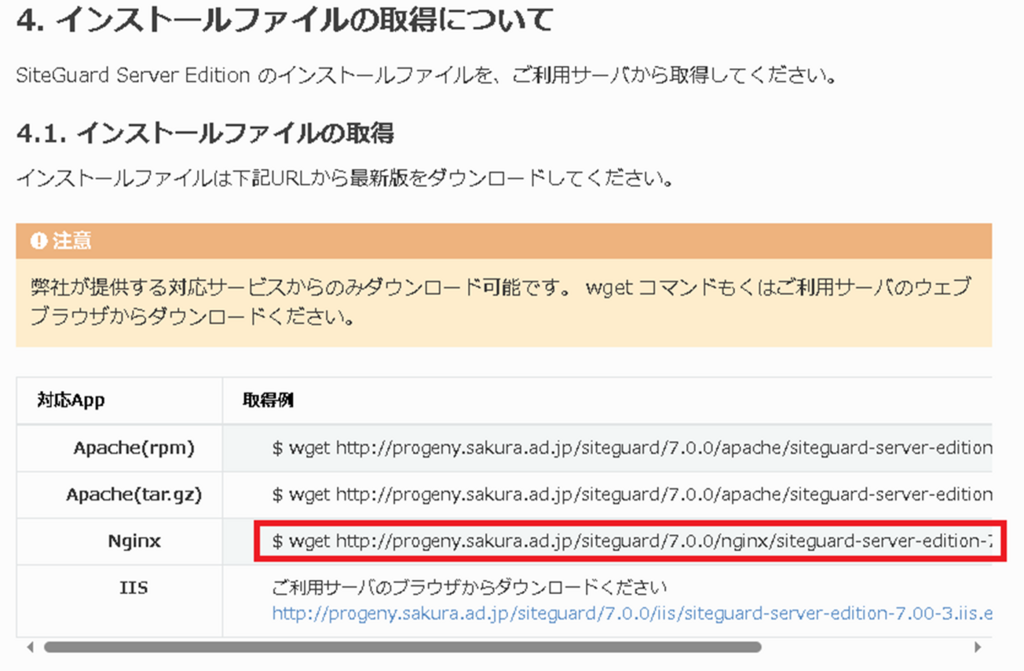
SiteGuardのソースをダウンロード。
|
1 2 3 |
# wget http://progeny.sakura.ad.jp/siteguard/7.0.0/nginx/siteguard-server-edition-7.00-3.nginx.x86_64.tar.gz |
https://manual.sakura.ad.jp/cloud/securearea/siteguardserveredition.html
ソースを解凍。
|
1 2 3 |
# tar -zxvf siteguard-server-edition-7.00-3.nginx.x86_64.tar.gz |
SiteGuard本体をインストール。
SiteGuardインストール先ディレクトリ:/opt/jp-secure/siteguardlite
|
1 2 3 4 |
# cd /root/src/siteguard-server-edition-7.00-3.nginx.x86_64 # make install |
シグネチャ更新URL 変更
シグネチャ更新URL取得。
https://manual.sakura.ad.jp/cloud/securearea/siteguardserveredition.html
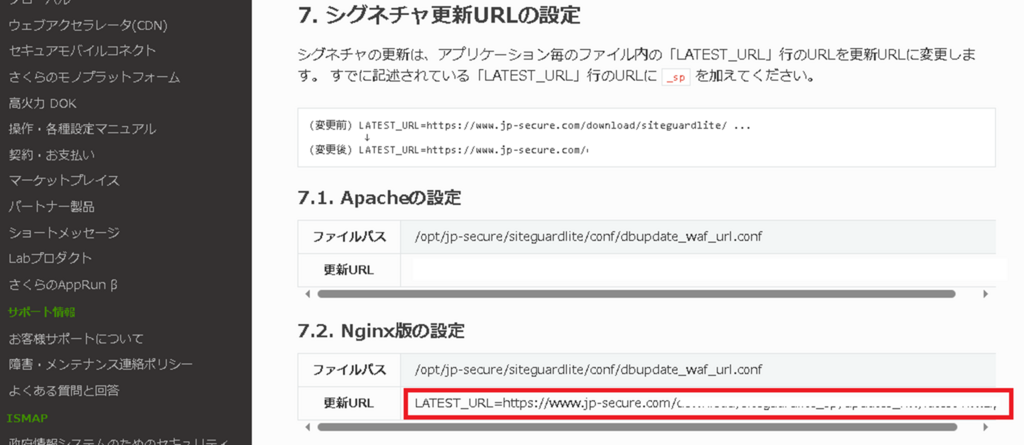
シグネチャ更新URLを変更。
|
1 2 3 |
# vi /opt/jp-secure/siteguardlite/conf/dbupdate_waf_url.conf |

Nginx その1
Nginx用のユーザ追加
Nginxの実行ユーザ作成。
※nologinを指定しているので、コンソールからnginxuserユーザでログインすることはできない。
|
1 2 3 |
# useradd -s /sbin/nologin nginxuser |
ユーザーの確認。
|
1 2 3 4 |
# cat /etc/passwd # id nginxuser |
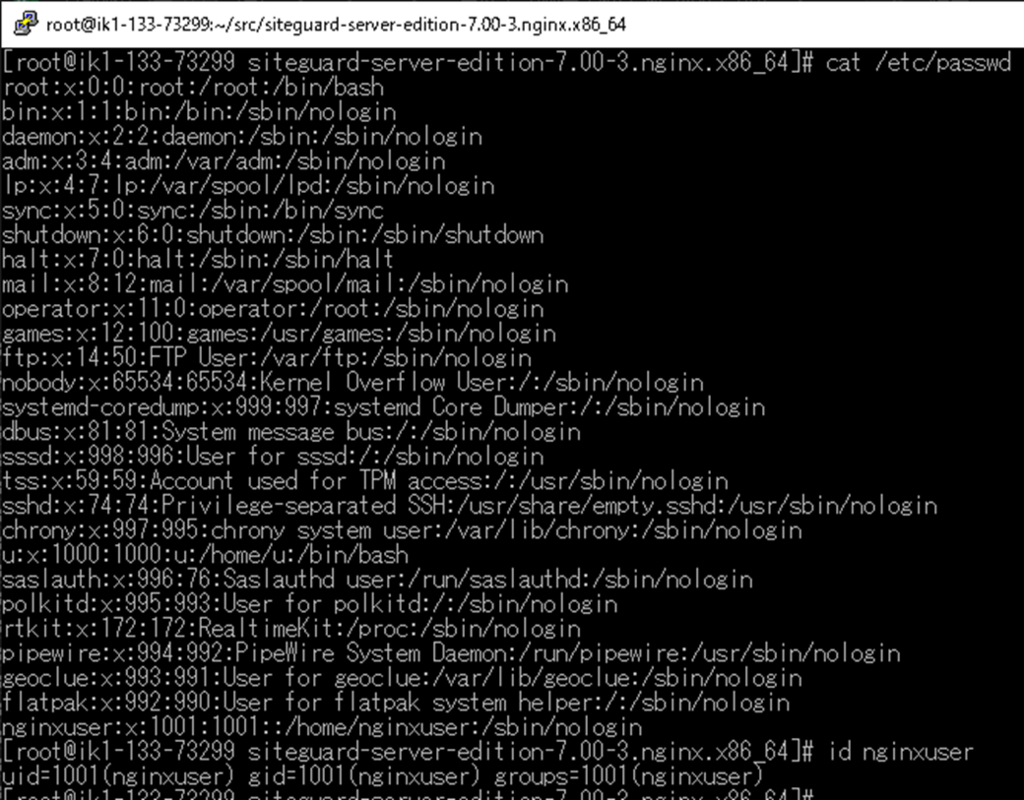
関連フォルダ作成
|
1 2 3 4 5 6 7 8 9 10 11 12 |
# mkdir -p /etc/nginx/ # mkdir -p /etc/nginx/sites-available/ # mkdir -p /etc/nginx/sites-enabled/ # mkdir -p /var/cache/nginx/client_temp # mkdir -p /var/cache/nginx/proxy_temp # mkdir -p /var/cache/nginx/fastcgi_temp # mkdir -p /var/cache/nginx/uwsgi_temp # mkdir -p /var/cache/nginx/scgi_temp # chown -R nginxuser:nginxuser /var/cache/nginx # chmod -R 700 /var/cache/nginx |
バーチャルホスト用設定ファイルの保存先 … sites-available。
有効にするバーチャルホストのリンク設定先 … sites-enabled。
sites-availableディレクトリには全てのバーチャルホスト用設定ファイルを保存します。
sites-enabledディレクトリには有効にするバーチャルホストの設定ファイルに対してシンボリックリンクを設定していきます。
sites-enabledのシンボリックリンクが設定されているバーチャルホストが有効になるイメージです。
ビルド/インストール
Nginx、OpenSSL、ソースダウンロード。
|
1 2 3 4 5 |
# cd /root/src # curl -LO https://nginx.org/download/nginx-1.27.2.tar.gz # curl -LO https://www.openssl.org/source/openssl-3.4.0.tar.gz |
tarファイルを解凍。
|
1 2 3 4 |
# tar xzvf nginx-1.27.2.tar.gz # tar xzvf openssl-3.4.0.tar.gz |
Nginxのソースコードを修正。
※httpレスポンスからNginx情報を削除し、Nginxを使っていることを判別させない。
※これ以上空にするとWEBブラウザでHTMLを処理できない不具合が発生しハマる。ここまで減らせていればNginxを使っているのはバレないので良しとする。
|
1 2 3 |
# vi /root/src/nginx-1.27.2/src/http/ngx_http_header_filter_module.c |
static u_char ngx_http_server_string[] = “Server: nginx” CRLF;
static u_char ngx_http_server_full_string[] = “Server: ” NGINX_VER CRLF;
static u_char ngx_http_server_build_string[] = “Server: ” NGINX_VER_BUILD CRLF;
↓
static u_char ngx_http_server_string[] = “Server: ” CRLF;
static u_char ngx_http_server_full_string[] = “Server: ” CRLF;
static u_char ngx_http_server_build_string[] = “Server: ” CRLF;

configureコマンド実行。
|
1 2 3 4 5 6 7 8 9 10 11 12 13 14 15 16 17 18 19 20 21 22 23 24 25 26 27 28 29 30 31 32 33 34 35 36 37 38 39 40 41 42 43 44 45 46 |
# cd /root/src/nginx-1.27.2 # ./configure \ --prefix=/usr/local/nginx \ --sbin-path=/usr/local/sbin/nginx \ --modules-path=/etc/nginx/modules \ --conf-path=/etc/nginx/nginx.conf \ --error-log-path=/var/log/nginx/error.log \ --http-log-path=/var/log/nginx/access.log \ --pid-path=/var/run/nginx.pid \ --lock-path=/var/run/nginx.lock \ --http-client-body-temp-path=/var/cache/nginx/client_temp \ --http-proxy-temp-path=/var/cache/nginx/proxy_temp \ --http-fastcgi-temp-path=/var/cache/nginx/fastcgi_temp \ --http-uwsgi-temp-path=/var/cache/nginx/uwsgi_temp \ --http-scgi-temp-path=/var/cache/nginx/scgi_temp \ --user=nginxuser \ --group=nginxuser \ --with-compat \ --with-file-aio \ --with-threads \ --with-http_addition_module \ --with-http_auth_request_module \ --with-http_dav_module \ --with-http_flv_module \ --with-http_gunzip_module \ --with-http_gzip_static_module \ --with-http_mp4_module \ --with-http_random_index_module \ --with-http_realip_module \ --with-http_secure_link_module \ --with-http_slice_module \ --with-http_ssl_module \ --with-http_stub_status_module \ --with-http_sub_module \ --with-http_v2_module \ --with-mail \ --with-mail_ssl_module \ --with-stream \ --with-stream_realip_module \ --with-stream_ssl_module \ --with-stream_ssl_preread_module \ --with-openssl=/root/src/openssl-3.4.0 \ --with-openssl-opt=enable-tls1_3 \ --add-module=/opt/jp-secure/siteguardlite/nginx |
Configuration summary。

Nginxインストール。
|
1 2 3 4 |
# make # make install |
組み込みモジュールの確認。
|
1 2 3 |
# nginx -V |

サービス登録
サービスファイルを作成。
|
1 2 3 |
# vi /etc/systemd/system/nginx.service |
ファイルの中身。
|
1 2 3 4 5 6 7 8 9 10 11 12 13 14 15 16 17 18 |
[Unit] Description=nginx - high performance web server Documentation=https://nginx.org/en/docs/ After=network.target [Service] Type=forking PIDFile=/var/run/nginx.pid ExecStartPre=/usr/local/sbin/nginx -t -q -c /etc/nginx/nginx.conf ExecStart=/usr/local/sbin/nginx -c /etc/nginx/nginx.conf ExecReload=/usr/local/sbin/nginx -s reload ExecStop=/usr/local/sbin/nginx -s quit PrivateTmp=true [Install] WantedBy=multi-user.target |
サービスを有効化。
|
1 2 3 |
# systemctl enable nginx.service |
サービスを起動。
|
1 2 3 |
# systemctl start nginx.service |
サービスの状態確認。
|
1 2 3 4 |
# systemctl status nginx.service # systemctl is-enabled nginx.service |
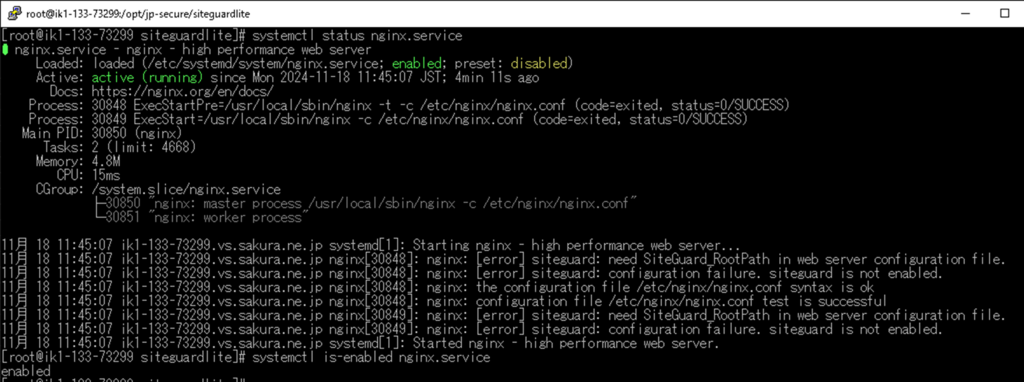
Nginx接続確認
Nginxサービスが起動していれば、外部から接続確認できる。
http://ik1-133-73299.vs.sakura.ne.jp/
http://133.242.203.53/


メモ
confファイルの変更を反映。
# systemctl daemon-reload
サービス停止。
|
1 2 3 |
# systemctl stop nginx.service |
サービス再起動。
|
1 2 3 |
# systemctl restart nginx.service |
SiteGuard無しで試しインストールする場合。
|
1 2 3 4 5 6 7 8 9 10 11 12 13 14 15 16 17 18 19 20 21 22 23 24 25 26 27 28 29 30 31 32 33 34 35 36 37 38 39 40 41 42 43 44 |
# ./configure \ --prefix=/usr/local/nginx \ --sbin-path=/usr/local/sbin/nginx \ --modules-path=/etc/nginx/modules \ --conf-path=/etc/nginx/nginx.conf \ --error-log-path=/var/log/nginx/error.log \ --http-log-path=/var/log/nginx/access.log \ --pid-path=/var/run/nginx.pid \ --lock-path=/var/run/nginx.lock \ --http-client-body-temp-path=/var/cache/nginx/client_temp \ --http-proxy-temp-path=/var/cache/nginx/proxy_temp \ --http-fastcgi-temp-path=/var/cache/nginx/fastcgi_temp \ --http-uwsgi-temp-path=/var/cache/nginx/uwsgi_temp \ --http-scgi-temp-path=/var/cache/nginx/scgi_temp \ --user=nginxuser \ --group=nginxuser \ --with-compat \ --with-file-aio \ --with-threads \ --with-http_addition_module \ --with-http_auth_request_module \ --with-http_dav_module \ --with-http_flv_module \ --with-http_gunzip_module \ --with-http_gzip_static_module \ --with-http_mp4_module \ --with-http_random_index_module \ --with-http_realip_module \ --with-http_secure_link_module \ --with-http_slice_module \ --with-http_ssl_module \ --with-http_stub_status_module \ --with-http_sub_module \ --with-http_v2_module \ --with-mail \ --with-mail_ssl_module \ --with-stream \ --with-stream_realip_module \ --with-stream_ssl_module \ --with-stream_ssl_preread_module \ --with-openssl=/root/src/openssl-3.4.0 \ --with-openssl-opt=enable-tls1_3 |
Nginxをアンインストールする場合。
※「# make uninstall」ではアンインストールできない。
|
1 2 3 4 5 6 7 8 9 10 11 |
# systemctl stop nginx # systemctl disable nginx # rm -rf /usr/local/nginx # rm -f /usr/local/sbin/nginx # rm -rf /etc/nginx # rm -rf /var/log/nginx # rm -rf /var/cache/nginx # rm -f /etc/systemd/system/nginx.service # systemctl daemon-reload |
SiteGuard その2
SiteGuardセットアップ
セットアップ実行
SiteGuardのセットアップを実行し、SiteGuardをNginxでホストする。
|
1 2 3 4 |
# cd /opt/jp-secure/siteguardlite/ # ./setup.sh |
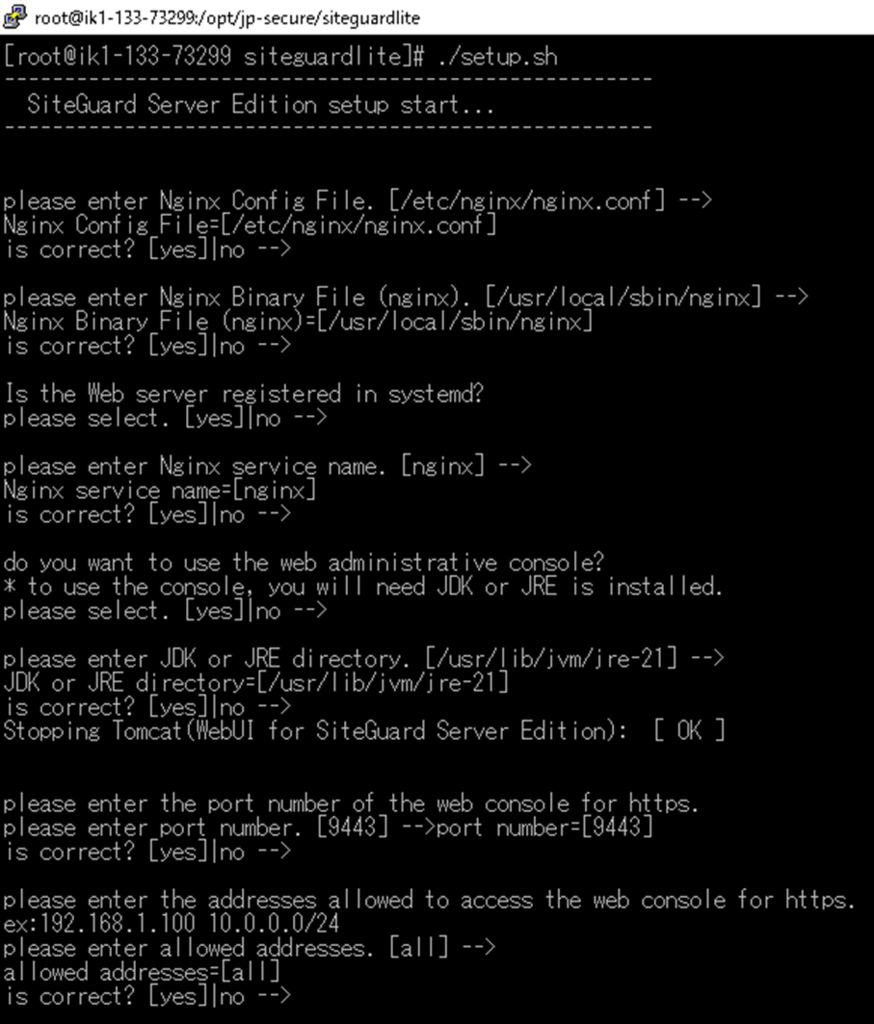
デフォルト設定で問題ないので全てEnter。
|
1 2 3 4 5 6 7 8 9 10 11 12 13 14 15 16 17 18 19 20 21 22 23 24 25 26 27 28 29 30 31 32 33 34 35 36 37 38 39 40 41 42 43 44 45 46 47 48 49 50 51 52 53 54 55 56 57 58 59 60 61 62 63 64 65 66 67 68 69 70 71 72 |
------------------------------------------------------ SiteGuard Server Edition setup start... ------------------------------------------------------ please enter Nginx Config File. [/etc/nginx/nginx.conf] --> Nginx Config File=[/etc/nginx/nginx.conf] is correct? [yes]|no --> please enter Nginx Binary File (nginx). [/usr/local/sbin/nginx] --> Nginx Binary File (nginx)=[/usr/local/sbin/nginx] is correct? [yes]|no --> Is the Web server registered in systemd? please select. [yes]|no --> please enter Nginx service name. [nginx] --> Nginx service name=[nginx] is correct? [yes]|no --> do you want to use the web administrative console? * to use the console, you will need JDK or JRE is installed. please select. [yes]|no --> please enter JDK or JRE directory. [/usr/lib/jvm/jre-21] --> JDK or JRE directory=[/usr/lib/jvm/jre-21] is correct? [yes]|no --> Stopping Tomcat(WebUI for SiteGuard Server Edition): [ OK ] please enter the port number of the web console for https. please enter port number. [9443] -->port number=[9443] is correct? [yes]|no --> please enter the addresses allowed to access the web console for https. ex:192.168.1.100 10.0.0.0/24 please enter allowed addresses. [all] --> allowed addresses=[all] is correct? [yes]|no --> do you change the ssl certificate files? please select. yes|[no] --> update server config file done. ------------------------------------------------------ check if the ssl settings on admin console are appropriate.... ------------------------------------------------------ Skip the SSL protocol setting process(03). update Makefile done. ------------------------------------------------------ Starting services... ------------------------------------------------------ Starting Tomcat(WebUI for SiteGuard Server Edition): [ OK ] Nginx restart. Are you sure? [yes]|no -->Stopping : [ OK ] ------------------------------------------------------ clear tmp files ------------------------------------------------------ removing tmp files ... done. starting web server ... Starting : [ OK ] Nginx restart done. ------------------------------------------------------ finished SiteGuard Server Edition setup ------------------------------------------------------ Please access following URL for starting service. https://ik1-133-73299.vs.sakura.ne.jp:9443/ (default user:admin, default password:admin) ------------------------------------------------------ SiteGuard Server Edition setup done... ------------------------------------------------------ |

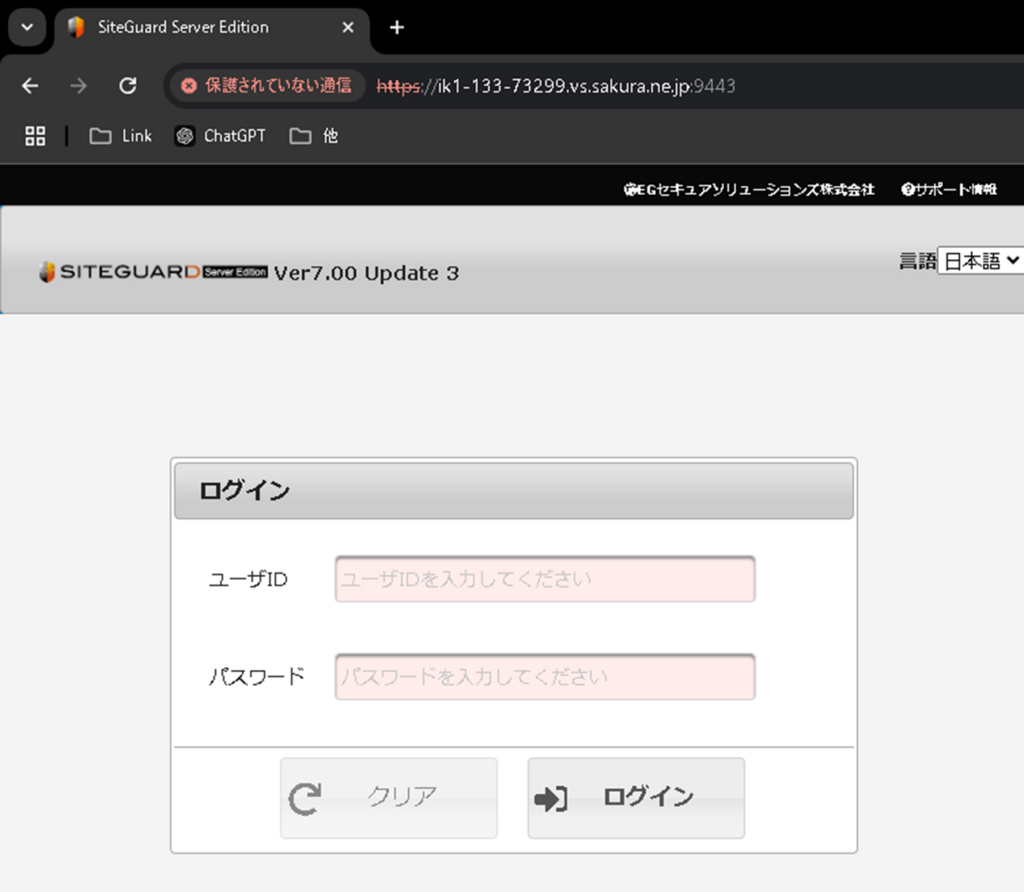
接続確認
SiteGuardのWebコンソールに接続できるか確認。
https://ik1-133-73299.vs.sakura.ne.jp:9443
SiteGuard設定(Webコンソール)
WebコンソールからSiteGuardを設定。
入力値はマニュアル(siteguard-server-edition-700-3_nginx.pdf)に記載されてる。
https://ik1-133-73299.vs.sakura.ne.jp:9443
ログイン
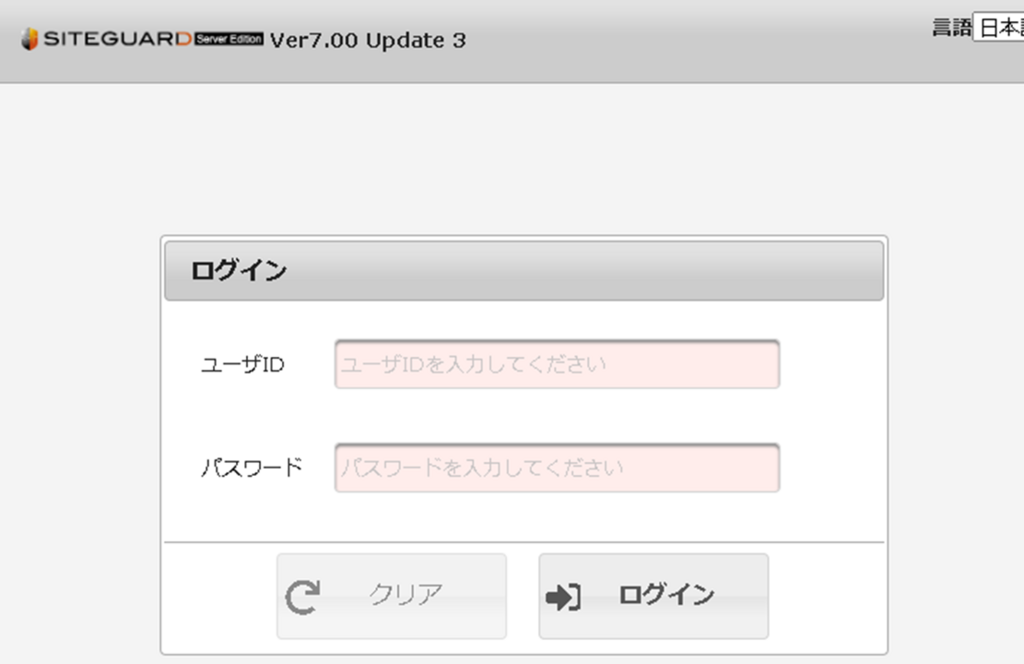
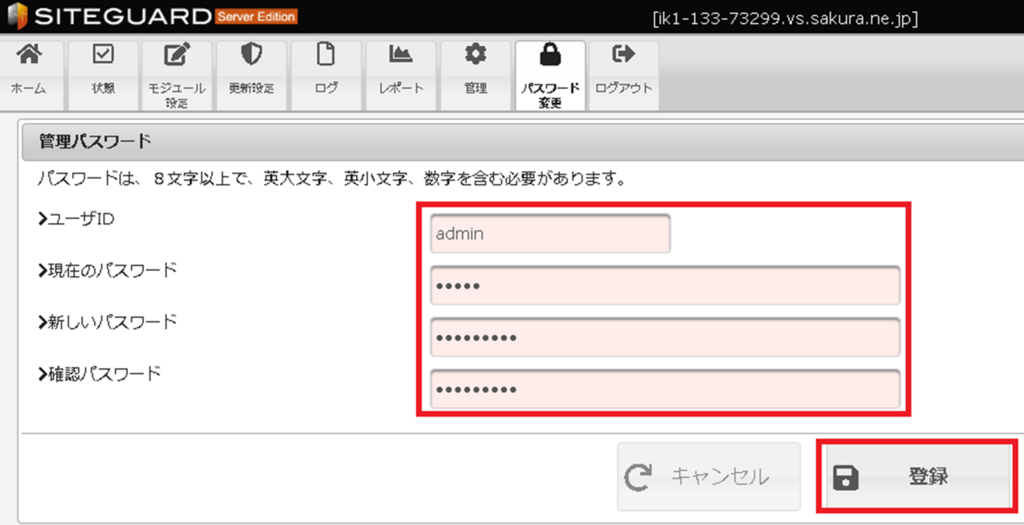
管理パスワードを登録。
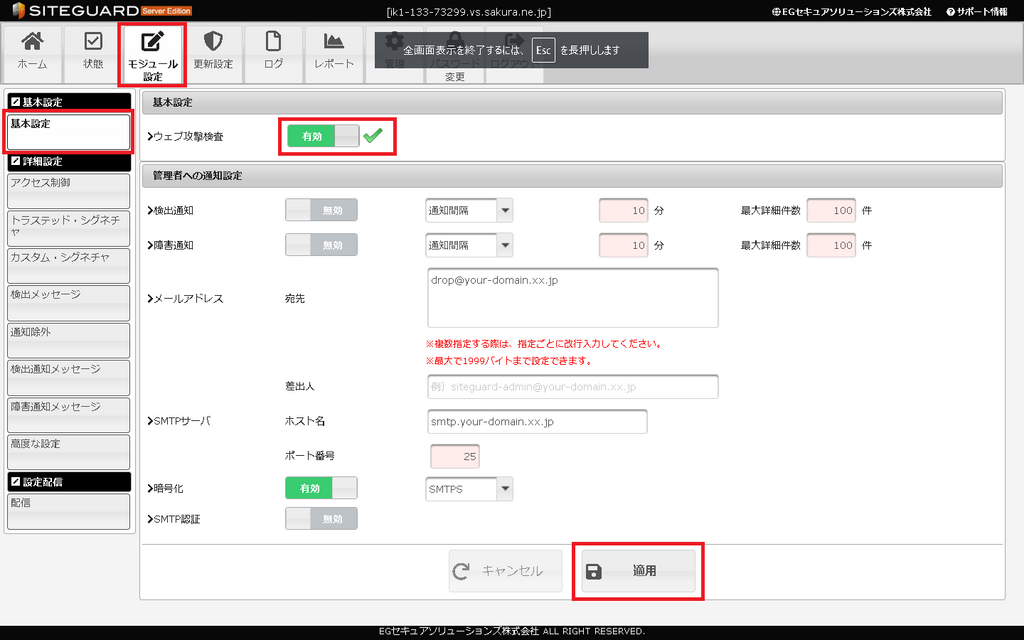
基本設定
「ウェブ攻撃検査」を有効にする。

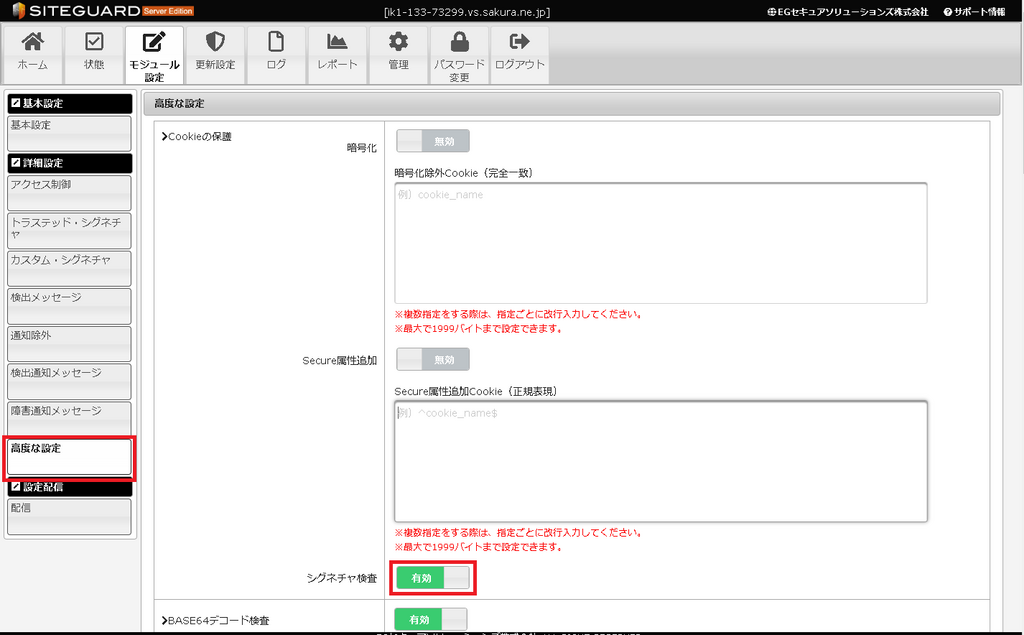
高度な設定
「シグネチャ検査」「URLデコードエラー検出」を有効にする。


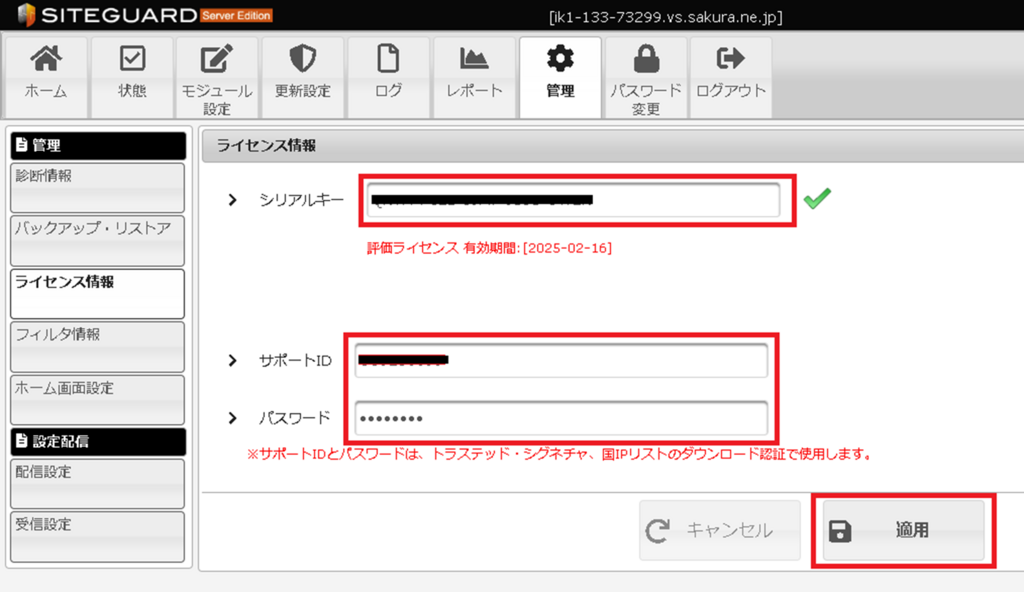
ライセンス情報
ライセンスの入力値はさくらVPSのWEBサイトに記載されてる。
https://manual.sakura.ad.jp/cloud/securearea/siteguardserveredition.html
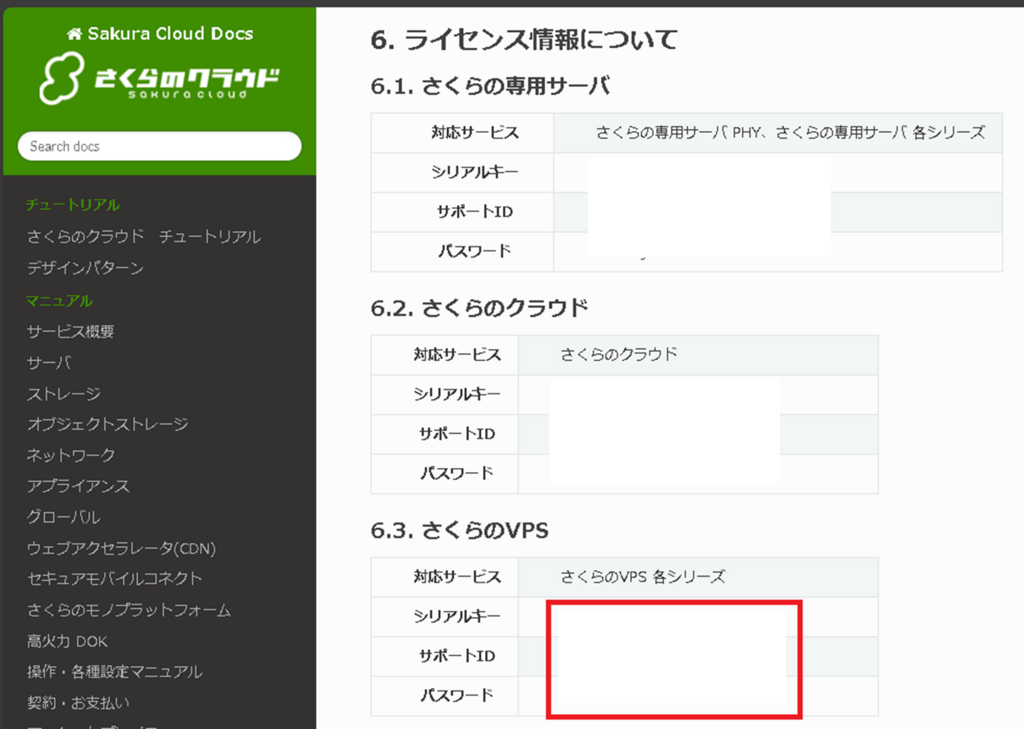
登録。

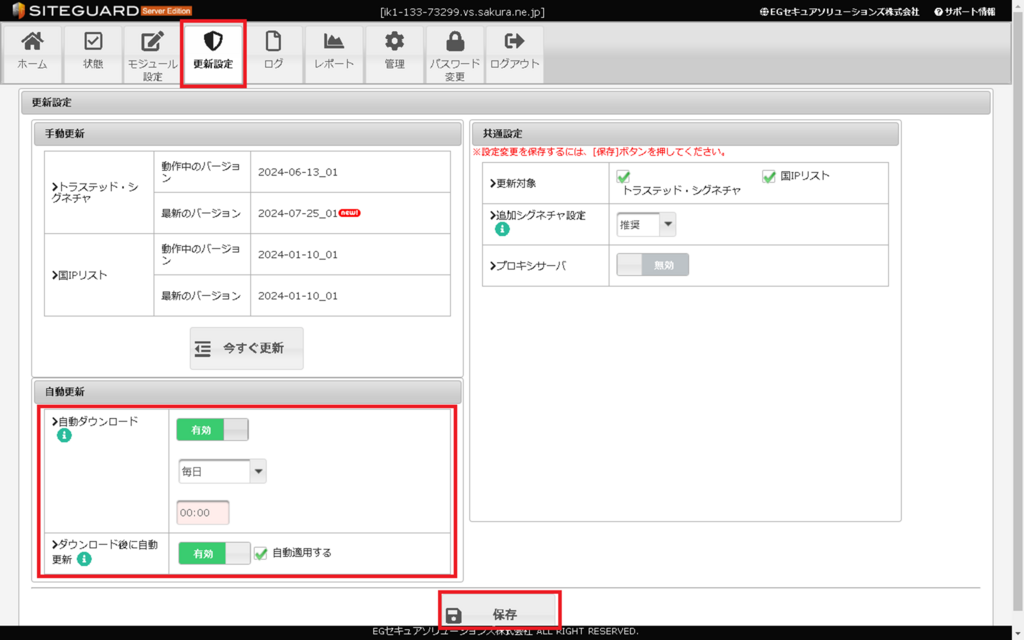
更新設定
「自動ダウンロード」「ダウンロード後に自動更新」を有効にする。

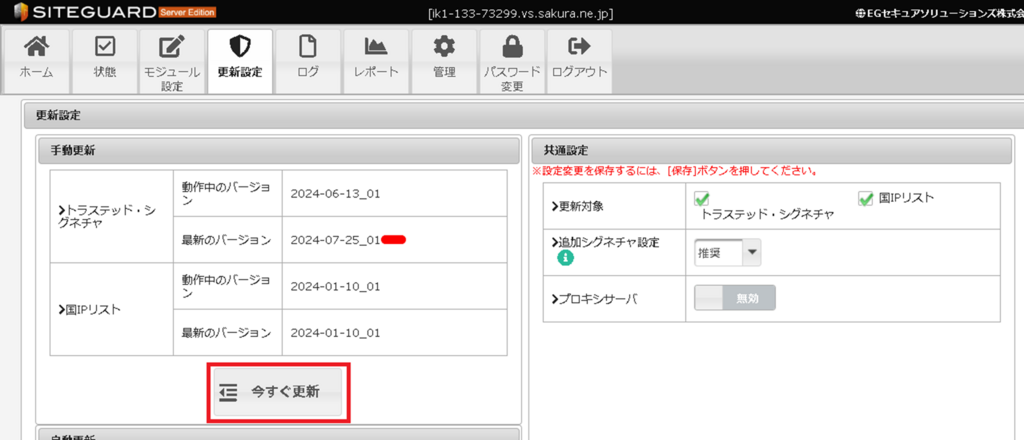
シグネチャを最新に更新する。

ASP.NET Core
フォルダ作成
Workフォルダ作成。
|
1 2 3 |
# mkdir -p /work/bak/aspnet/WebApplication1 |
Webアプリデプロイ先のフォルダ作成。
|
1 2 3 |
# mkdir -p /var/aspnet/WebApplication1 |
コンテンツ配置用ディレクトリ作成。 「メンテナンス中」などの静的htmlファイルなど。
|
1 2 3 |
# mkdir -p /var/www/WebApplication1 |
ASP.NET Coreインストール
Microsoft のパッケージ署名キーのインストール。
|
1 2 3 |
# rpm -Uvh https://packages.microsoft.com/config/centos/8/packages-microsoft-prod.rpm |

.NET 8.0 ASP.NET Core の Runtimeをインストール。
|
1 2 3 |
# dnf install aspnetcore-runtime-8.0 -y |
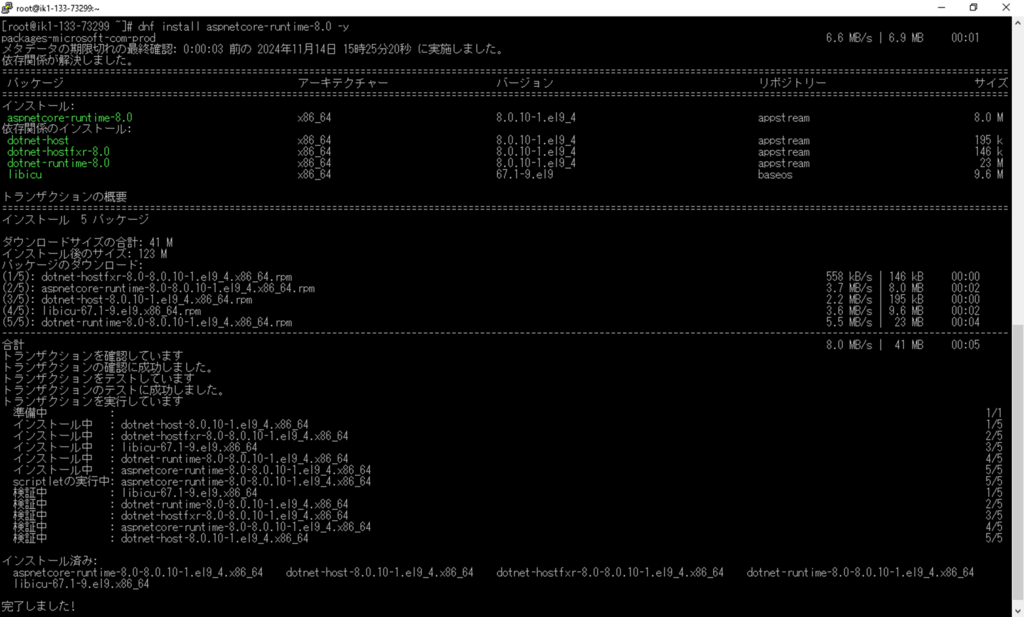
バージョン確認。
|
1 2 3 |
# /usr/bin/dotnet --info |
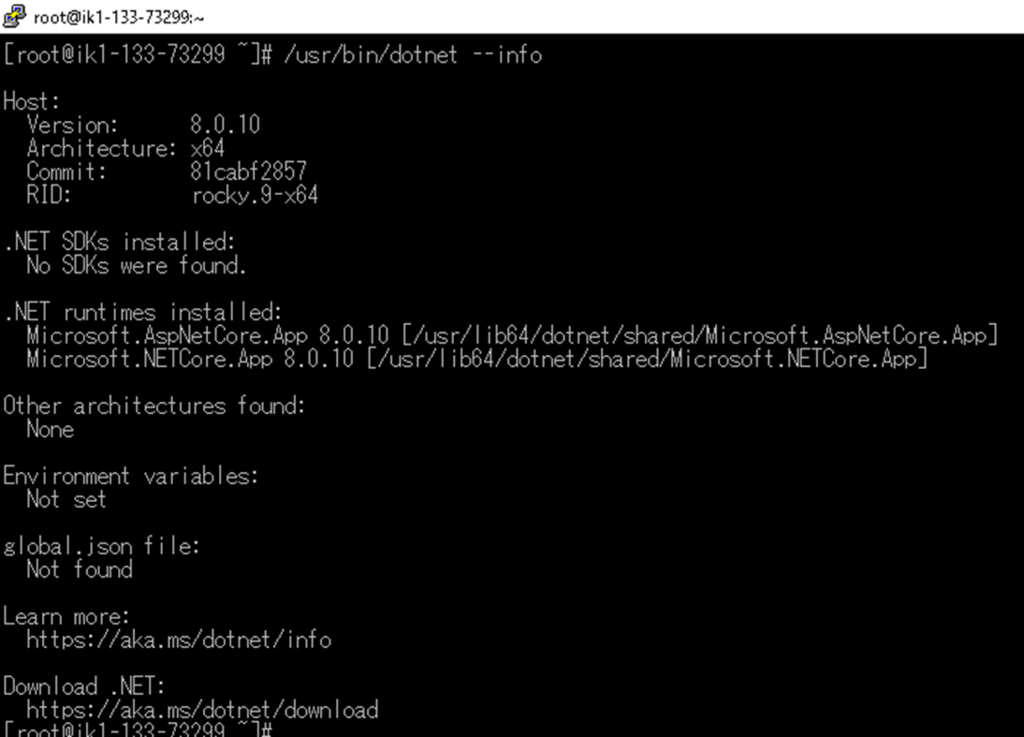
デプロイ(発行)
ローカルの開発PCで作業
発行設定
前回作成した .NET 8.0 + ASP.NET Core(MVC) + ApexCharts + Dapper + SQLite で実装する 注釈付きグラフ表示処理 のWEBアプリの発行設定。

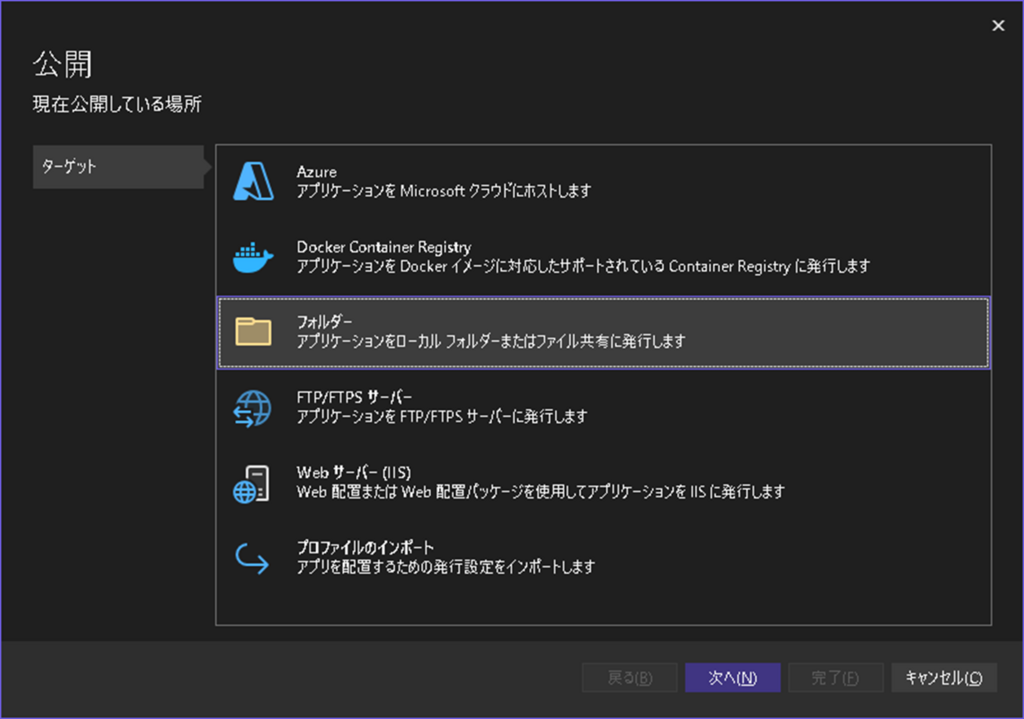
「フォルダー」を選択し次へ。
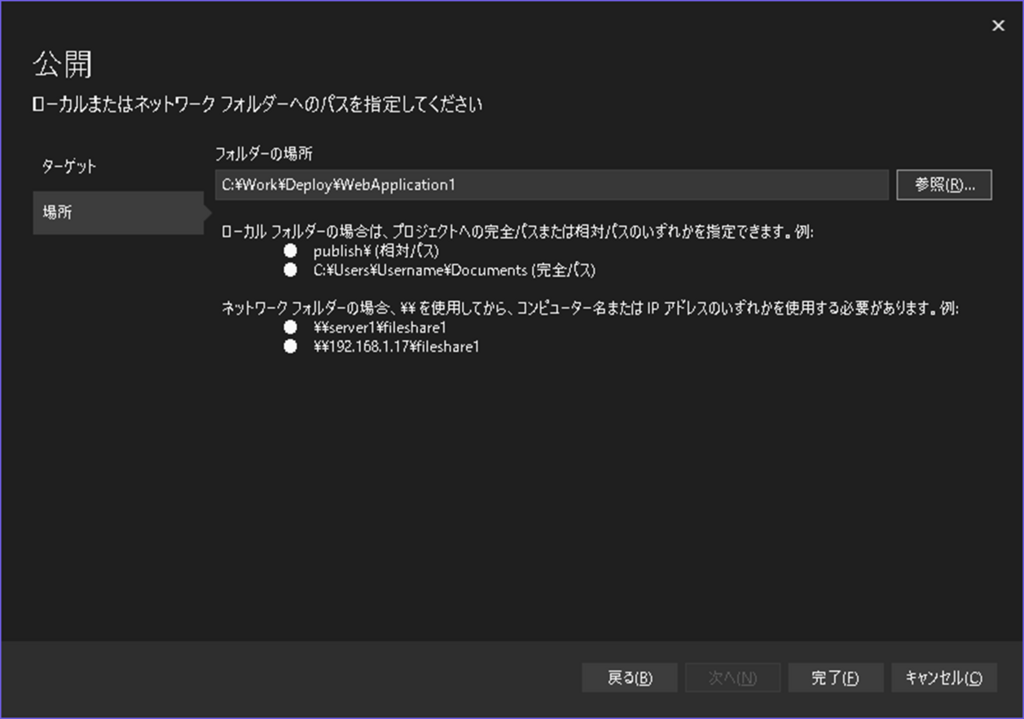
「フォルダーの場所」を入力し完了。
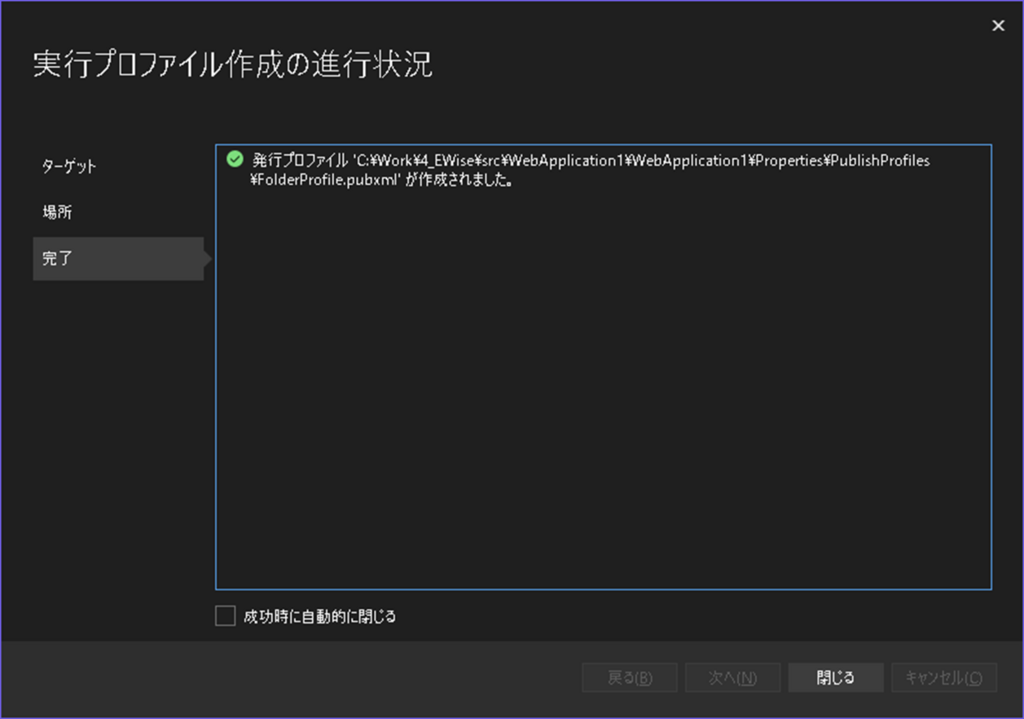
「すべての設定を表示」をクリック。
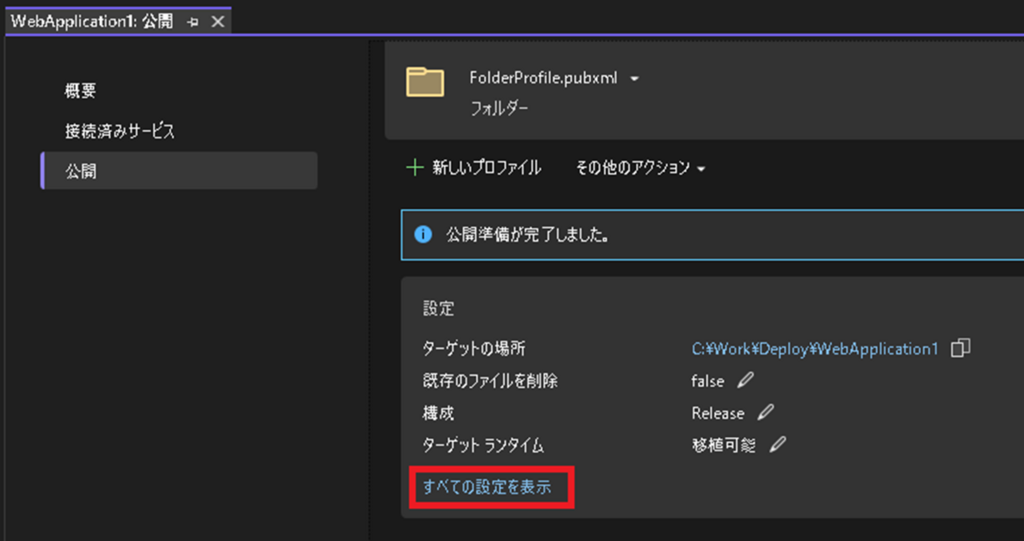
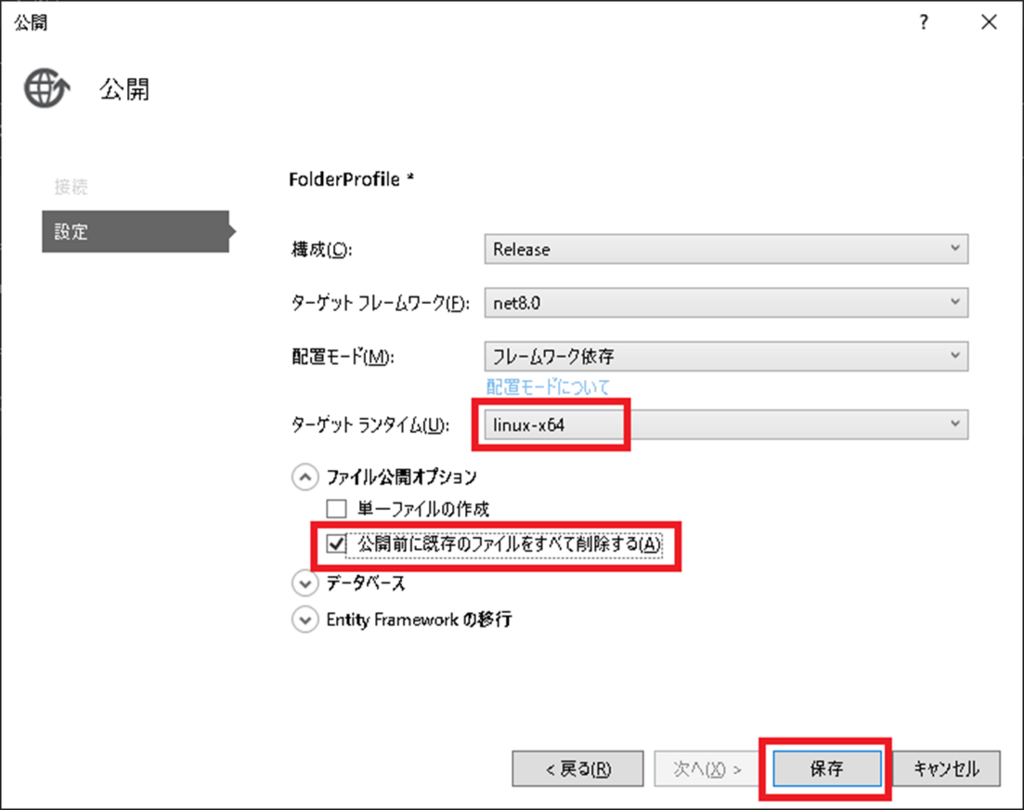
「ターゲット ランタイム」を「linux-x64」に変更。
「公開前に既存のファイルを全て削除する」をチェック有りにする。
「保存」をクリック。
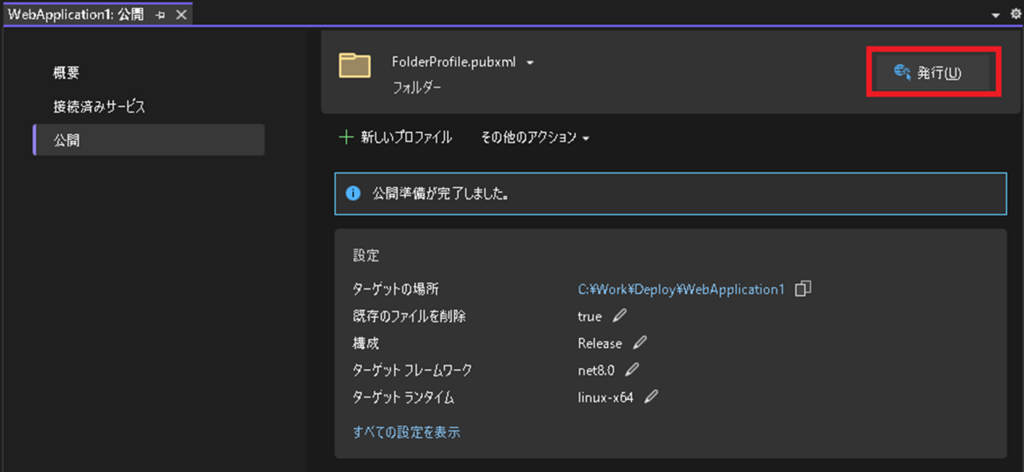
発行
「発行」をクリック。
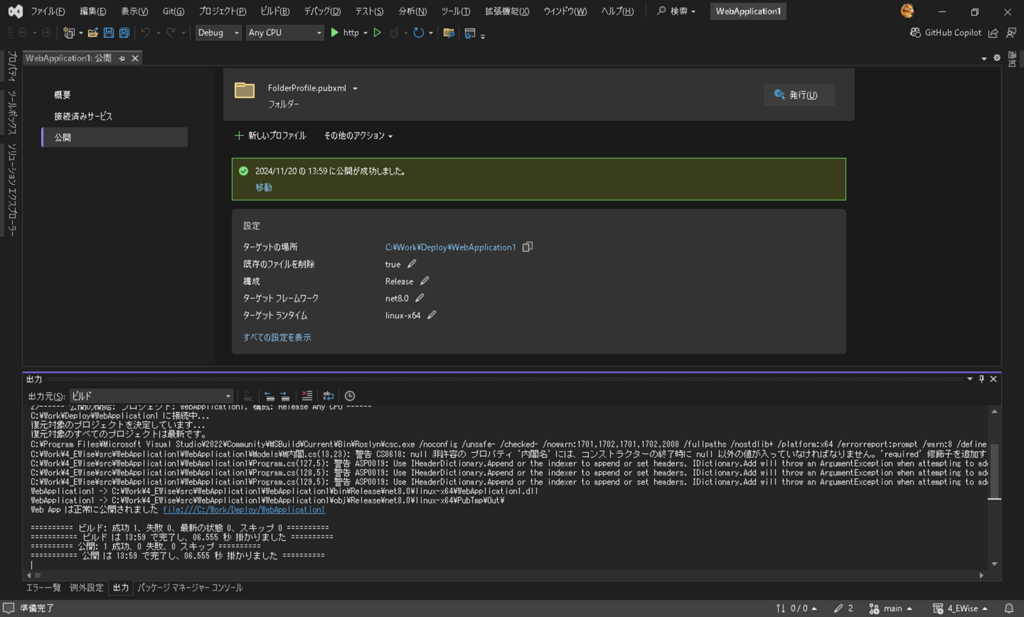
発行が正常終了した事を確認。
発行されたファイルを調整
appsettings.Development.json ファイルは不要なので削除。
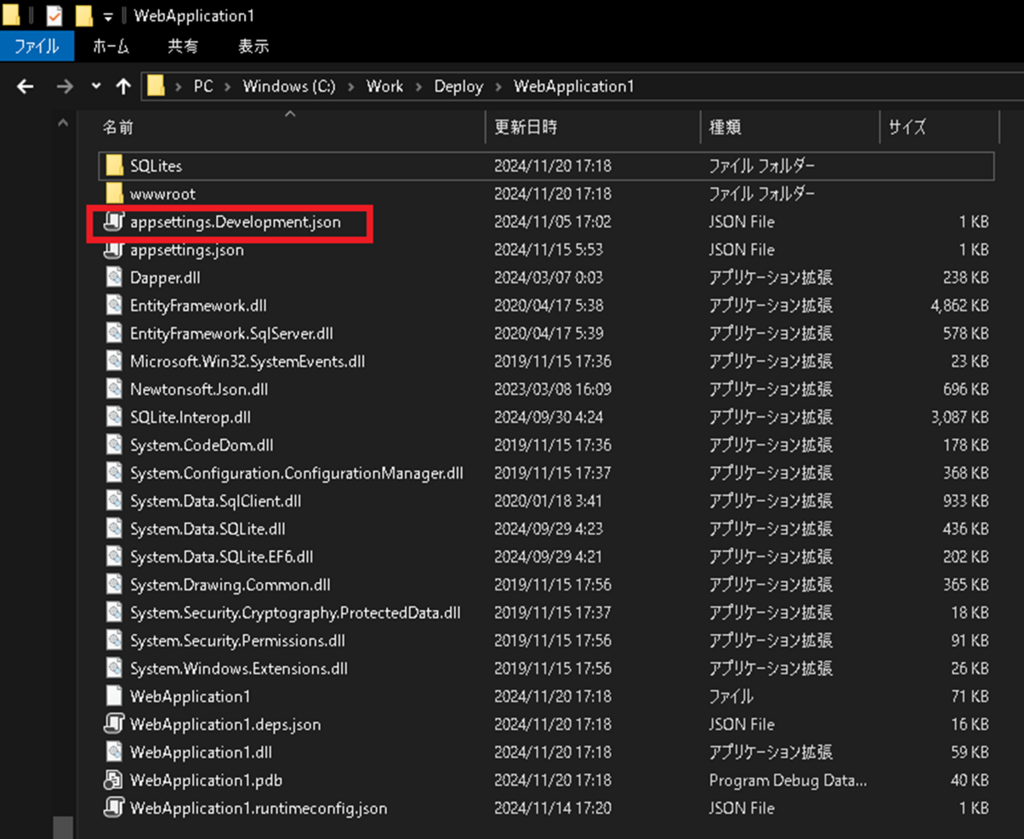
appsettings.json ファイルを開き、コネクションストリングのパスを Linux側に合わせる。
修正前。
|
1 2 3 4 5 |
"ConnectionStrings": { "DefaultConnection": "Data Source=.\\SQLites\\EWise.db;;Version=3;Pooling=True;Max Pool Size=100;;BusyTimeout=5000;Synchronous=OFF;" }, |
修正後。
|
1 2 3 4 5 |
"ConnectionStrings": { "DefaultConnection": "Data Source=/var/aspnet/WebApplication1/SQLites/EWise.db;;Version=3;Pooling=True;Max Pool Size=100;;BusyTimeout=5000;Synchronous=OFF;" }, |

Linuxへアップロード
WinSCPでログイン。


発行したフォルダを、ユーザーのホームディレクトリ(/home/u/)配下へドラッグ&ドロップ。
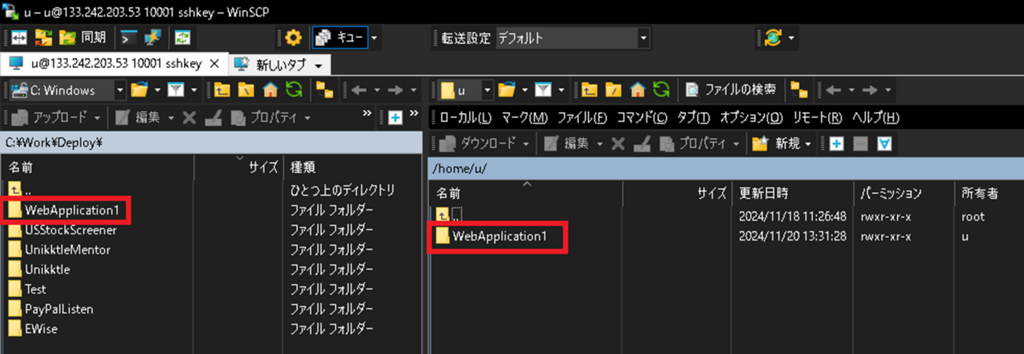
Linuxで作業
アップロードしたフォルダを移動
ユーザーのホームディレクトリへアップロードした発行フォルダを、/var/aspnet/ディレクトリ配下へ移動。
|
1 2 3 |
# mv -fTv /home/u/WebApplication1 /var/aspnet/WebApplication1 |
WEBアプリ起動テスト
Webアプリを単体起動し、エラーが発生しない事を確認。
※WEBアプリのサービス登録後は、サービスを停止してから単体起動しないとエラーになる。
|
1 2 3 |
# /usr/bin/dotnet /var/aspnet/WebApplication1/WebApplication1.dll --urls=http://localhost:12000 |
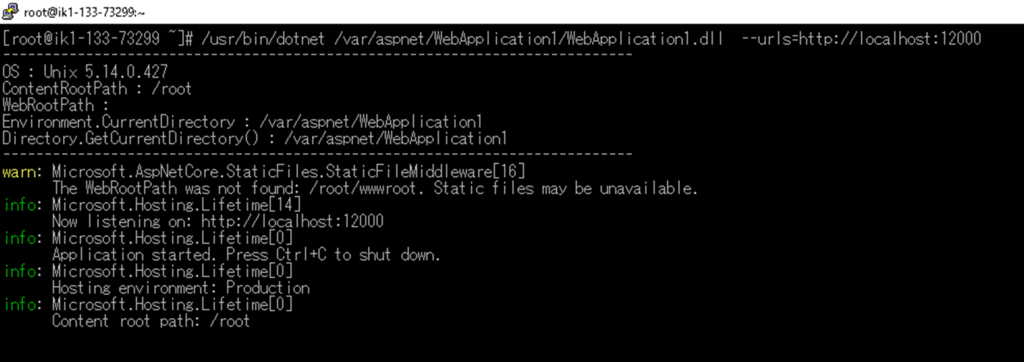
Webサービス登録
Webサービス設定ファイル作成。
|
1 2 3 |
# vi /etc/systemd/system/WebApplication1.service |
WebApplication1.serviceファイルの中身。
|
1 2 3 4 5 6 7 8 9 10 11 12 13 14 15 16 17 |
[Unit] Description=WebApplication1 web application [Service] WorkingDirectory=/var/aspnet/WebApplication1/ ExecStart=/usr/bin/dotnet /var/aspnet/WebApplication1/WebApplication1.dll --urls=http://localhost:12000 Restart=always RestartSec=10 KillSignal=SIGINT SyslogIdentifier=WebApplication1_Web User=root Environment=DOTNET_PRINT_TELEMETRY_MESSAGE=false [Install] WantedBy=multi-user.target |
Webアプリをサービスとして登録し、OS起動時に自動起動する。
|
1 2 3 |
# systemctl enable WebApplication1.service |

サービス再起動。
|
1 2 3 |
# systemctl restart WebApplication1.service |
サービスの状態を確認。
|
1 2 3 |
# systemctl status WebApplication1.service |

WEBサービス接続テスト
サービス登録したWEBサイトに対し、httpリクエストできることを確認。
|
1 2 3 |
# curl http://localhost:12000 |
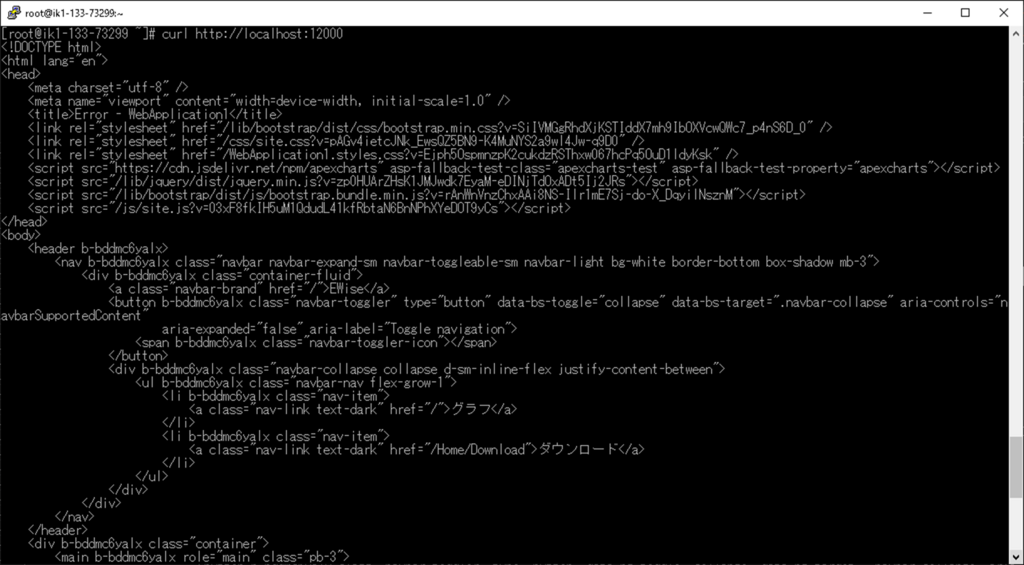
Nginx その2
nginx.conf 編集前
修正前の状態を確認。
|
1 2 3 |
# vi /etc/nginx/nginx.conf |
|
1 2 3 4 5 6 7 8 9 10 11 12 13 14 15 16 17 18 19 20 21 22 23 24 25 26 27 28 29 30 31 32 33 34 35 36 37 38 39 40 41 42 43 44 45 46 47 48 49 50 51 52 53 54 55 56 57 58 59 60 61 62 63 64 65 66 67 68 69 70 71 72 73 74 75 76 77 78 79 80 81 82 83 84 85 86 87 88 89 90 91 92 93 94 95 96 97 98 99 100 101 102 103 104 105 106 107 108 109 110 111 112 113 114 115 116 117 118 119 |
#user nobody; worker_processes 1; #error_log logs/error.log; #error_log logs/error.log notice; #error_log logs/error.log info; #pid logs/nginx.pid; events { worker_connections 1024; } http { include /opt/jp-secure/siteguardlite/conf/siteguardlite.conf; include /opt/jp-secure/siteguardlite/conf/nginx.conf.siteguardlite_admin_ssl; include mime.types; default_type application/octet-stream; #log_format main '$remote_addr - $remote_user [$time_local] "$request" ' # '$status $body_bytes_sent "$http_referer" ' # '"$http_user_agent" "$http_x_forwarded_for"'; #access_log logs/access.log main; sendfile on; #tcp_nopush on; #keepalive_timeout 0; keepalive_timeout 65; #gzip on; server { listen 80; server_name localhost; #charset koi8-r; #access_log logs/host.access.log main; location / { root html; index index.html index.htm; } #error_page 404 /404.html; # redirect server error pages to the static page /50x.html # error_page 500 502 503 504 /50x.html; location = /50x.html { root html; } # proxy the PHP scripts to Apache listening on 127.0.0.1:80 # #location ~ \.php$ { # proxy_pass http://127.0.0.1; #} # pass the PHP scripts to FastCGI server listening on 127.0.0.1:9000 # #location ~ \.php$ { # root html; # fastcgi_pass 127.0.0.1:9000; # fastcgi_index index.php; # fastcgi_param SCRIPT_FILENAME /scripts$fastcgi_script_name; # include fastcgi_params; #} # deny access to .htaccess files, if Apache's document root # concurs with nginx's one # #location ~ /\.ht { # deny all; #} } # another virtual host using mix of IP-, name-, and port-based configuration # #server { # listen 8000; # listen somename:8080; # server_name somename alias another.alias; # location / { # root html; # index index.html index.htm; # } #} # HTTPS server # #server { # listen 443 ssl; # server_name localhost; # ssl_certificate cert.pem; # ssl_certificate_key cert.key; # ssl_session_cache shared:SSL:1m; # ssl_session_timeout 5m; # ssl_ciphers HIGH:!aNULL:!MD5; # ssl_prefer_server_ciphers on; # location / { # root html; # index index.html index.htm; # } #} } |
構文に問題が無いか確認。
|
1 2 3 |
# nginx -t |

Nginxを再起動し設定を再読込み。
|
1 2 3 |
# systemctl restart nginx |
確認。
|
1 2 3 |
# systemctl status nginx |

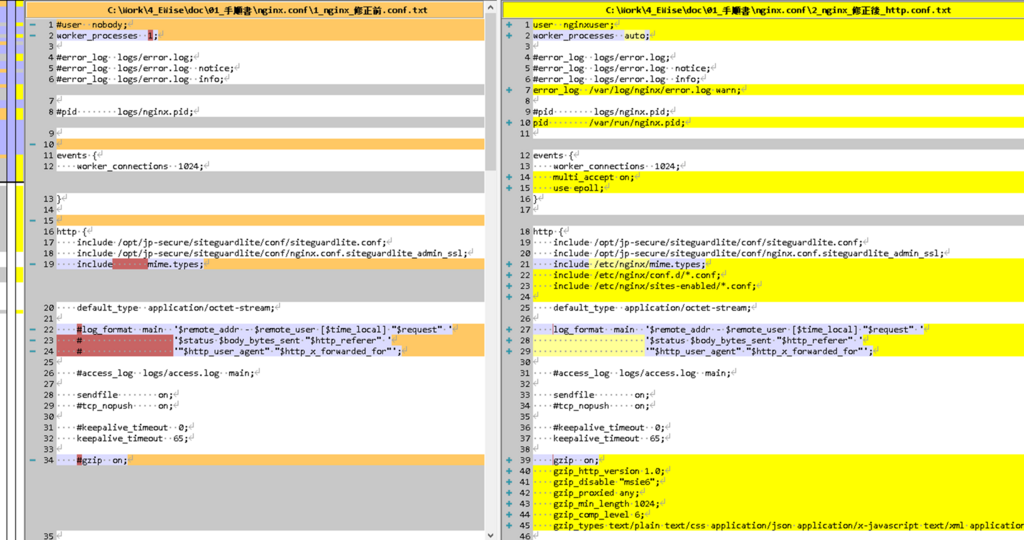
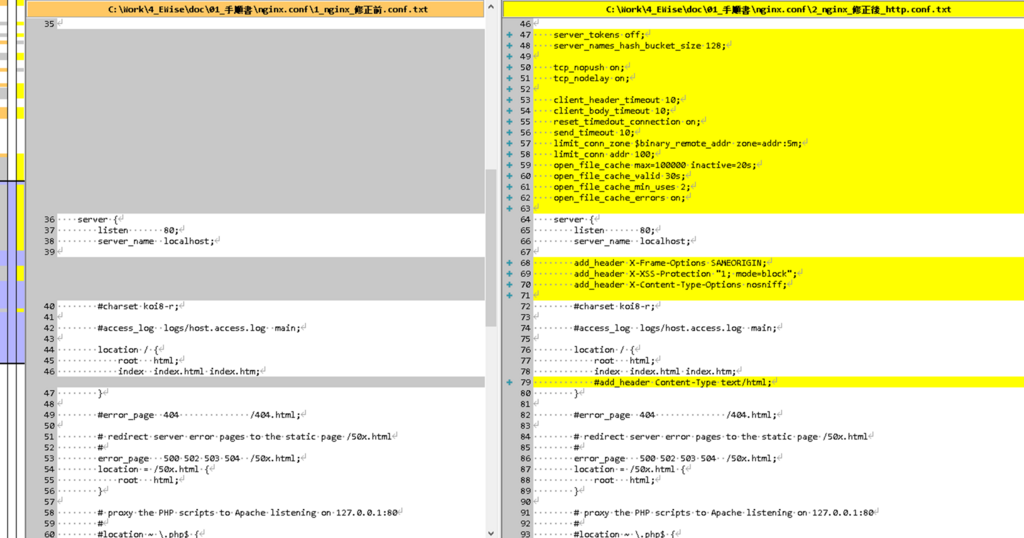
nginx.conf 編集
WEBサイトのパフォーマンスやセキュリティを上げる為の設定を幾つか追加。
|
1 2 3 |
# vi /etc/nginx/nginx.conf |
|
1 2 3 4 5 6 7 8 9 10 11 12 13 14 15 16 17 18 19 20 21 22 23 24 25 26 27 28 29 30 31 32 33 34 35 36 37 38 39 40 41 42 43 44 45 46 47 48 49 50 51 52 53 54 55 56 57 58 59 60 61 62 63 64 65 66 67 68 69 70 71 72 73 74 75 76 77 78 79 80 81 82 83 84 85 86 87 88 89 90 91 92 93 94 95 96 97 98 99 100 101 102 103 104 105 106 107 108 109 110 111 112 113 114 115 116 117 118 119 120 121 122 123 124 125 126 127 128 129 130 131 132 133 134 135 136 137 138 139 140 141 142 143 144 145 146 147 148 149 150 151 152 |
user nginxuser; worker_processes auto; #error_log logs/error.log; #error_log logs/error.log notice; #error_log logs/error.log info; error_log /var/log/nginx/error.log warn; #pid logs/nginx.pid; pid /var/run/nginx.pid; events { worker_connections 1024; multi_accept on; use epoll; } http { include /opt/jp-secure/siteguardlite/conf/siteguardlite.conf; include /opt/jp-secure/siteguardlite/conf/nginx.conf.siteguardlite_admin_ssl; include /etc/nginx/mime.types; include /etc/nginx/conf.d/*.conf; include /etc/nginx/sites-enabled/*.conf; default_type application/octet-stream; log_format main '$remote_addr - $remote_user [$time_local] "$request" ' '$status $body_bytes_sent "$http_referer" ' '"$http_user_agent" "$http_x_forwarded_for"'; #access_log logs/access.log main; sendfile on; #tcp_nopush on; #keepalive_timeout 0; keepalive_timeout 65; gzip on; gzip_http_version 1.0; gzip_disable "msie6"; gzip_proxied any; gzip_min_length 1024; gzip_comp_level 6; gzip_types text/plain text/css application/json application/x-javascript text/xml application/xml application/xml+rss text/javascript application/javascript; server_tokens off; server_names_hash_bucket_size 128; tcp_nopush on; tcp_nodelay on; client_header_timeout 10; client_body_timeout 10; reset_timedout_connection on; send_timeout 10; limit_conn_zone $binary_remote_addr zone=addr:5m; limit_conn addr 100; open_file_cache max=100000 inactive=20s; open_file_cache_valid 30s; open_file_cache_min_uses 2; open_file_cache_errors on; server { listen 80; server_name localhost; add_header X-Frame-Options SAMEORIGIN; add_header X-XSS-Protection "1; mode=block"; add_header X-Content-Type-Options nosniff; #charset koi8-r; #access_log logs/host.access.log main; location / { root html; index index.html index.htm; #add_header Content-Type text/html; } #error_page 404 /404.html; # redirect server error pages to the static page /50x.html # error_page 500 502 503 504 /50x.html; location = /50x.html { root html; } # proxy the PHP scripts to Apache listening on 127.0.0.1:80 # #location ~ \.php$ { # proxy_pass http://127.0.0.1; #} # pass the PHP scripts to FastCGI server listening on 127.0.0.1:9000 # #location ~ \.php$ { # root html; # fastcgi_pass 127.0.0.1:9000; # fastcgi_index index.php; # fastcgi_param SCRIPT_FILENAME /scripts$fastcgi_script_name; # include fastcgi_params; #} # deny access to .htaccess files, if Apache's document root # concurs with nginx's one # #location ~ /\.ht { # deny all; #} } # another virtual host using mix of IP-, name-, and port-based configuration # #server { # listen 8000; # listen somename:8080; # server_name somename alias another.alias; # location / { # root html; # index index.html index.htm; # } #} # HTTPS server # #server { # listen 443 ssl; # server_name localhost; # ssl_certificate cert.pem; # ssl_certificate_key cert.key; # ssl_session_cache shared:SSL:1m; # ssl_session_timeout 5m; # ssl_ciphers HIGH:!aNULL:!MD5; # ssl_prefer_server_ciphers on; # location / { # root html; # index index.html index.htm; # } #} } |
編集前後の差分比較。
構文に問題が無いか確認。
|
1 2 3 |
# nginx -t |

Nginxを再起動し設定を再読込み。
|
1 2 3 |
# systemctl restart nginx |
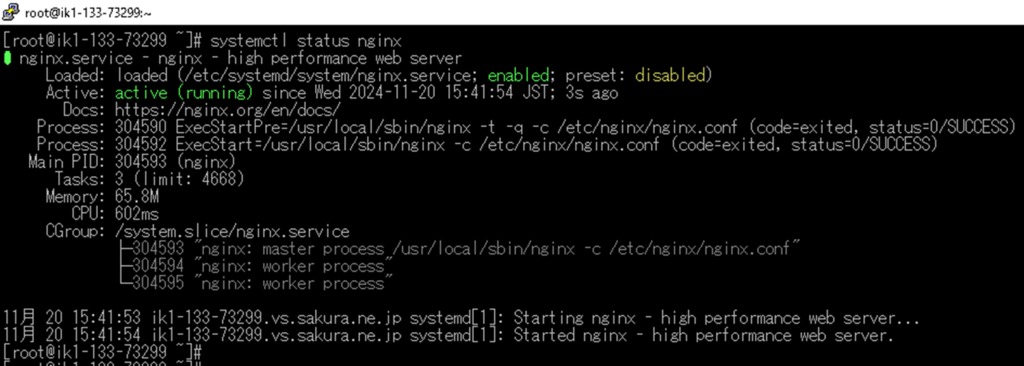
確認。
|
1 2 3 |
# systemctl status nginx |
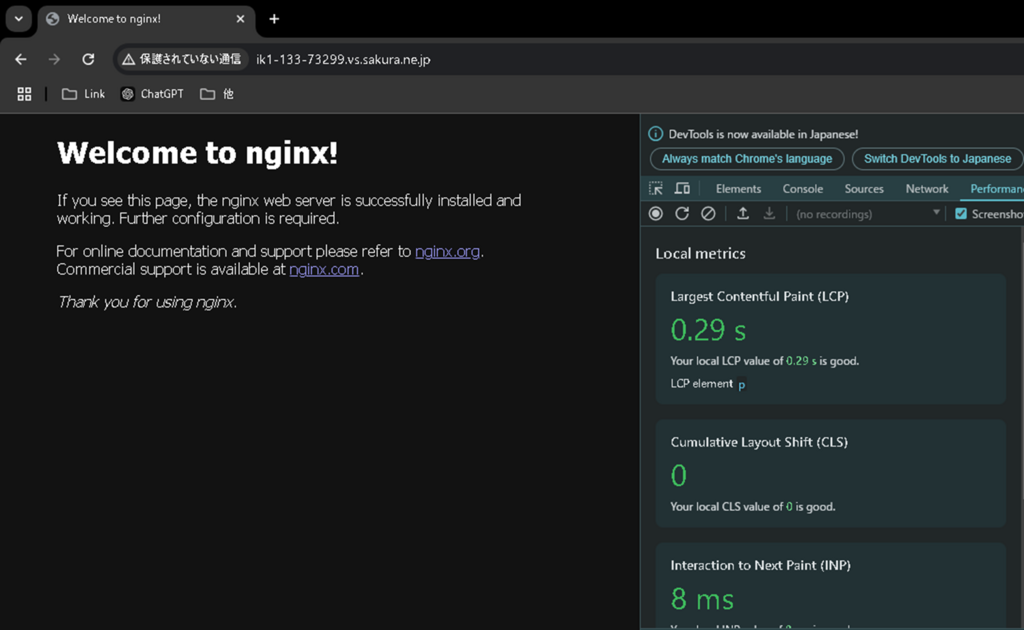
接続確認
外部からNginxのデフォルトページに接続できるか確認。
http://ik1-133-73299.vs.sakura.ne.jp/
Nginx その3
バーチャルホストconfファイル作成
デプロイしたWEBサイト用のバーチャルホスト設定ファイルを作成。
|
1 2 3 |
# vi /etc/nginx/sites-available/WebApplication1.conf |
ファイルの中身。※まずは httpで構成します。
|
1 2 3 4 5 6 7 8 9 10 11 12 13 14 15 16 17 18 19 20 21 22 23 24 25 26 27 28 29 30 31 32 33 34 35 36 37 38 39 40 41 42 43 44 45 46 47 48 49 50 51 52 53 54 |
server { listen 80; server_name ik1-133-73299.vs.sakura.ne.jp; etag off; autoindex off; SiteGuard on; client_max_body_size 1k; client_header_buffer_size 1k; large_client_header_buffers 4 8k; add_header X-Frame-Options SAMEORIGIN; add_header X-XSS-Protection "1; mode=block"; add_header X-Content-Type-Options nosniff; error_log /var/log/nginx/WebApplication1.error.log; location / { root /var/aspnet/WebApplication1/wwwroot/; proxy_pass http://localhost:12000; proxy_http_version 1.1; proxy_set_header Upgrade $http_upgrade; proxy_set_header Connection keep-alive; proxy_set_header Host $host; proxy_cache_bypass $http_upgrade; proxy_set_header X-Forwarded-For $proxy_add_x_forwarded_for; proxy_set_header X-Forwarded-Proto $scheme; } location /css/ { alias /var/aspnet/WebApplication1/wwwroot/css/; } location /js/ { alias /var/aspnet/WebApplication1/wwwroot/js/; } location /lib/bootstrap/dist/css/ { alias /var/aspnet/WebApplication1/wwwroot/lib/bootstrap/dist/css/; } location /sitemap/ { alias /var/sitemap/WebApplication1/; } error_page 500 502 503 504 /50x.html; location = /50x.html { root /usr/share/nginx/html; } } |
バーチャルホストの有効化(シンボリックリンク作成)。
|
1 2 3 |
# ln -s /etc/nginx/sites-available/WebApplication1.conf /etc/nginx/sites-enabled/WebApplication1.conf |
リンク確認。
|
1 2 3 |
# ll /etc/nginx/sites-enabled/ |

内容確認。
|
1 2 3 |
# more /etc/nginx/sites-enabled/WebApplication1.conf |
構文に問題が無いか確認。
|
1 2 3 |
# nginx -t |

Nginxを再起動し設定を再読込み。
|
1 2 3 |
# systemctl restart nginx |
確認。
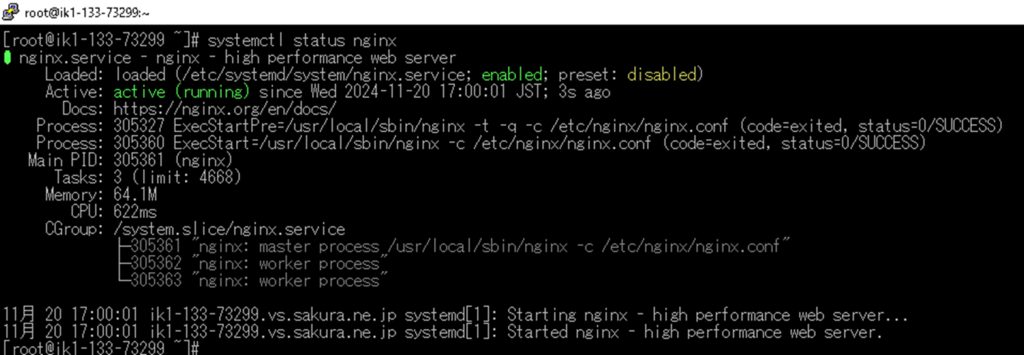
|
1 2 3 |
# systemctl status nginx |
接続確認
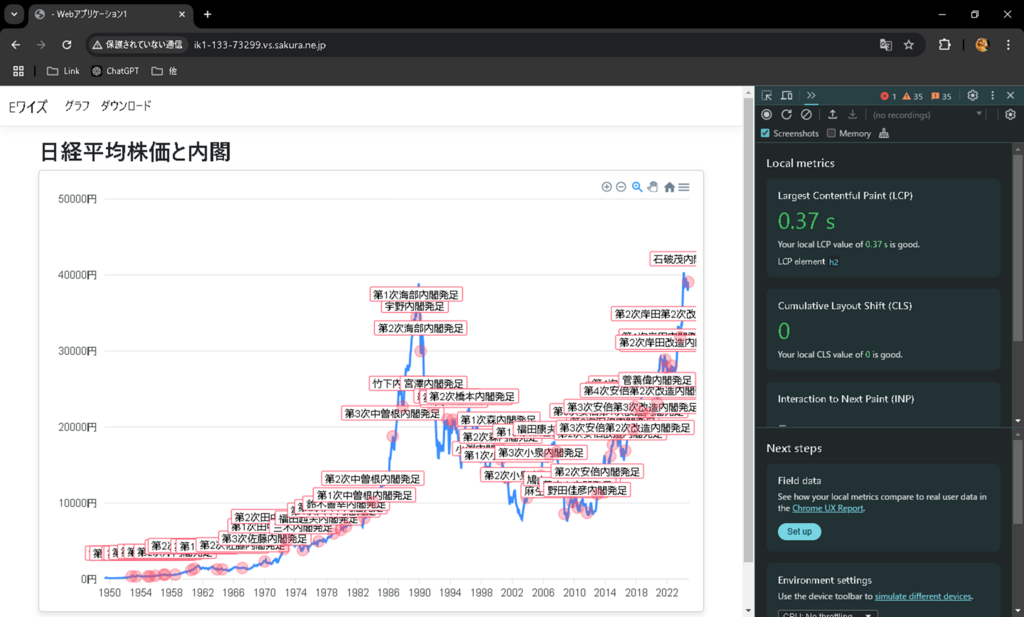
デプロイしたWEBサイトは、前回作成したWEBアプリ。
.NET 8.0 + ASP.NET Core(MVC) + ApexCharts + Dapper + SQLite で実装する 注釈付きグラフ表示処理
接続
http://ik1-133-73299.vs.sakura.ne.jp/
ドメイン
ドメイン取得
さくらのドメインで任意のドメインを契約。
https://domain.sakura.ad.jp

ドメインコントロールパネル 設定
取得したドメインと さくらVPSのIPを紐付ける
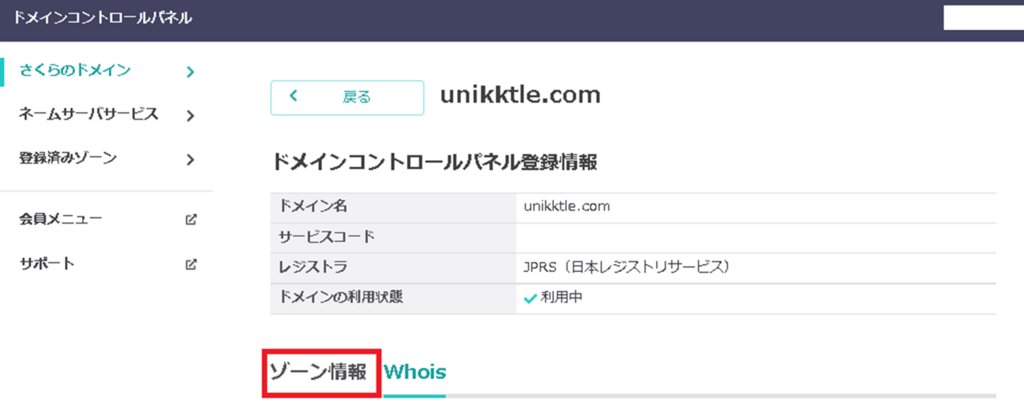
さくらインターネットの会員メニューで「ドメインの契約情報を確認」をクリック。
https://secure.sakura.ad.jp/menu/top
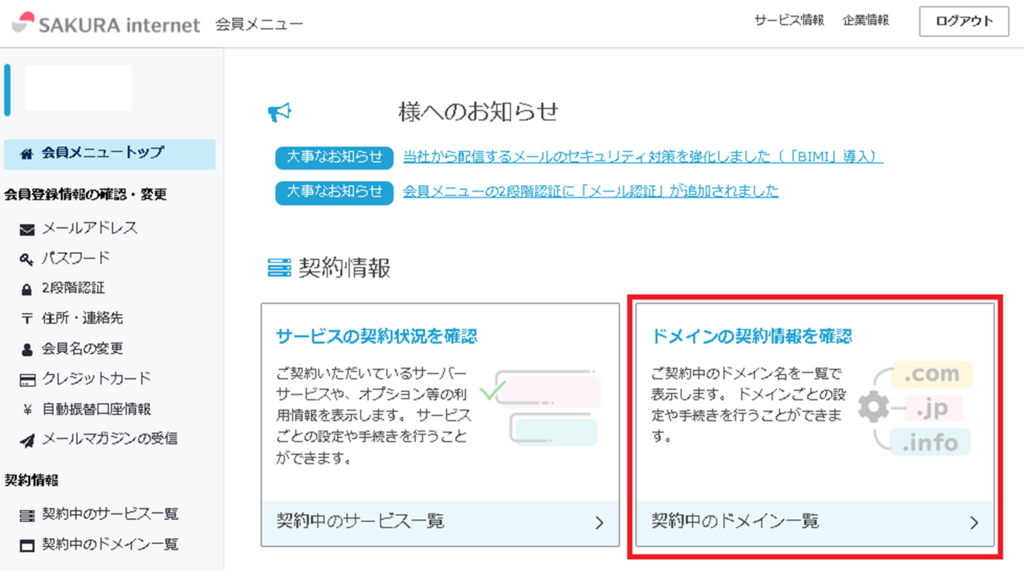
「Whois情報変更」をクリック。
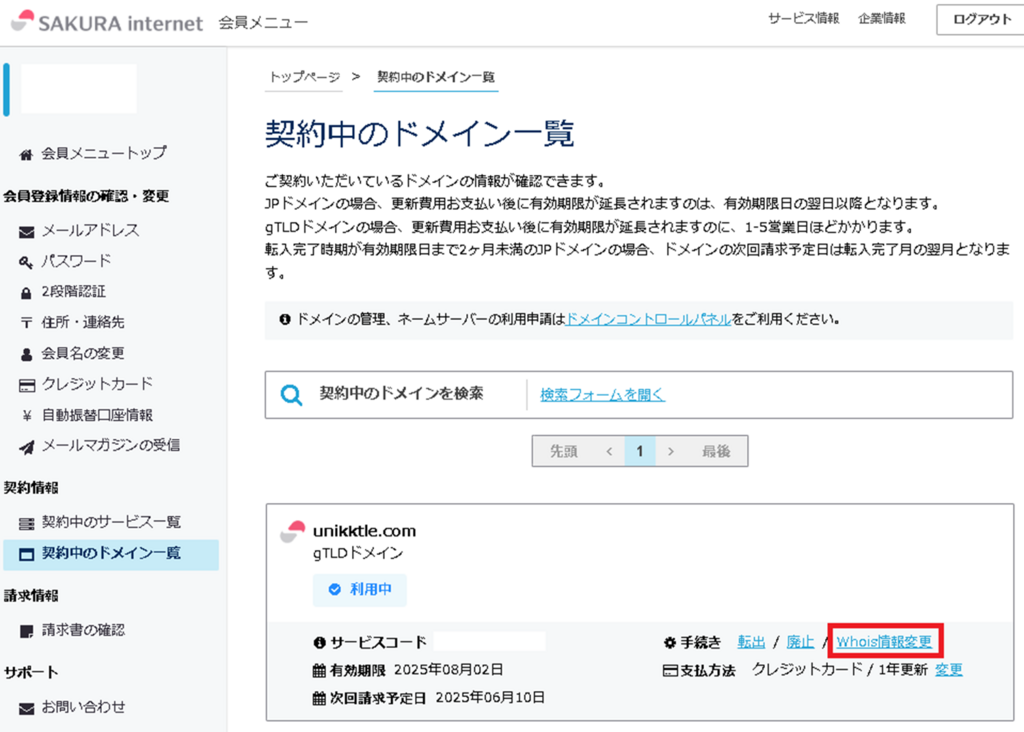
「Whois情報変更」をクリック。
「編集」をクリック。
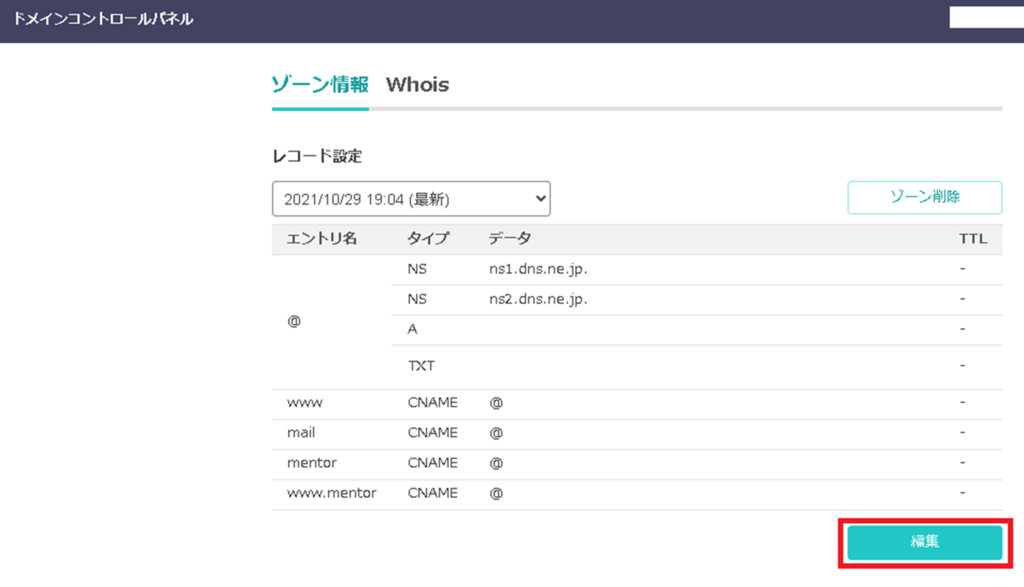
「タイプ A」の「データ」に VPSの IPアドレスを入力し「保存」クリック。

メモ。

接続確認。
http://unikktle.com/

Linux設定
バーチャルホストconf設定
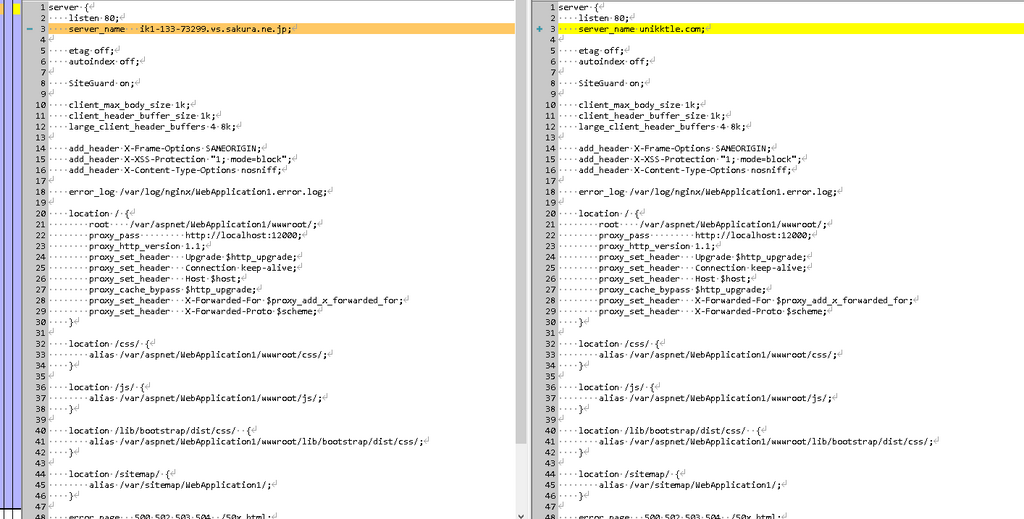
バーチャルホスト用の設定ファイルの「server_name」をドメイン名に変更。
|
1 2 3 |
# vi /etc/nginx/sites-available/WebApplication1.conf |
内容
|
1 2 3 4 5 6 7 8 9 10 11 12 13 14 15 16 17 18 19 20 21 22 23 24 25 26 27 28 29 30 31 32 33 34 35 36 37 38 39 40 41 42 43 44 45 46 47 48 49 50 51 52 53 54 |
server { listen 80; server_name unikktle.com; etag off; autoindex off; SiteGuard on; client_max_body_size 1k; client_header_buffer_size 1k; large_client_header_buffers 4 8k; add_header X-Frame-Options SAMEORIGIN; add_header X-XSS-Protection "1; mode=block"; add_header X-Content-Type-Options nosniff; error_log /var/log/nginx/WebApplication1.error.log; location / { root /var/aspnet/WebApplication1/wwwroot/; proxy_pass http://localhost:12000; proxy_http_version 1.1; proxy_set_header Upgrade $http_upgrade; proxy_set_header Connection keep-alive; proxy_set_header Host $host; proxy_cache_bypass $http_upgrade; proxy_set_header X-Forwarded-For $proxy_add_x_forwarded_for; proxy_set_header X-Forwarded-Proto $scheme; } location /css/ { alias /var/aspnet/WebApplication1/wwwroot/css/; } location /js/ { alias /var/aspnet/WebApplication1/wwwroot/js/; } location /lib/bootstrap/dist/css/ { alias /var/aspnet/WebApplication1/wwwroot/lib/bootstrap/dist/css/; } location /sitemap/ { alias /var/sitemap/WebApplication1/; } error_page 500 502 503 504 /50x.html; location = /50x.html { root /usr/share/nginx/html; } } |
差分
https化
SSL証明書(Let’s Encrypt)取得手順を確認
Let’s Encrypt は無料SSL証明書のデファクトスタンダード。
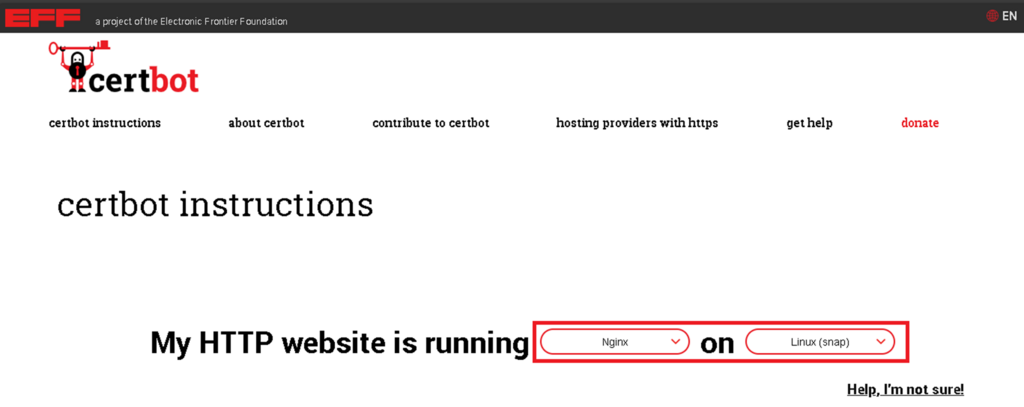
certbot instructionsページで、OSとWebサーバを入力し、SSL証明書の取得手順をメモ。
https://certbot.eff.org/instructions?ws=nginx&os=snap
snapd
snapdをインストール。
|
1 2 3 4 |
# dnf install epel-release # dnf install snapd |
シンボリックリンクを作成。
|
1 2 3 |
# ln -s /var/lib/snapd/snap /snap |
snapdサービスを有効化。
|
1 2 3 |
# systemctl enable --now snapd.socket |
snapdサービスを再起動。
|
1 2 3 |
# systemctl restart snapd.socket |
確認。
|
1 2 3 |
# systemctl status snapd.socket |

certbot
snapを使用して certbotをインストール。
|
1 2 3 |
# snap install --classic certbot |

certbot コマンドを準備。
|
1 2 3 |
# ln -s /snap/bin/certbot /usr/bin/certbot |
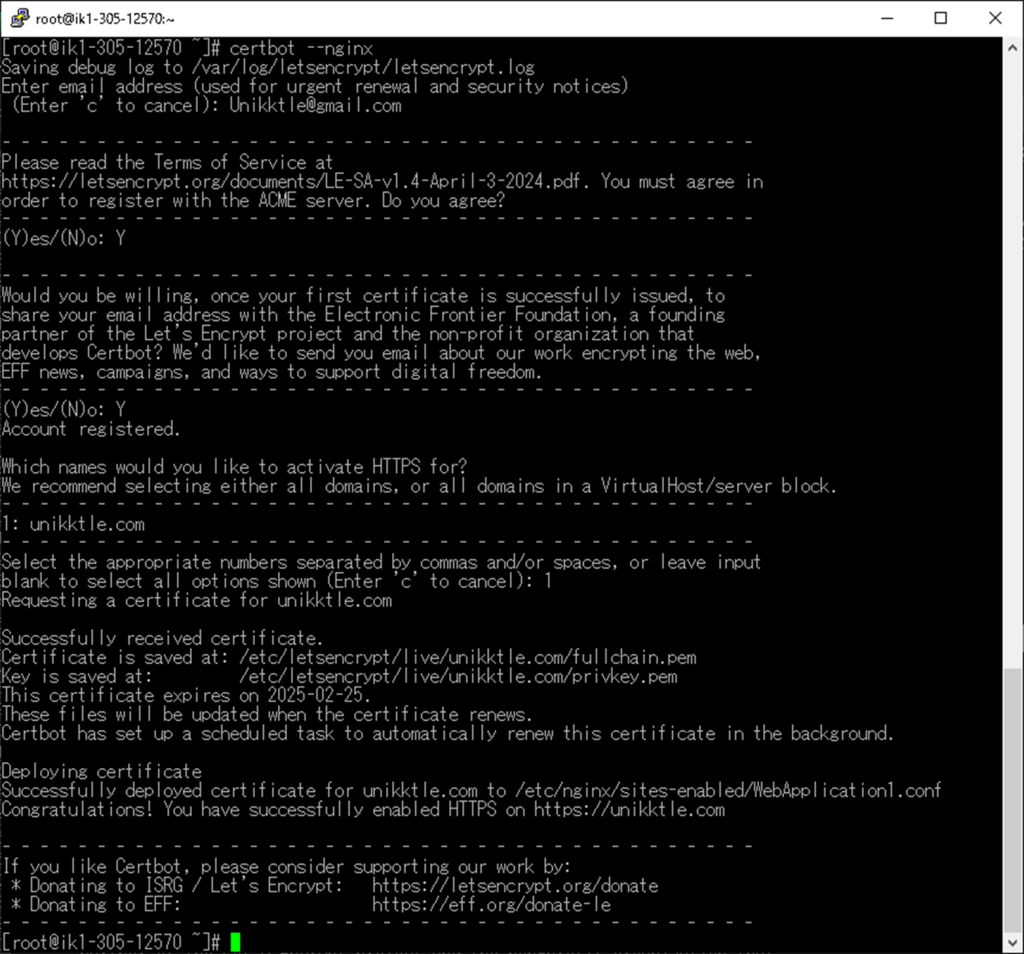
SSL証明書を取得。
|
1 2 3 |
# certbot --nginx |
|
1 2 3 4 5 6 7 8 9 10 11 12 13 14 15 16 17 18 19 20 21 22 23 24 25 26 27 28 29 30 31 32 33 34 35 36 37 38 39 40 41 42 43 44 45 46 47 48 |
Saving debug log to /var/log/letsencrypt/letsencrypt.log Enter email address (used for urgent renewal and security notices) (Enter 'c' to cancel): Unikktle@gmail.com - - - - - - - - - - - - - - - - - - - - - - - - - - - - - - - - - - - - - - - - Please read the Terms of Service at https://letsencrypt.org/documents/LE-SA-v1.4-April-3-2024.pdf. You must agree in order to register with the ACME server. Do you agree? - - - - - - - - - - - - - - - - - - - - - - - - - - - - - - - - - - - - - - - - (Y)es/(N)o: Y - - - - - - - - - - - - - - - - - - - - - - - - - - - - - - - - - - - - - - - - Would you be willing, once your first certificate is successfully issued, to share your email address with the Electronic Frontier Foundation, a founding partner of the Let's Encrypt project and the non-profit organization that develops Certbot? We'd like to send you email about our work encrypting the web, EFF news, campaigns, and ways to support digital freedom. - - - - - - - - - - - - - - - - - - - - - - - - - - - - - - - - - - - - - - - - (Y)es/(N)o: Y Account registered. Which names would you like to activate HTTPS for? We recommend selecting either all domains, or all domains in a VirtualHost/server block. - - - - - - - - - - - - - - - - - - - - - - - - - - - - - - - - - - - - - - - - 1: unikktle.com - - - - - - - - - - - - - - - - - - - - - - - - - - - - - - - - - - - - - - - - Select the appropriate numbers separated by commas and/or spaces, or leave input blank to select all options shown (Enter 'c' to cancel): 1 Requesting a certificate for unikktle.com Successfully received certificate. Certificate is saved at: /etc/letsencrypt/live/unikktle.com/fullchain.pem Key is saved at: /etc/letsencrypt/live/unikktle.com/privkey.pem This certificate expires on 2025-02-25. These files will be updated when the certificate renews. Certbot has set up a scheduled task to automatically renew this certificate in the background. Deploying certificate Successfully deployed certificate for unikktle.com to /etc/nginx/sites-enabled/WebApplication1.conf Congratulations! You have successfully enabled HTTPS on https://unikktle.com - - - - - - - - - - - - - - - - - - - - - - - - - - - - - - - - - - - - - - - - If you like Certbot, please consider supporting our work by: * Donating to ISRG / Let's Encrypt: https://letsencrypt.org/donate * Donating to EFF: https://eff.org/donate-le - - - - - - - - - - - - - - - - - - - - - - - - - - - - - - - - - - - - - - - - |
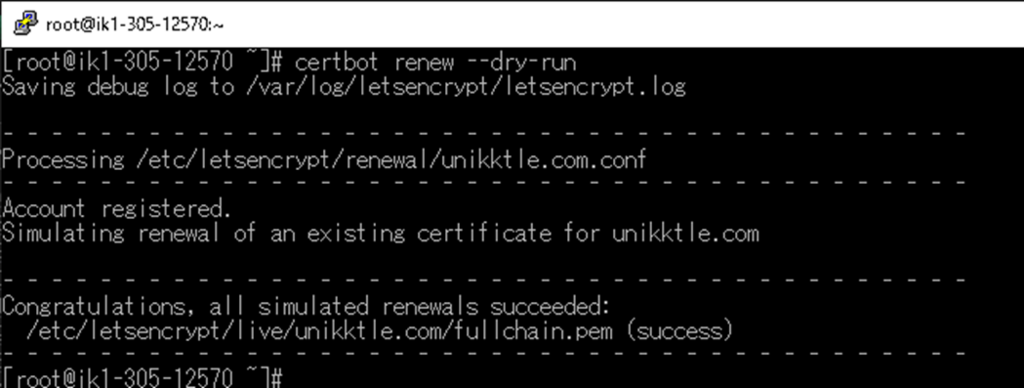
自動更新テスト。
|
1 2 3 |
# certbot renew --dry-run |
Nginx 確認
certbotによるhttps化は Nginxに自動反映される。
構文に問題が無いか確認。
|
1 2 3 |
# nginx -t |
Nginxを再起動し設定を再読込み。
|
1 2 3 |
# systemctl restart nginx |
nginx.conf に変更は無い。
|
1 2 3 |
# vi /etc/nginx/nginx.conf |
バーチャルホストconfが変更されている。
|
1 2 3 |
# vi /etc/nginx/sites-available/WebApplication1.conf |
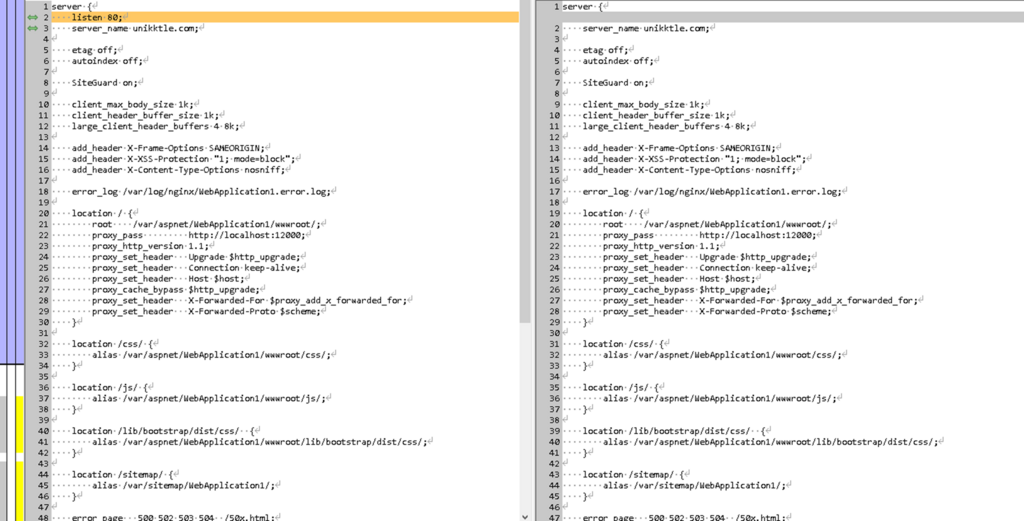
最終的な バーチャルホストconf設定内容。
|
1 2 3 4 5 6 7 8 9 10 11 12 13 14 15 16 17 18 19 20 21 22 23 24 25 26 27 28 29 30 31 32 33 34 35 36 37 38 39 40 41 42 43 44 45 46 47 48 49 50 51 52 53 54 55 56 57 58 59 60 61 62 63 64 65 66 67 68 69 70 71 72 73 |
server { server_name unikktle.com; etag off; autoindex off; SiteGuard on; client_max_body_size 1k; client_header_buffer_size 1k; large_client_header_buffers 4 8k; add_header X-Frame-Options SAMEORIGIN; add_header X-XSS-Protection "1; mode=block"; add_header X-Content-Type-Options nosniff; error_log /var/log/nginx/WebApplication1.error.log; location / { root /var/aspnet/WebApplication1/wwwroot/; proxy_pass http://localhost:12000; proxy_http_version 1.1; proxy_set_header Upgrade $http_upgrade; proxy_set_header Connection keep-alive; proxy_set_header Host $host; proxy_cache_bypass $http_upgrade; proxy_set_header X-Forwarded-For $proxy_add_x_forwarded_for; proxy_set_header X-Forwarded-Proto $scheme; } location /css/ { alias /var/aspnet/WebApplication1/wwwroot/css/; } location /js/ { alias /var/aspnet/WebApplication1/wwwroot/js/; } location /lib/bootstrap/dist/css/ { alias /var/aspnet/WebApplication1/wwwroot/lib/bootstrap/dist/css/; } location /sitemap/ { alias /var/sitemap/WebApplication1/; } error_page 500 502 503 504 /50x.html; location = /50x.html { root /usr/share/nginx/html; } listen 443 ssl; # managed by Certbot ssl_certificate /etc/letsencrypt/live/unikktle.com/fullchain.pem; # managed by Certbot ssl_certificate_key /etc/letsencrypt/live/unikktle.com/privkey.pem; # managed by Certbot include /etc/letsencrypt/options-ssl-nginx.conf; # managed by Certbot ssl_dhparam /etc/letsencrypt/ssl-dhparams.pem; # managed by Certbot } server { if ($host = unikktle.com) { return 301 https://$host$request_uri; } # managed by Certbot listen 80; server_name unikktle.com; return 404; # managed by Certbot } |
差分。

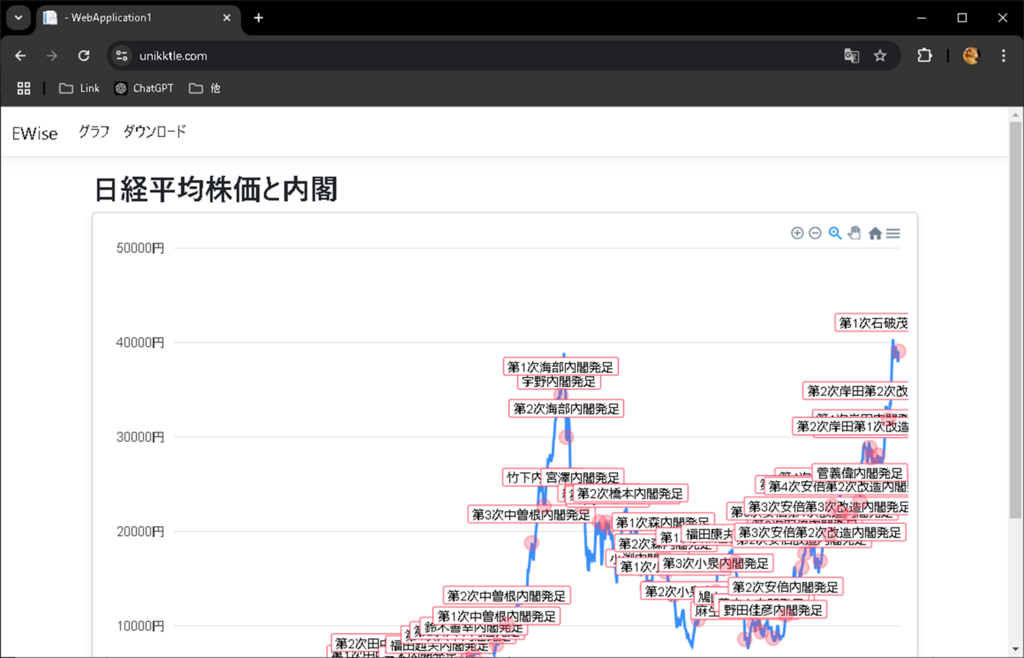
https接続確認
OS再起動後 接続確認
OS再起動後でも、全て変更が反映され、全てのサービスが起動し、デプロイしたWEBアプリに https接続できることを確認する。
OS再起動
|
1 2 3 |
# sync;sync;shutdown -r now |
https接続確認
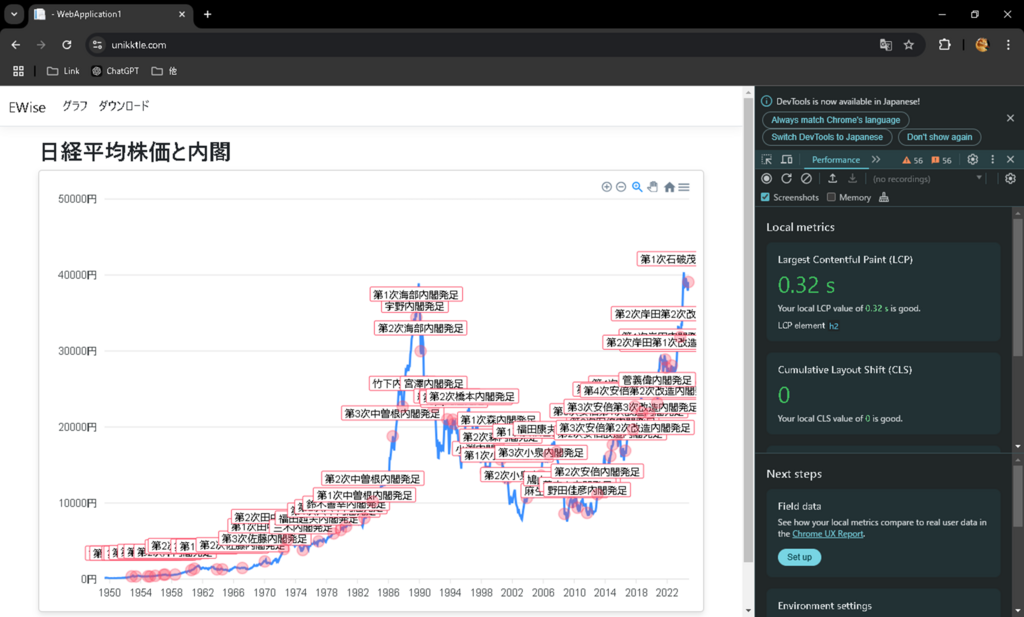
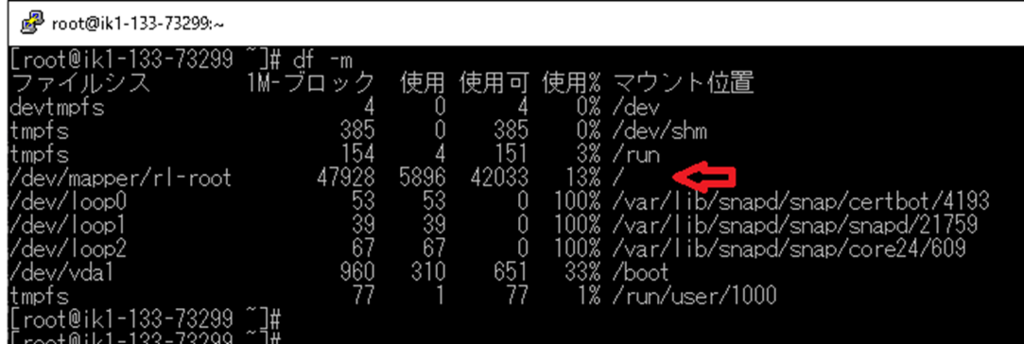
OSの状態を確認
ディスクは 50GBの契約で、42GBがまだ空いてる。
|
1 2 3 |
# df -m |
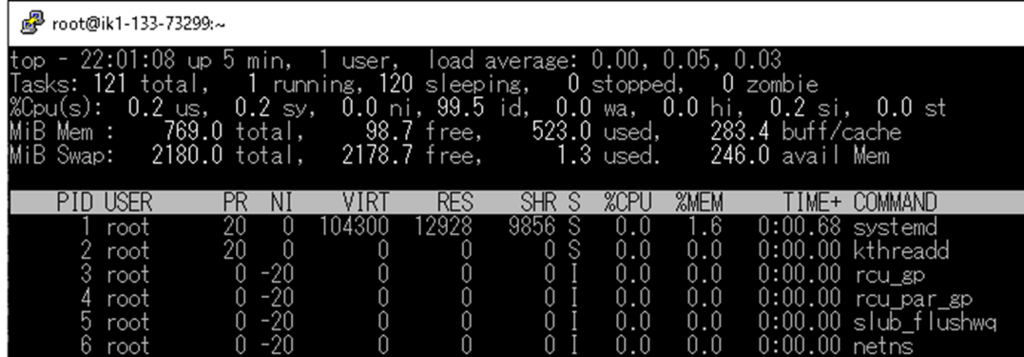
物理メモリは 1GBの契約で 245MB がまだ空いてる。
|
1 2 3 |
# free -m |

CPUは 仮想2コアの契約で CPU負荷は0%状態。
|
1 2 3 |
# top |
さくらVPS パケットフィルタ
ISOファイルからOSをインストールすると、「パケットフィルター設定」が解除されるので、さくらVPSコントロールパネルでパケットフィルタを設定する。
Linux OS 上のファイアウォールで不要なポート接続は遮断しているが、パケットフィルタも設定することでセキュリティとパフォーマンスが上がる。
設定
「パケットフィルターを設定」をクリック。
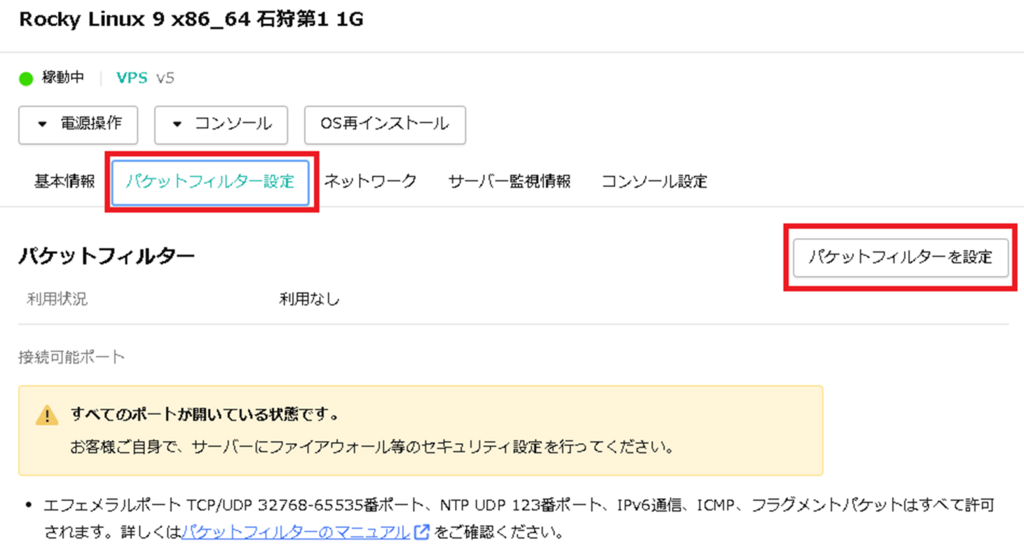
「パケットフィルター設定を利用する」をクリック。
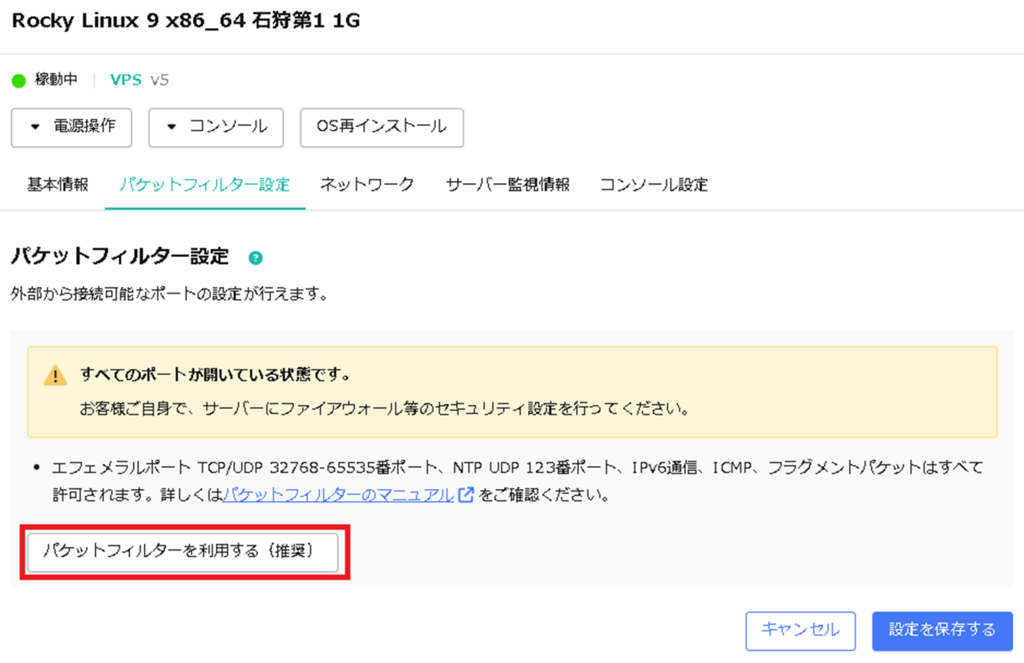
「パケットフィルター設定を追加する」をクリック。
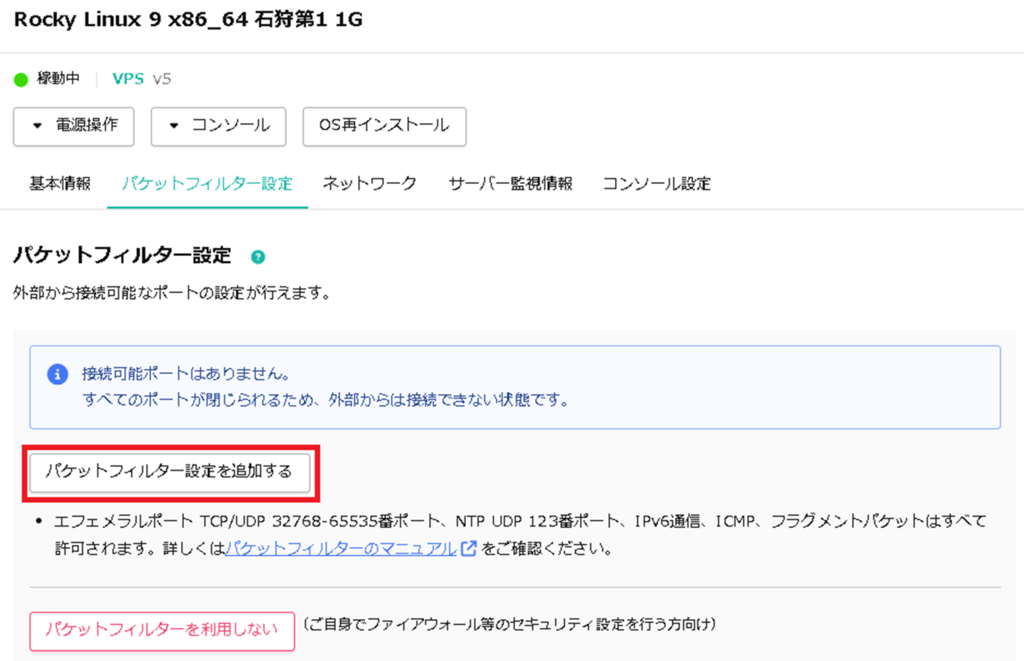
Linuxのファイアウォールで解放しているポートと同じ内容を設定し、「設定を保存する」をクリック。
設定完了。
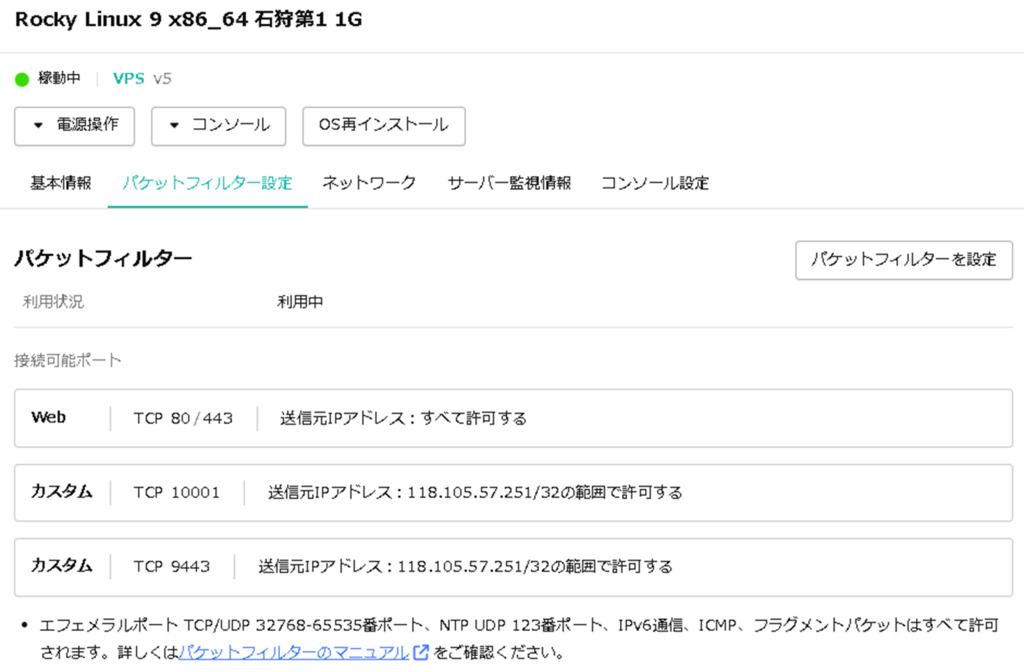
確認
パケットフィルタ設定後でも、https接続できることを確認。
https://unikktle.com/
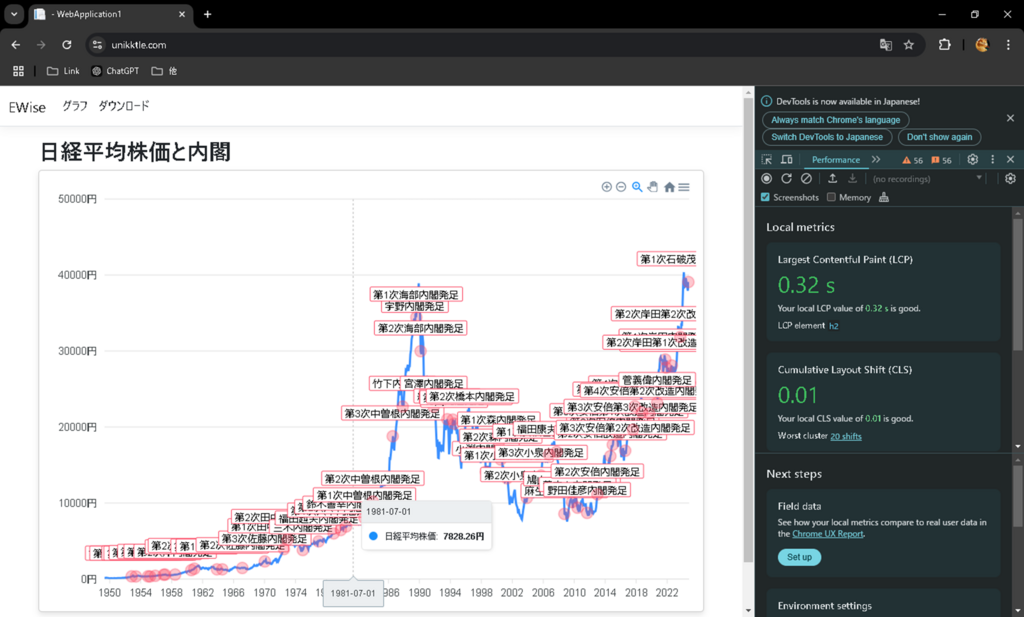
パケットフィルタ設定後でも、ssh接続できることを確認。


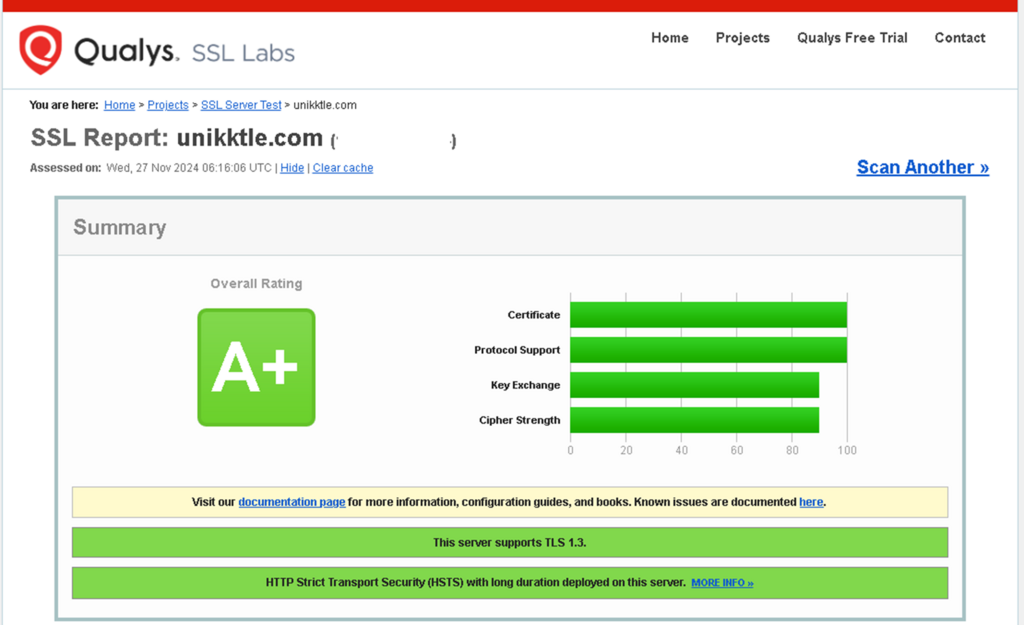
セキュリティ診断
Qualys SSL Labs
WEBサイトのセキュリティレベルを確認。
https://www.ssllabs.com/ssltest/analyze.html?d=unikktle.com
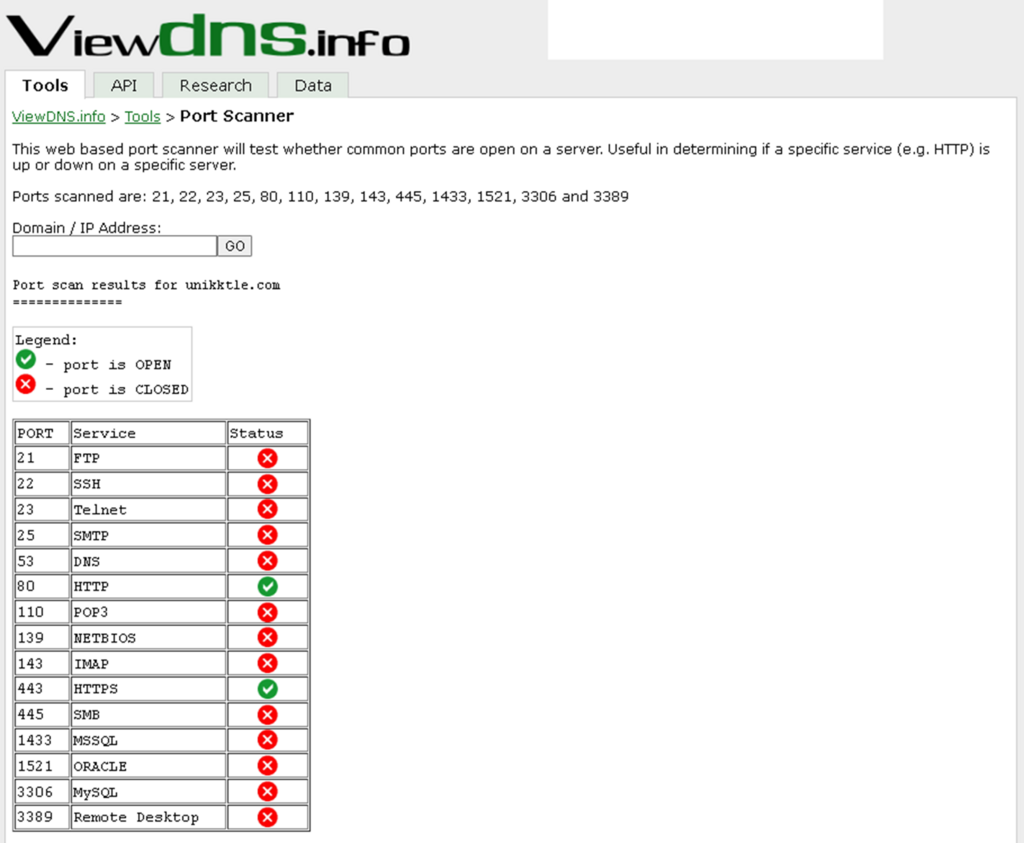
ViewDNS.info
不要なポートが解放されていないか確認。
https://viewdns.info/portscan/?host=unikktle.com


コメント